> ## Documentation Index
> Fetch the complete documentation index at: https://docs.minimus.io/llms.txt
> Use this file to discover all available pages before exploring further.
# Sync with Google Artifact Registry
> Set up pull through to mirror Minimus images to Google Artifact Registry
If your organization uses the Google Artifact Registry as the source of truth, you can set up a pull-through cache for your Minimus container images. This option allows you to benefit from the Minimus security advantage while keeping your current processes.
Refer to Google Cloud's Artifact Registry guide for [remote repositories](https://docs.cloud.google.com/artifact-registry/docs/repositories/remote-overview) for further information.
## Prerequisites
1. Google Cloud project access:
* Permissions to access and create registries in Artifact Registry
* Permissions to create secrets in Google Secret Manager
* [Artifact Registry API](https://docs.cloud.google.com/artifact-registry/docs/reference/rest) must be enabled in your Google project
2. Access to Docker or Podman to execute an image pull. This may be done locally or within a Google Cloud Shell.
## Set up a remote repository in Google Cloud
In this step, we will set up the Minimus registry as a remote repository in the Google Cloud Artifact Registry to enable pull through.
Save your Minimus token to the Google Secret Manager.
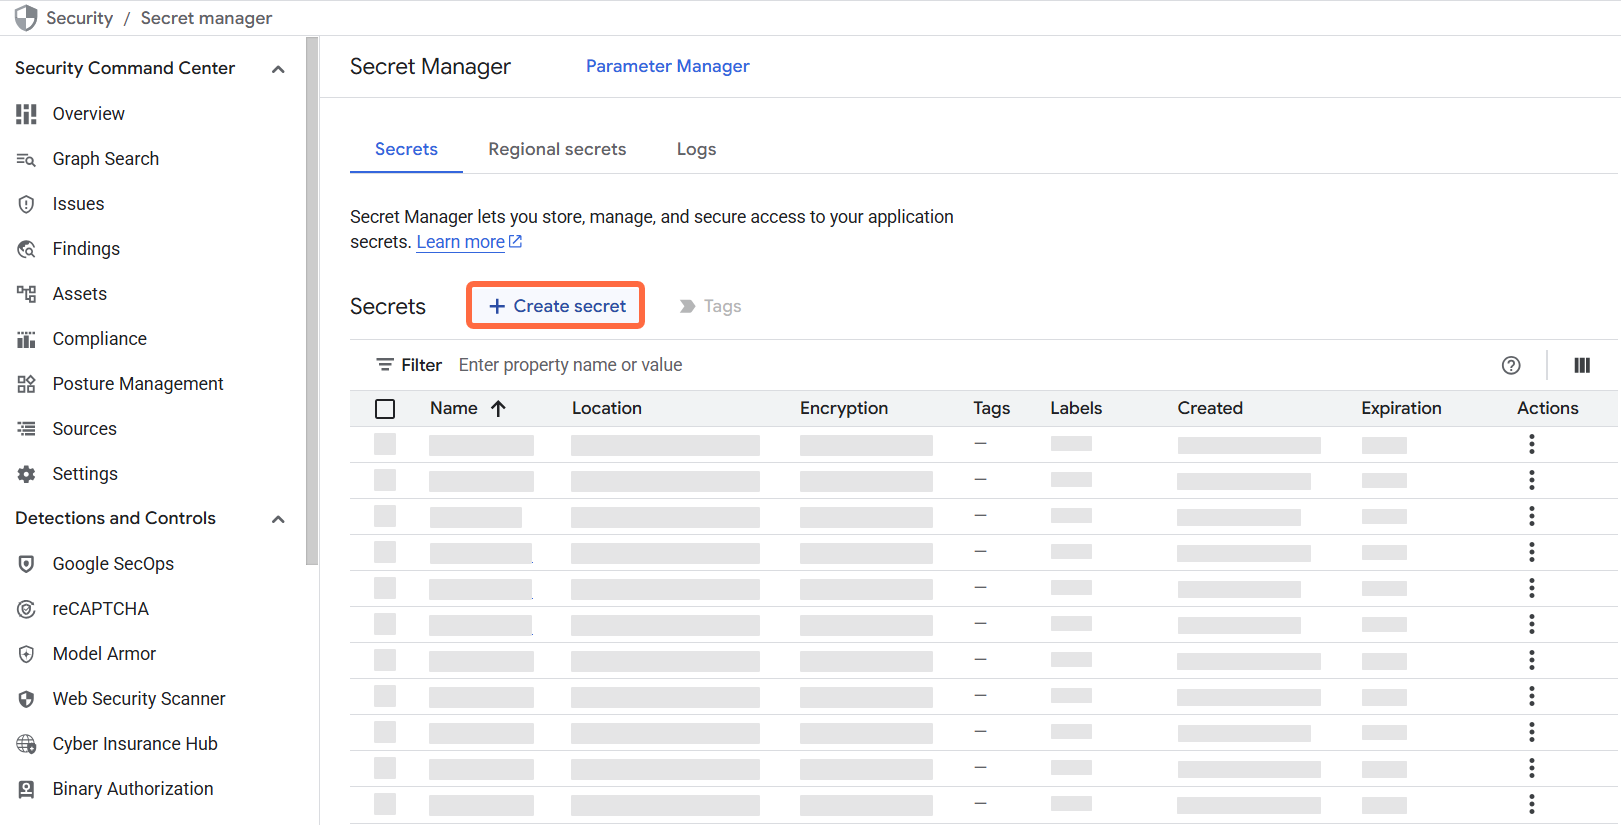
1. Visit the Google Artifact Registry Secret Manager ([direct link](https://console.cloud.google.com/security/secret-manager)).
2. Select **+ Create secret** (top banner):
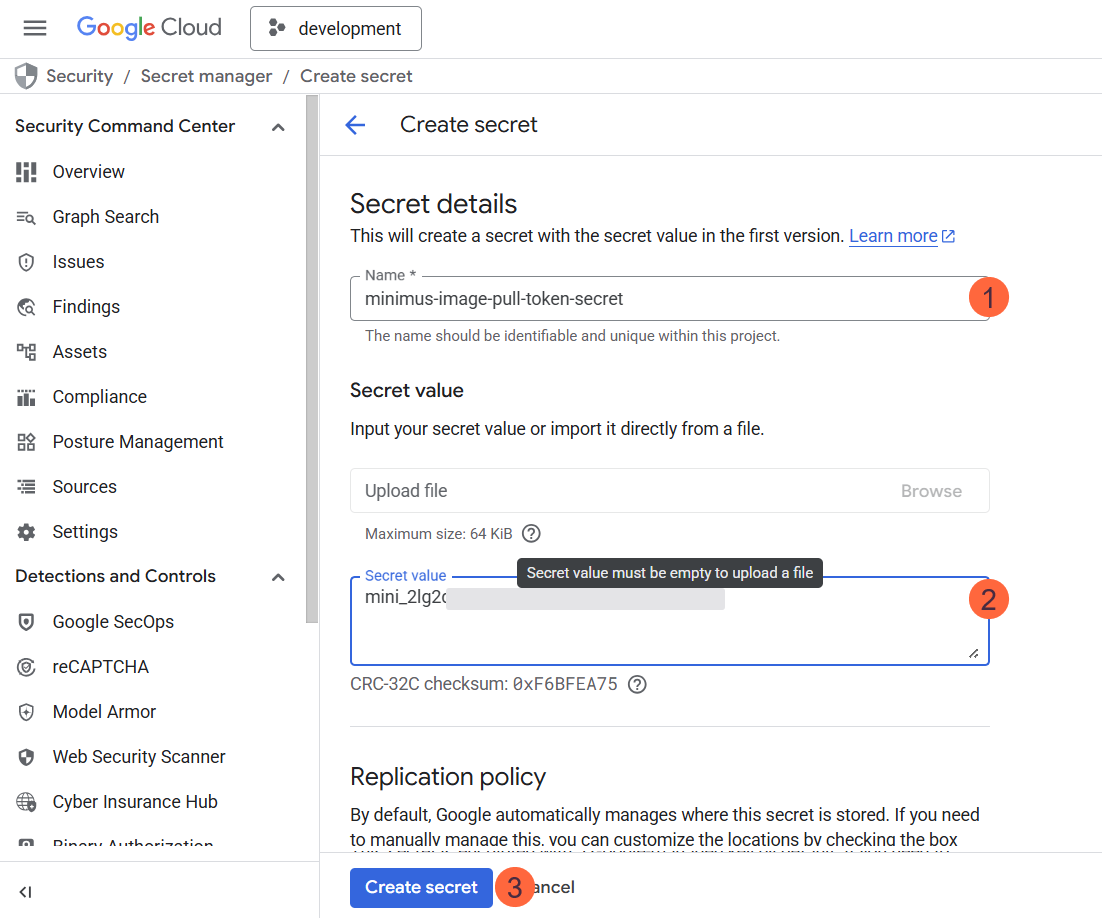
 3. Fill in the form:
1. **Name** your secret, for example, `minimus-image-pull-token-secret`.
2. **Secret Value:** Paste your Minimus token as the value.
3. Configure the rest of the options, including encryption and rotation periods. You can keep the defaults but we recommend that you align with your organizational policies.
4. Select **Create Secret** to confirm and save the secret.
3. Fill in the form:
1. **Name** your secret, for example, `minimus-image-pull-token-secret`.
2. **Secret Value:** Paste your Minimus token as the value.
3. Configure the rest of the options, including encryption and rotation periods. You can keep the defaults but we recommend that you align with your organizational policies.
4. Select **Create Secret** to confirm and save the secret.
 Now that the Minimus token is saved in the Google Secret Manager, you are ready to configure Minimus as a remote repository.
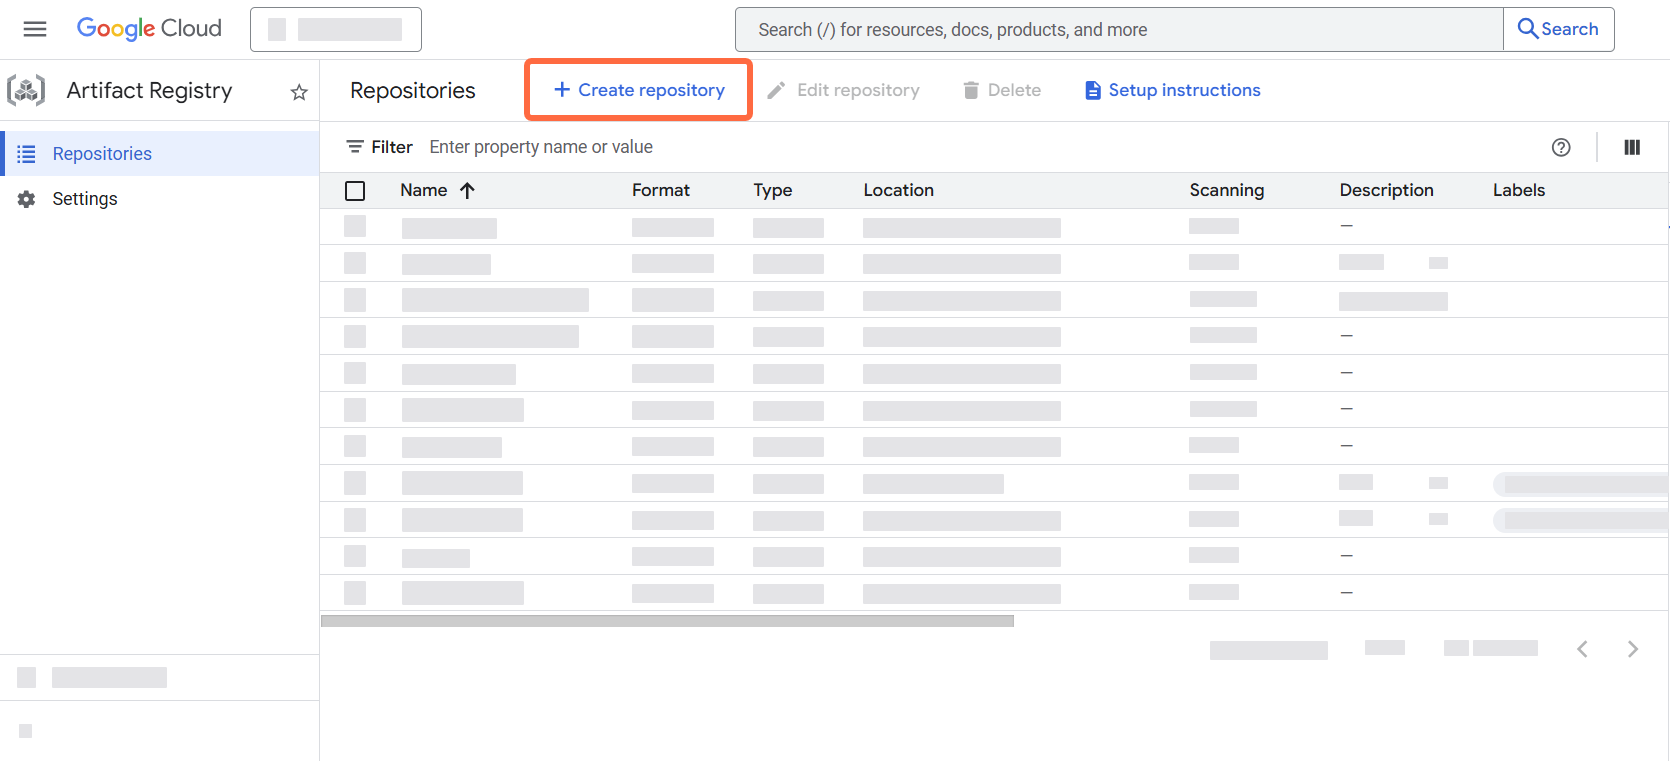
1. Visit the [Google Artifact Registry landing page](https://console.cloud.google.com/artifacts)
2. Select **+ Create repository** (top banner):
Now that the Minimus token is saved in the Google Secret Manager, you are ready to configure Minimus as a remote repository.
1. Visit the [Google Artifact Registry landing page](https://console.cloud.google.com/artifacts)
2. Select **+ Create repository** (top banner):
 3. Fill in the form:
1. **Name** the repository, for example, `reg-mini-dev-remote`.
2. **Format**: Select **Docker** as the format.
3. **Mode**: Select **Remote** from the available options.
4. **Remote repository source**: Select **Custom**.
5. Type in `https://reg.mini.dev` as the custom repository URL.
3. Fill in the form:
1. **Name** the repository, for example, `reg-mini-dev-remote`.
2. **Format**: Select **Docker** as the format.
3. **Mode**: Select **Remote** from the available options.
4. **Remote repository source**: Select **Custom**.
5. Type in `https://reg.mini.dev` as the custom repository URL.
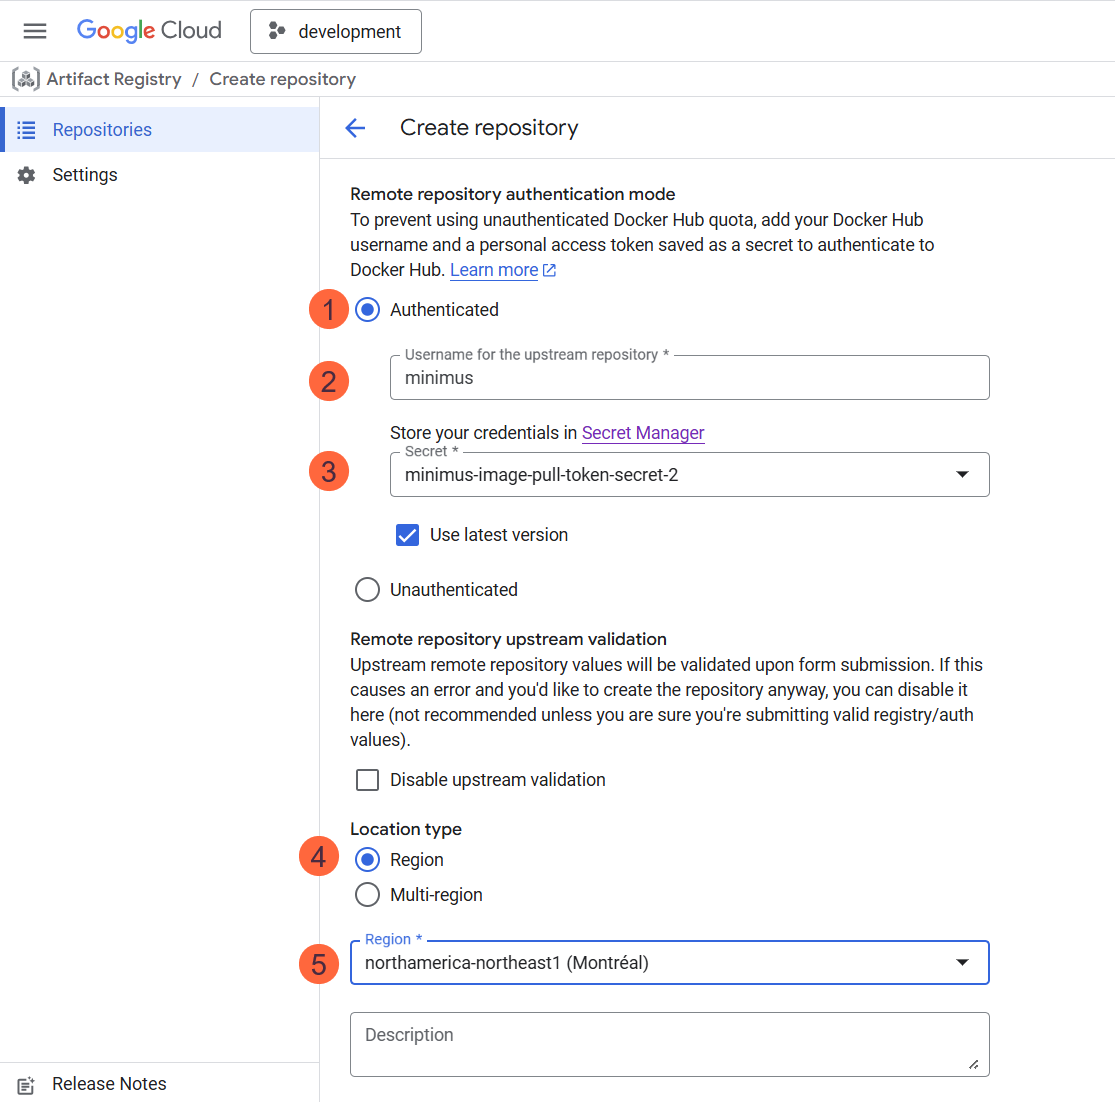
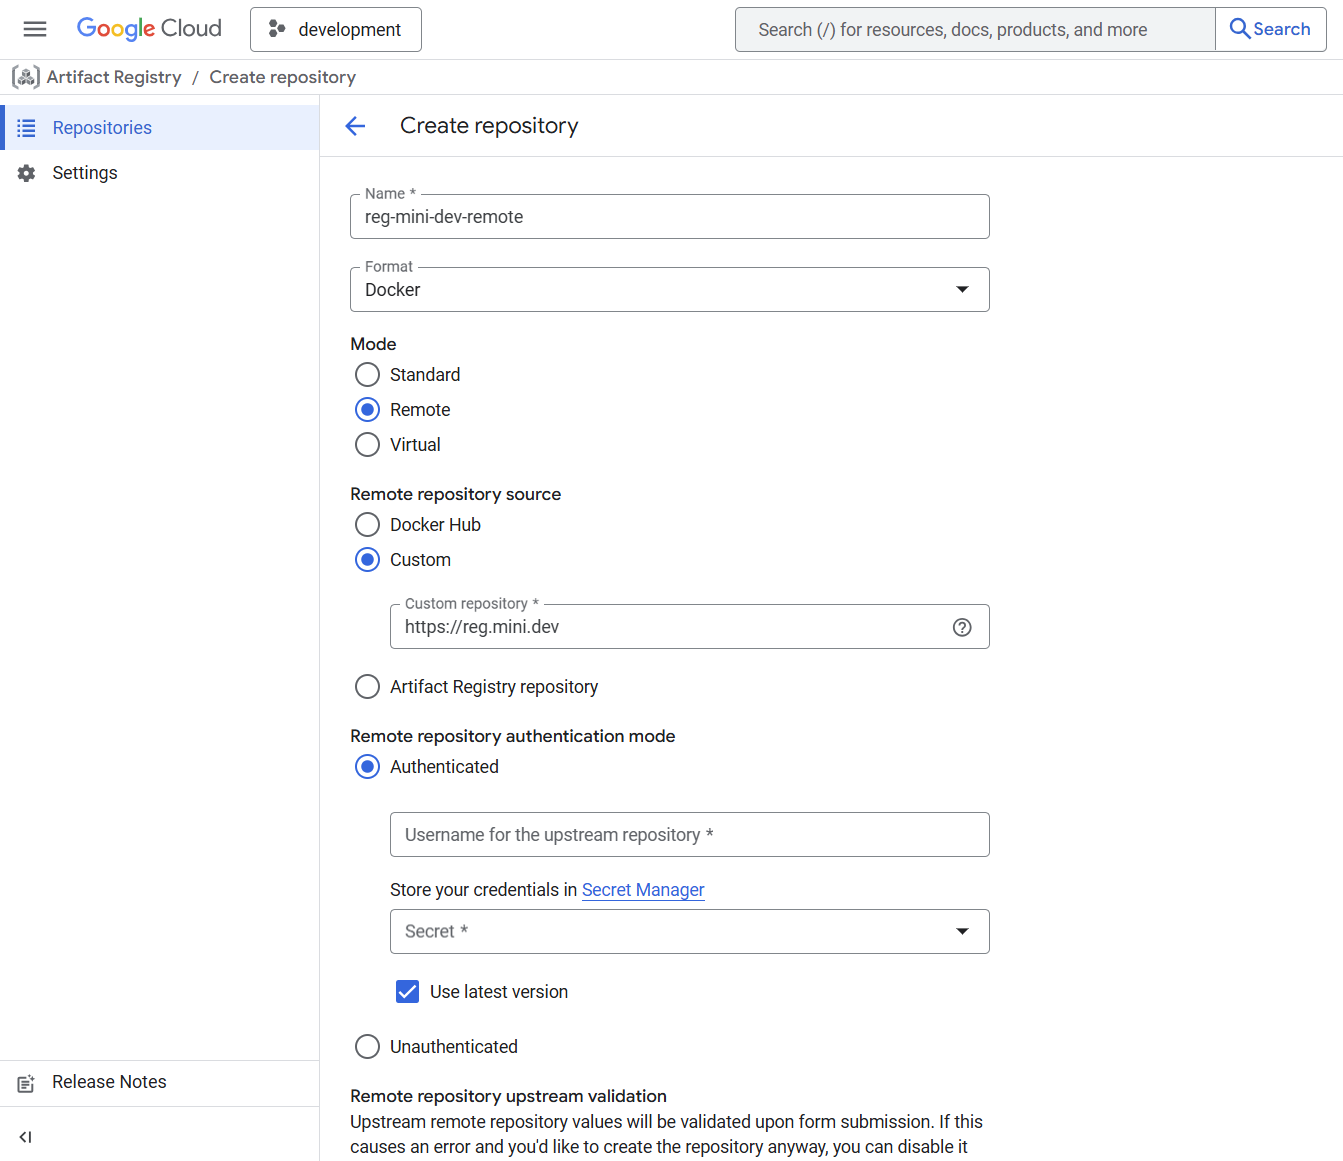 1. Still in the same form, under the section **Remote repository authentication mode**, select **Authenticated**.
2. Fill out the form:
1. **Username for the upstream registry**: Enter the username `minimus`
2. **Secret**: Select the name of the secret created in the previous step.
3. **Location type**: Select **Region**
4. Select the region from the list.
5. Configure the rest of the options, including encryption, cleanup policies, artifact analysis, etc. You can keep the defaults but we recommend that you align with your organizational policies.
1. Still in the same form, under the section **Remote repository authentication mode**, select **Authenticated**.
2. Fill out the form:
1. **Username for the upstream registry**: Enter the username `minimus`
2. **Secret**: Select the name of the secret created in the previous step.
3. **Location type**: Select **Region**
4. Select the region from the list.
5. Configure the rest of the options, including encryption, cleanup policies, artifact analysis, etc. You can keep the defaults but we recommend that you align with your organizational policies.
 Select **Create** at the bottom of the form. If successful, a success message will appear and you will be able to view the remote repository details.
## Pulling Minimus images into Artifact Registry
Now that you've set up the Minimus registry as a remote repository, you are ready to pull Minimus images into your Google Cloud Artifact Registry.
You can either trigger image pulls locally or via Google cloud shell with relative docker access to the Google registry. For purposes of this guide we will show how to use Google Cloud Shell from the Google Cloud Console.
1. Authenticate to Google Cloud Shell from your Google Console. You should see a welcome message such as `Welcome to Cloud Shell!...`.
Select **Create** at the bottom of the form. If successful, a success message will appear and you will be able to view the remote repository details.
## Pulling Minimus images into Artifact Registry
Now that you've set up the Minimus registry as a remote repository, you are ready to pull Minimus images into your Google Cloud Artifact Registry.
You can either trigger image pulls locally or via Google cloud shell with relative docker access to the Google registry. For purposes of this guide we will show how to use Google Cloud Shell from the Google Cloud Console.
1. Authenticate to Google Cloud Shell from your Google Console. You should see a welcome message such as `Welcome to Cloud Shell!...`.
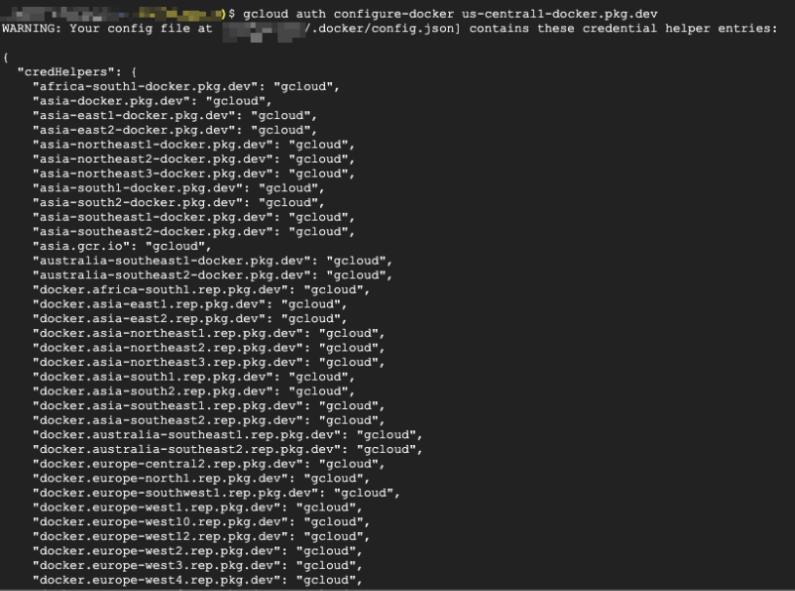
 2. Validate that Docker access is configured locally:
```shellscript Command template theme={null}
#command format
gcloud auth configure-docker {your-region}
#example
gcloud auth configure-docker us-central1-docker.pkg.dev
```
2. Validate that Docker access is configured locally:
```shellscript Command template theme={null}
#command format
gcloud auth configure-docker {your-region}
#example
gcloud auth configure-docker us-central1-docker.pkg.dev
```
 3. Execute a Docker or Podman pull command:
```shellscript Docker Pull Command wrap theme={null}
#docker command format
docker pull {your registry region}/{google-project-id}/{remote-repository-name}/{desired-minimus-image}
#example
docker pull us-central1-docker.pkg.dev/acme-project/reg-mini-dev-remote/python:latest
```
```shellscript Podman Pull Command theme={null}
#podman command format
podman pull {your registry region}/{google-project-id}/{remote-repository-name}/{desired-minimus-image}
#example
podman pull us-central1-docker.pkg.dev/acme-project/reg-mini-dev-remote/python:latest
```
3. Execute a Docker or Podman pull command:
```shellscript Docker Pull Command wrap theme={null}
#docker command format
docker pull {your registry region}/{google-project-id}/{remote-repository-name}/{desired-minimus-image}
#example
docker pull us-central1-docker.pkg.dev/acme-project/reg-mini-dev-remote/python:latest
```
```shellscript Podman Pull Command theme={null}
#podman command format
podman pull {your registry region}/{google-project-id}/{remote-repository-name}/{desired-minimus-image}
#example
podman pull us-central1-docker.pkg.dev/acme-project/reg-mini-dev-remote/python:latest
```
 4. That's it! You have validated that you can pull Minimus images into your Google Cloud Artifact Registry.