> ## Documentation Index
> Fetch the complete documentation index at: https://docs.minimus.io/llms.txt
> Use this file to discover all available pages before exploring further.
# Create Action
> Set up webhooks, GitHub Actions, email, and Slack alerts for when a vulnerability is fixed or a new version is released
You can set actions to automatically pull the new image version/digest or notify you of its release. The actions can be tailored to specific image lines or to respond to vulnerabilities of certain severity or exploitability labels.
Private images created by [Creator](/enterprise-edition/image-creator) are fully supported by Minimus actions.
## Overview
As a rule, actions only apply to images included in your Minimus subscription.
There are 2 steps to configuring an action:
1. Decide when to set off the action, that is, what the action should respond to. The following triggers are supported:
1. New image version/digest released
2. New Helm chart version released
3. Vulnerability fix
4. Image line nearing EOL
5. Image line reached EOL
6. EOL image was pulled
2. Decide what the response should be, that is, what the action should do. The following responses are supported:
1. Trigger a webhook
2. Send email
3. Send Slack alert
4. Trigger GitHub Action
## When to trigger the action
### By new Helm chart version release
You can set an action to trigger in response to a new version release for Helm charts published by Minimus.
1. Select **Actions** in the left menu. Then select **Create Action** and fill out the form as follows.
2. **Name** the action.
3. **When -** Select **New Helm chart version released**.
4. **If** - Add your filters. You can filter by Helm chart name or select categories, for example FIPS or STIG.\\
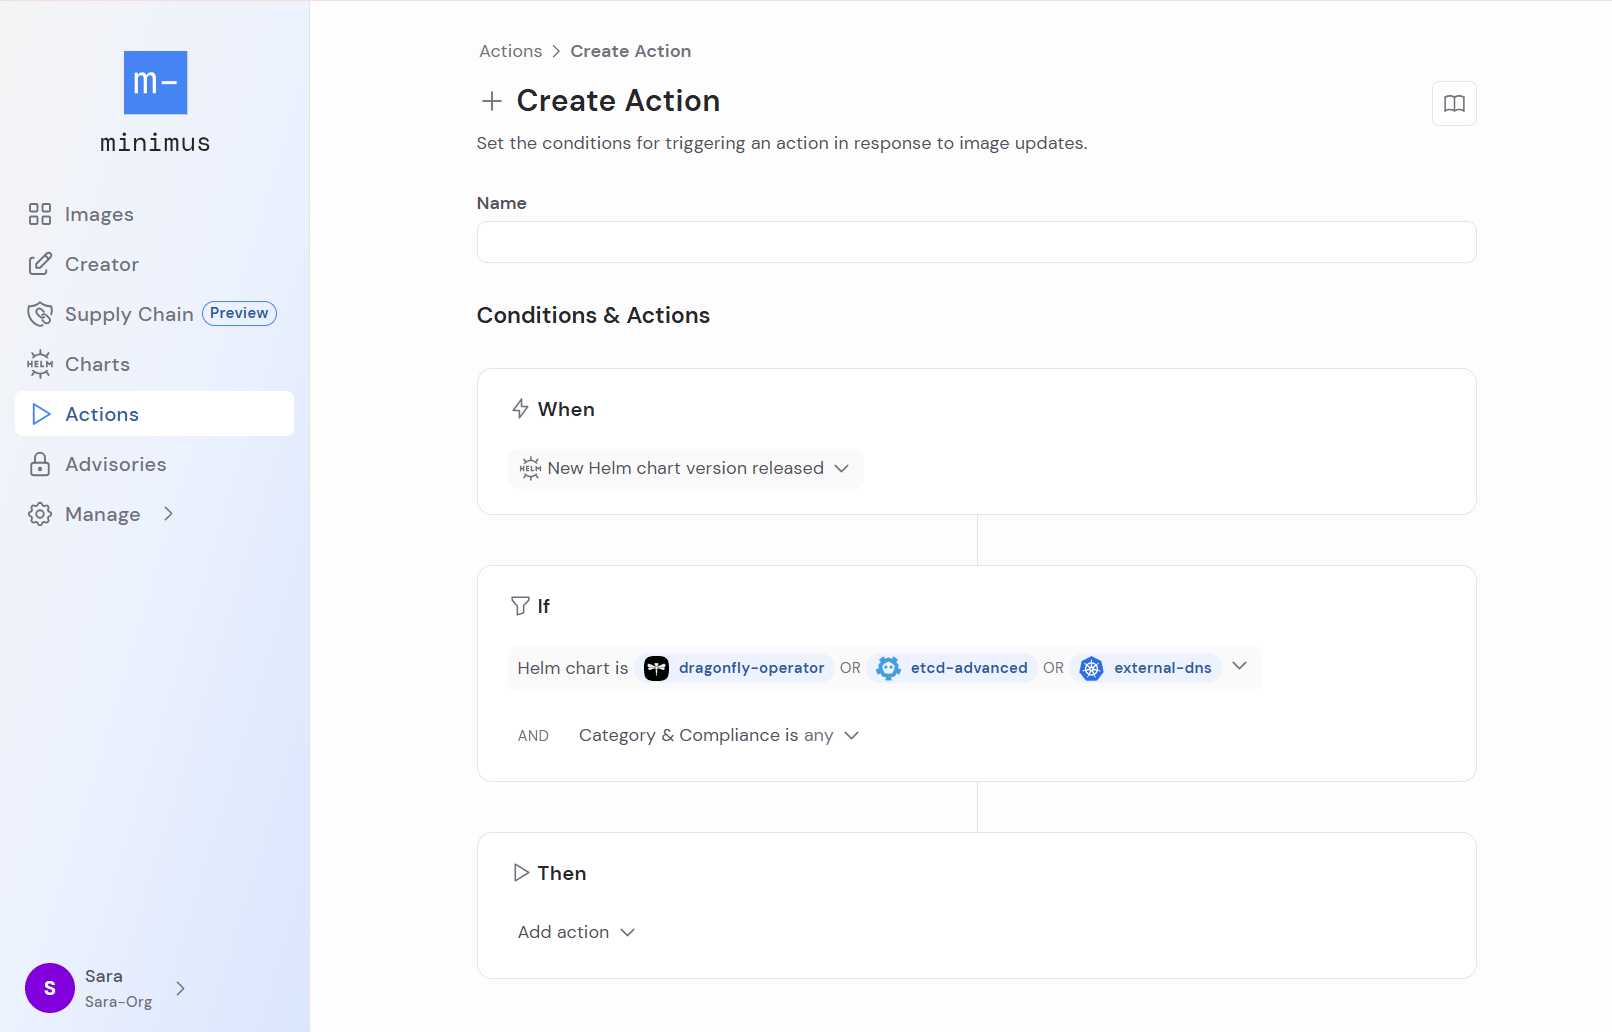 5. **Then** - select the action and proceed as explained below.
### By new version/digest release
You can set an action to trigger in response to a new version release or a new image digest (that is, a new image build following an update as shown in the [image changelog](/foundations/image-card)).
1. Select **Actions** in the left menu. Then select **Create Action** and fill out the form as follows.
2. **Name** the action.
3. **When -** Select **New image version is released**. If you prefer, toggle on the option to **Alert for every new digest of the same version**. When enabled, the action will trigger every time there is a new image build for the relevant image lines. See also [digest history](https://docs.minimus.io/foundations/image-version#digest-history) and [image changelog](https://docs.minimus.io/foundations/image-card#changelog).
5. **Then** - select the action and proceed as explained below.
### By new version/digest release
You can set an action to trigger in response to a new version release or a new image digest (that is, a new image build following an update as shown in the [image changelog](/foundations/image-card)).
1. Select **Actions** in the left menu. Then select **Create Action** and fill out the form as follows.
2. **Name** the action.
3. **When -** Select **New image version is released**. If you prefer, toggle on the option to **Alert for every new digest of the same version**. When enabled, the action will trigger every time there is a new image build for the relevant image lines. See also [digest history](https://docs.minimus.io/foundations/image-version#digest-history) and [image changelog](https://docs.minimus.io/foundations/image-card#changelog).
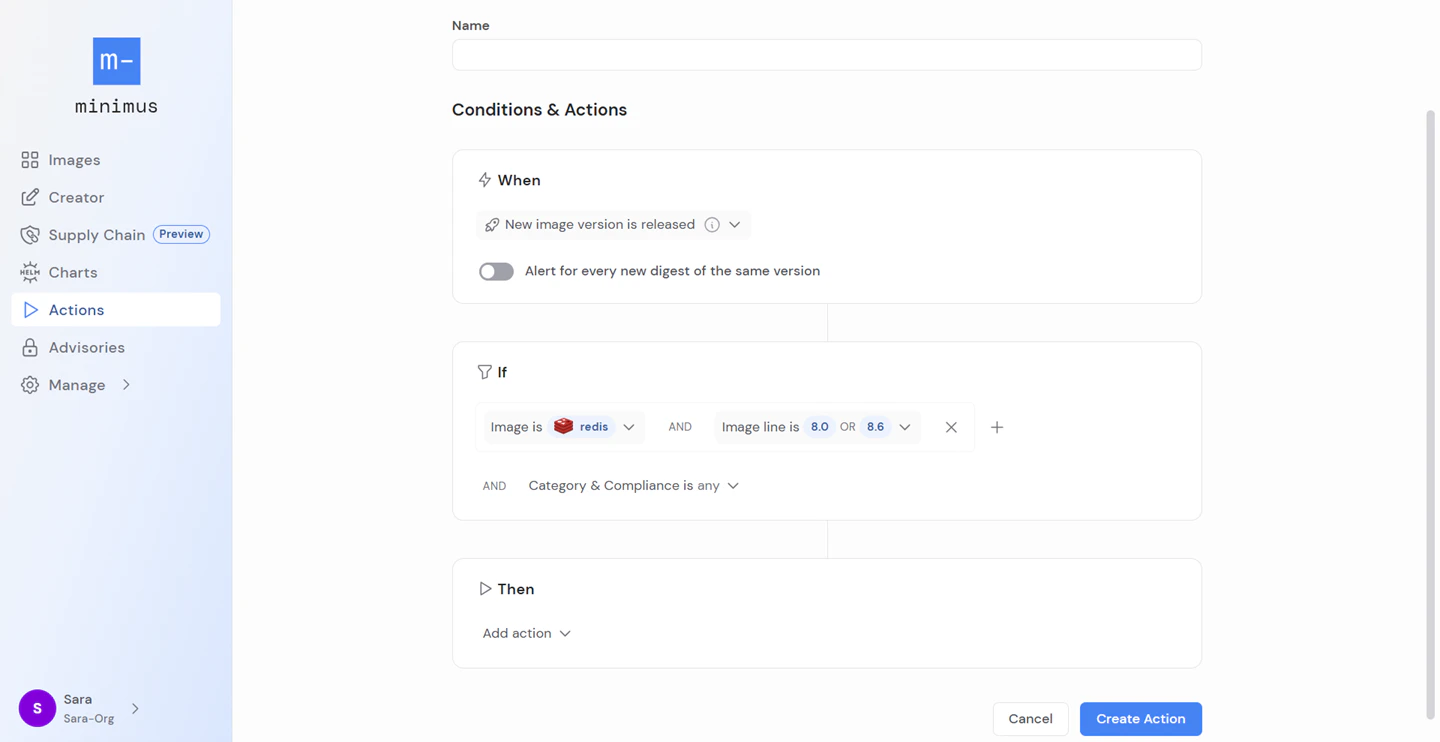 4. **If** - Add your filters. You can filter by image properties and combine as many filters as relevant:
1. Select images by name from the list.
Only images included in your subscription will be shown.
2. Select image lines from the list.
End of life (EOL) indications and dates will be shown on lines reaching or post-EOL.
4. **If** - Add your filters. You can filter by image properties and combine as many filters as relevant:
1. Select images by name from the list.
Only images included in your subscription will be shown.
2. Select image lines from the list.
End of life (EOL) indications and dates will be shown on lines reaching or post-EOL.
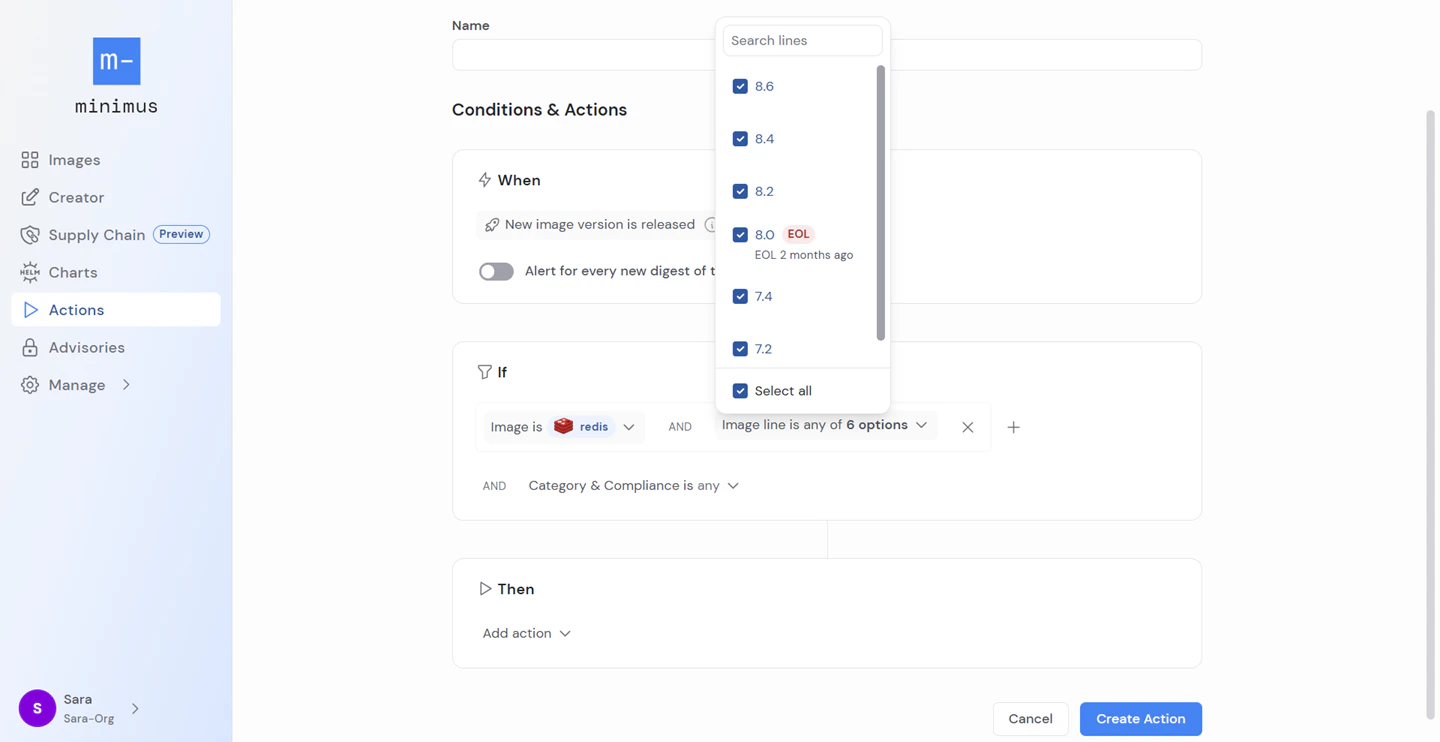 3. Instead of selecting specific images by name, you can instead select relevant filters from the **image category & compliance**. Compliance may be FIPS or STIG compatibility.
5. **Then** - select the action and proceed as explained below.
### By vulnerability fix
You can set an action to trigger in response to a vulnerability fix.
1. Select **Actions** in the left menu. Then select **Create Action** and fill out the form as follows.
2. **Name** the action.
3. **When -** Select **Vulnerability is fixed**
4. **If** - Add your filters. You can combine filters for image and vulnerability properties:
1. Select images by name from the list.
Only images included in your subscription will be shown.
2. Select image lines from the list.
End of life (EOL) indications and dates will be shown on lines reaching or post-EOL.
3. Instead of selecting specific images by name, you can instead select relevant filters from the **image category & compliance**. Compliance may be FIPS or STIG compatibility.
5. **Then** - select the action and proceed as explained below.
### By vulnerability fix
You can set an action to trigger in response to a vulnerability fix.
1. Select **Actions** in the left menu. Then select **Create Action** and fill out the form as follows.
2. **Name** the action.
3. **When -** Select **Vulnerability is fixed**
4. **If** - Add your filters. You can combine filters for image and vulnerability properties:
1. Select images by name from the list.
Only images included in your subscription will be shown.
2. Select image lines from the list.
End of life (EOL) indications and dates will be shown on lines reaching or post-EOL.
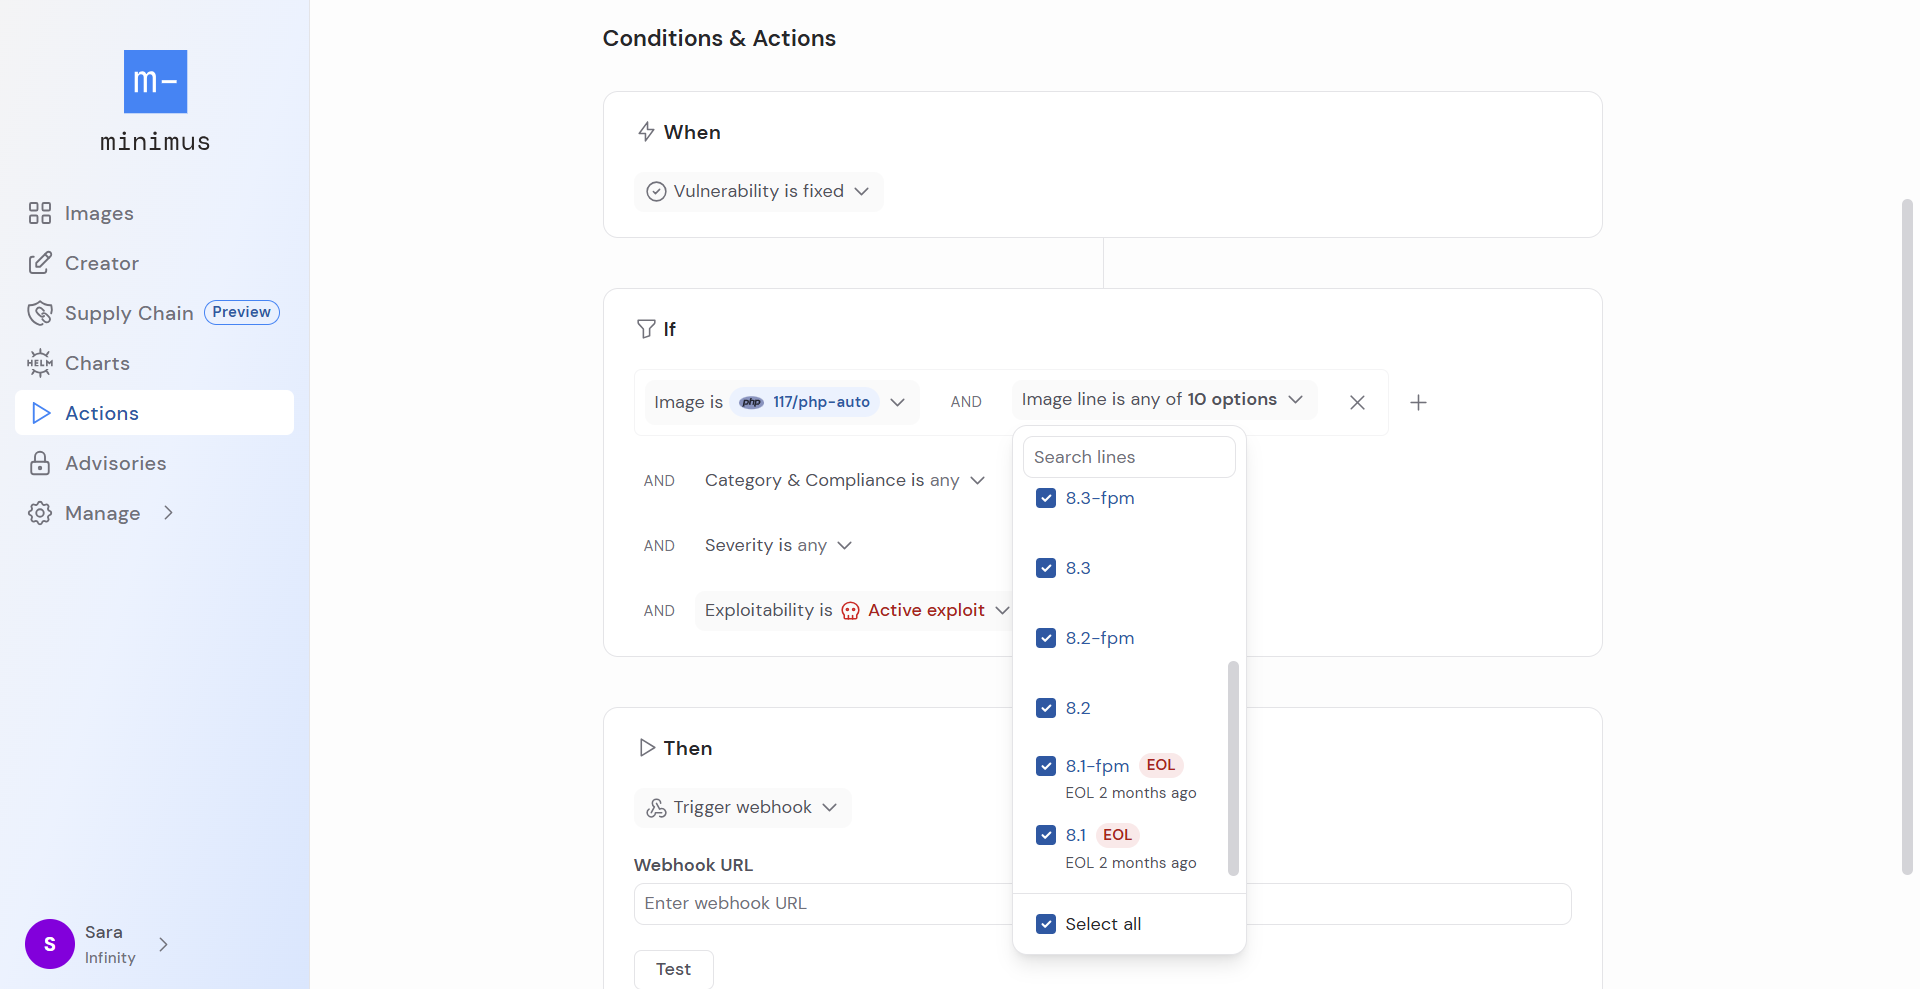 3. Instead of selecting specific images by name, you can instead select relevant filters from the **image category & compliance**. Compliance may be FIPS or STIG compatibility.
4. Select vulnerability **Severity**. You can select unknown, low, medium, high, critical.
5. Select **Exploitability** is either **Active exploit, Likely to be exploited**, or both.
5. **Then** - select the action and proceed as explained below.
### By EOL date
EOL notifications run once daily and only alert once per image line to avoid duplicates.
1. Select **Actions** in the left menu. Then select **Create Action** and fill out the form as follows.
2. **Name** the action.
3. **When** - Select one of the following:
1. Select **Image line nearing EOL**. Then decide how many weeks of advance notice you want (1–12 weeks).
Saving the action adds it to the daily queue. The first alert will be sent during the next scheduled notification window, and will list all relevant image lines that have already passed the notification threshold. For example, if you set a 2 week notice, the first alert will notify you of any images that have less than 2 weeks remaining until EOL.
2. Select **Image line reached EOL**.
Saving the action adds it to the daily queue. The first alert will be sent during the next scheduled notification window, and will list all relevant image lines that have reached EOL in the past 90 days.
4. **If** - Add your filters. You can filter by image properties and combine as many filters as relevant:
1. Select images by name from the list.
Only images included in your subscription will be shown.
2. Select image lines from the list.
End of life (EOL) indications and dates will be shown on lines reaching or post-EOL.
3. Instead of selecting specific images by name, you can instead select relevant filters from the **image category & compliance**. Compliance may be FIPS or STIG compatibility.
5. **Then** - select the action and proceed as explained below.
### By EOL image pull
Configure actions to trigger when images that have passed end-of-life are pulled.
1. Select **Actions** in the left menu. Then select **Create Action** and fill out the form as follows.
2. **Name** the action.
3. **When** - Select **EOL image was pulled**
4. **If** - Add your filters. You can filter by image properties and combine as many filters as relevant:
1. Select images by name from the list.
Only images included in your subscription will be shown.
2. Select image lines from the list.
End of life (EOL) indications and dates will be shown on lines reaching or post-EOL.
3. Instead of selecting specific images by name, you can instead select relevant filters from the **image category & compliance**. Compliance may be FIPS or STIG compatibility.
5. **Then** - select the action and proceed as explained below.
## Trigger a webhook
1. Select the action **Trigger webhook**
2. Add your webhook URL. The webhook client is a simple HTTP client that sends POST requests to the endpoint.
3. **Test** the action.
4. If the test is successful, select **Create Action** to save and enable the action.
### About action webhooks
* The webhook provider receives a single event for each alert. Aggregation is not currently supported.
* Here’s an example of the JSON payload schema sent by the action:
```json JSON payload schema example expandable lines theme={null}
{
"actionName": "Example Alert",
"eventType": "newImageVersion",
"eventTime": "2025-04-10T00:28:59.037085531Z",
"imageDetails": {
"name": "mongo",
"tags": [
"7.0.18-dev-202504100027",
"7-dev",
"7.0.18-dev",
"7.0-dev"
],
"digest": "sha256:9c45497ff4b8217571e8ae5298719b4912b304617dc6f28db5a4053d3bdc44dc",
"labels": [
"databases"
],
"link": "images.minimus.io/gallery/images/mongo/lines/7.0/versions/7.0.18-dev/specification"
}
}
```
## Send email notifications
Minimus will send an email notification for every relevant update.
1. Select the action **Send email**.
1. List recipients (using commas as separators). You can add CC recipients as well.
2. Optionally, you can add a custom note. The note will be appended to the default messages.
2. **Test** the action.
3. If the test is successful, select **Create Action** to save and enable the action.
## Send Slack alerts
1. Select the action **Send Slack Alert**.
1. Click the button **Connect to Slack**.
2. **Allow** the permissions requested in the popup window. If you are connected to several Slack workspaces, you can select the relevant one from the top right corner.
3. The form will now show the **connected workspace**.
4. List the channels to be notified. The Minimus app can send messages to public channels by default. For private channels, you will need to add the Minimus app to the channel in advance.
5. **Test** the action.
2. If the test is successful, select **Create Action** to enable it.
### Add the Minimus App to a private Slack channel
If you don't give the Minimus App permissions to message your private Slack channel, the test will fail with the message "not in channel".
1. In your private Slack channel, click the kebab menu in the top right corner.
2. Select **Edit settings**.
3. Select the **Integrations** tab.
3. Instead of selecting specific images by name, you can instead select relevant filters from the **image category & compliance**. Compliance may be FIPS or STIG compatibility.
4. Select vulnerability **Severity**. You can select unknown, low, medium, high, critical.
5. Select **Exploitability** is either **Active exploit, Likely to be exploited**, or both.
5. **Then** - select the action and proceed as explained below.
### By EOL date
EOL notifications run once daily and only alert once per image line to avoid duplicates.
1. Select **Actions** in the left menu. Then select **Create Action** and fill out the form as follows.
2. **Name** the action.
3. **When** - Select one of the following:
1. Select **Image line nearing EOL**. Then decide how many weeks of advance notice you want (1–12 weeks).
Saving the action adds it to the daily queue. The first alert will be sent during the next scheduled notification window, and will list all relevant image lines that have already passed the notification threshold. For example, if you set a 2 week notice, the first alert will notify you of any images that have less than 2 weeks remaining until EOL.
2. Select **Image line reached EOL**.
Saving the action adds it to the daily queue. The first alert will be sent during the next scheduled notification window, and will list all relevant image lines that have reached EOL in the past 90 days.
4. **If** - Add your filters. You can filter by image properties and combine as many filters as relevant:
1. Select images by name from the list.
Only images included in your subscription will be shown.
2. Select image lines from the list.
End of life (EOL) indications and dates will be shown on lines reaching or post-EOL.
3. Instead of selecting specific images by name, you can instead select relevant filters from the **image category & compliance**. Compliance may be FIPS or STIG compatibility.
5. **Then** - select the action and proceed as explained below.
### By EOL image pull
Configure actions to trigger when images that have passed end-of-life are pulled.
1. Select **Actions** in the left menu. Then select **Create Action** and fill out the form as follows.
2. **Name** the action.
3. **When** - Select **EOL image was pulled**
4. **If** - Add your filters. You can filter by image properties and combine as many filters as relevant:
1. Select images by name from the list.
Only images included in your subscription will be shown.
2. Select image lines from the list.
End of life (EOL) indications and dates will be shown on lines reaching or post-EOL.
3. Instead of selecting specific images by name, you can instead select relevant filters from the **image category & compliance**. Compliance may be FIPS or STIG compatibility.
5. **Then** - select the action and proceed as explained below.
## Trigger a webhook
1. Select the action **Trigger webhook**
2. Add your webhook URL. The webhook client is a simple HTTP client that sends POST requests to the endpoint.
3. **Test** the action.
4. If the test is successful, select **Create Action** to save and enable the action.
### About action webhooks
* The webhook provider receives a single event for each alert. Aggregation is not currently supported.
* Here’s an example of the JSON payload schema sent by the action:
```json JSON payload schema example expandable lines theme={null}
{
"actionName": "Example Alert",
"eventType": "newImageVersion",
"eventTime": "2025-04-10T00:28:59.037085531Z",
"imageDetails": {
"name": "mongo",
"tags": [
"7.0.18-dev-202504100027",
"7-dev",
"7.0.18-dev",
"7.0-dev"
],
"digest": "sha256:9c45497ff4b8217571e8ae5298719b4912b304617dc6f28db5a4053d3bdc44dc",
"labels": [
"databases"
],
"link": "images.minimus.io/gallery/images/mongo/lines/7.0/versions/7.0.18-dev/specification"
}
}
```
## Send email notifications
Minimus will send an email notification for every relevant update.
1. Select the action **Send email**.
1. List recipients (using commas as separators). You can add CC recipients as well.
2. Optionally, you can add a custom note. The note will be appended to the default messages.
2. **Test** the action.
3. If the test is successful, select **Create Action** to save and enable the action.
## Send Slack alerts
1. Select the action **Send Slack Alert**.
1. Click the button **Connect to Slack**.
2. **Allow** the permissions requested in the popup window. If you are connected to several Slack workspaces, you can select the relevant one from the top right corner.
3. The form will now show the **connected workspace**.
4. List the channels to be notified. The Minimus app can send messages to public channels by default. For private channels, you will need to add the Minimus app to the channel in advance.
5. **Test** the action.
2. If the test is successful, select **Create Action** to enable it.
### Add the Minimus App to a private Slack channel
If you don't give the Minimus App permissions to message your private Slack channel, the test will fail with the message "not in channel".
1. In your private Slack channel, click the kebab menu in the top right corner.
2. Select **Edit settings**.
3. Select the **Integrations** tab.
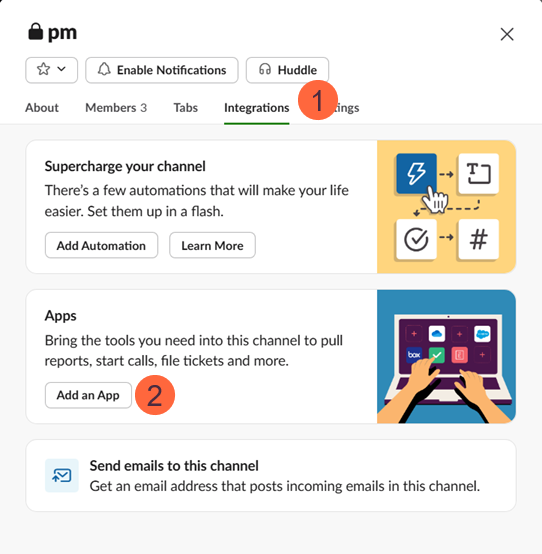 4. Add the Minimus App.
5. That's it. Minimus can now notify the channel.
## Trigger GitHub Actions
1. Select the action **Trigger GitHub Actions**.
1. Click the button **Connect to GitHub**.
2. Select the relevant GitHub owner or organization.
4. Add the Minimus App.
5. That's it. Minimus can now notify the channel.
## Trigger GitHub Actions
1. Select the action **Trigger GitHub Actions**.
1. Click the button **Connect to GitHub**.
2. Select the relevant GitHub owner or organization.
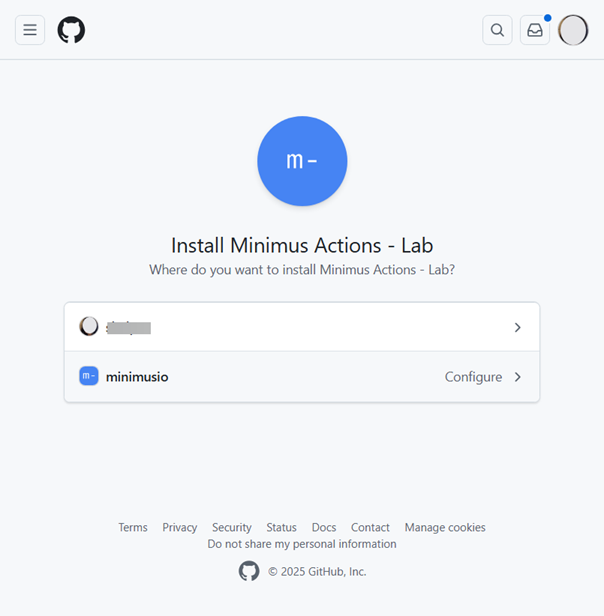 2. Specify the **Owner** and **Repository**. For example, if your organization's GitHub URL looks like `https://github.com/myorganization/myproject/` - the owner is `myorganization` and the repository is `myproject`.
3. **Test** the connection.
4. If the test is successful, select **Create Action** to enable it.
### Troubleshooting the connection to GitHub
* **Scroll down if necessary**\
If you previously created an action that connected to your GitHub repo, the popup approval window will open in your general GitHub settings menu - [https://github.com/settings/profile](https://github.com/settings/profile).
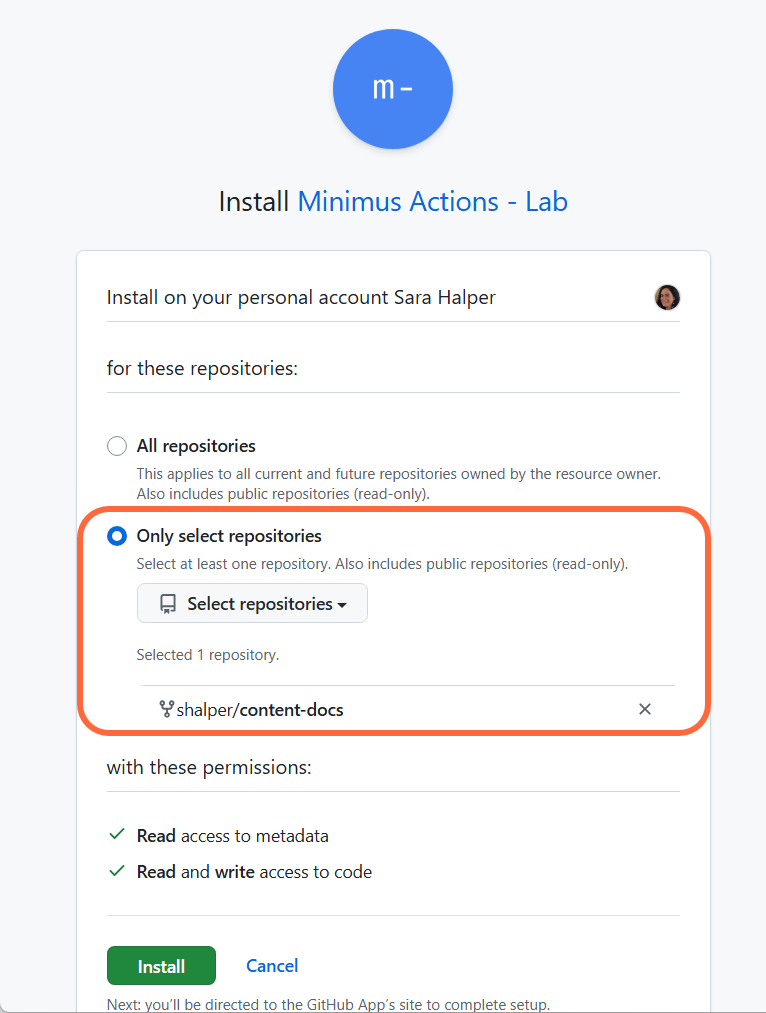
* Scroll down until you see the section for configuring **Repository access**.
* Select the relevant owner and repo as usual and save your selection.
2. Specify the **Owner** and **Repository**. For example, if your organization's GitHub URL looks like `https://github.com/myorganization/myproject/` - the owner is `myorganization` and the repository is `myproject`.
3. **Test** the connection.
4. If the test is successful, select **Create Action** to enable it.
### Troubleshooting the connection to GitHub
* **Scroll down if necessary**\
If you previously created an action that connected to your GitHub repo, the popup approval window will open in your general GitHub settings menu - [https://github.com/settings/profile](https://github.com/settings/profile).
* Scroll down until you see the section for configuring **Repository access**.
* Select the relevant owner and repo as usual and save your selection.
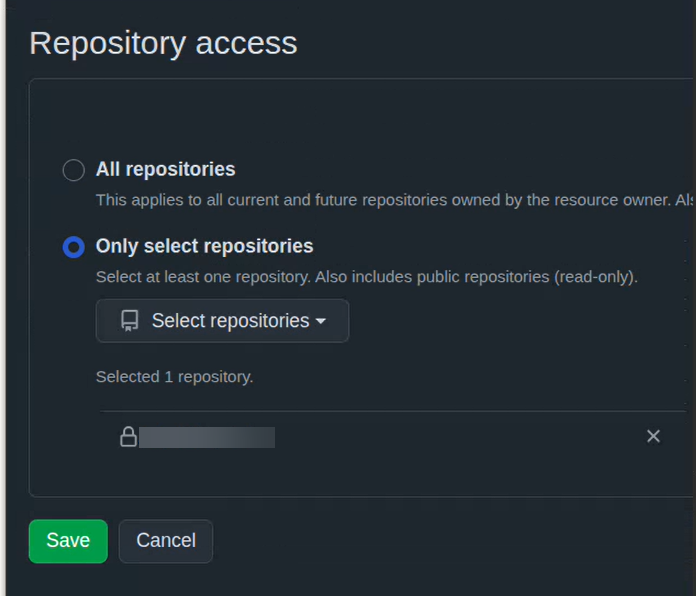 * **Reset repository selection if necessary**\
Sometimes, if you previously created an action that connected to a private GitHub repo, the popup approval window will apply your previous selection. In this case, the **Repository access** section will appear to be "locked" on your previous selection with the **Save** button disabled.
* To activate the **Save** button, first change the selection to **All repositories**.
* Next, select the relevant owner and repository and save your selection.
Note that the relevant configuration is also found in your GitHub settings under [https://github.com/settings/installations](https://github.com/settings/installations).
* **Reset repository selection if necessary**\
Sometimes, if you previously created an action that connected to a private GitHub repo, the popup approval window will apply your previous selection. In this case, the **Repository access** section will appear to be "locked" on your previous selection with the **Save** button disabled.
* To activate the **Save** button, first change the selection to **All repositories**.
* Next, select the relevant owner and repository and save your selection.
Note that the relevant configuration is also found in your GitHub settings under [https://github.com/settings/installations](https://github.com/settings/installations).