> ## Documentation Index
> Fetch the complete documentation index at: https://docs.minimus.io/llms.txt
> Use this file to discover all available pages before exploring further.
# Microsoft Azure SSO
> Configure single-sign-on (SSO) for Minimus via Azure
Add single-sign-on (SSO) to Minimus in Azure, by configuring Minimus as a custom SAML app.
## Prepare the SSO form in Minimus
1. Go to **Manage** > **Users & Groups** ([direct link](https://images.minimus.io/manage/access/users?saml=open))
2. Click **Configure SSO** at the top of the page to open the Minimus SSO form.
Keep this form open and available in another browser tab as you configure the SAML app in Azure.
3. The form has 4 parts:
1. **Configure Minimus as a custom app in your identity provider** - You will copy these parameters from Minimus to Azure in the next steps.
1. SP Entity ID
2. Reply URL (Callback / ACS URL)
3. Relay State (optional) - If you leave the Relay State blank, users will only be able to login with SSO from the Minimus homepage.
2. **Connect Minimus to your identity provider** - You will fetch these parameters from your Azure custom app and save them to the Minimus form:
1. Login SSO URL
2. IdP Entity ID
3. Certificate
3. **SAML Attribute Mapping** - You will the fetch the Azure claim names for the following parameters and save them to the Minimus form:
| Minimus Parameter | Azure Attribute Name |
| :---------------- | :--------------------- |
| Email | user.mail |
| Full Name | user.userprincipalname |
4. **Group Mapping** is optional and can be enabled if you plan to configure user groups. [See the instructions in user groups](/manage/user-groups).
## Add Minimus as a custom app under Azure Enterprise Applications
1. The first step is to create the Minimus App in Azure and link it to your Minimus Console. Go to **Enterprise Applications** to begin.
2. Select the option **New application**.
3. In the top bar, select the option to **Create your own application**.
1. Name the application. (We'll assume the name **Minimus App** was used for the rest of this guide.)
2. Select the option to **Integrate any other application you don't find in the gallery (Non-gallery)**.
3. Click **Create**.
4. Wait for the success confirmation. It may take a minute or so.
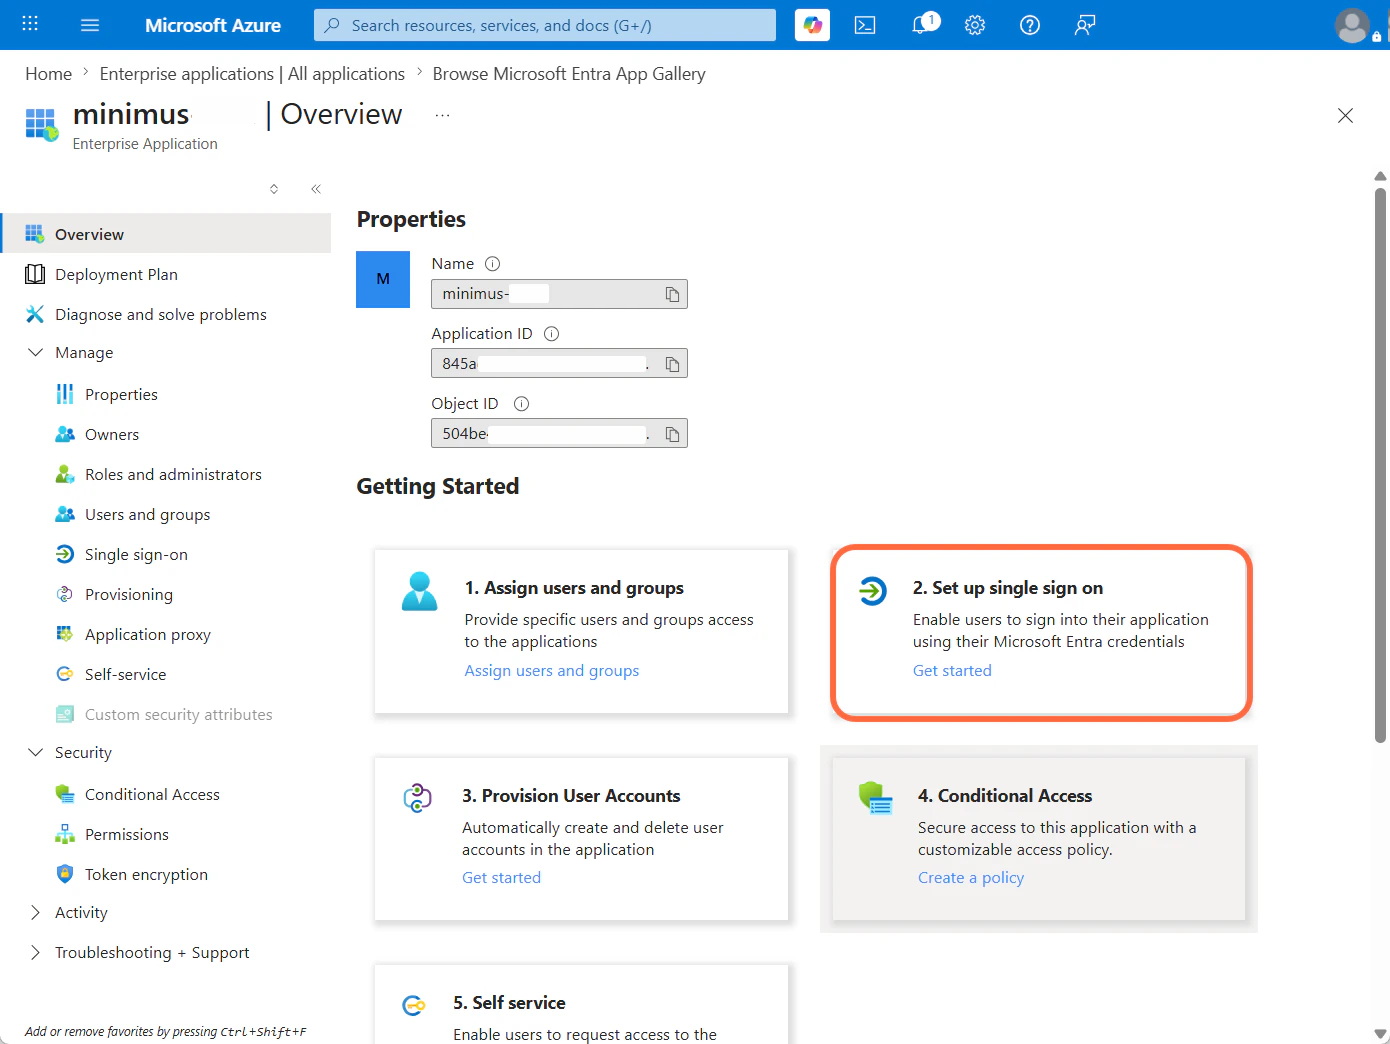
1. Select **Set up single sign on**.
 2. Select **SAML**.
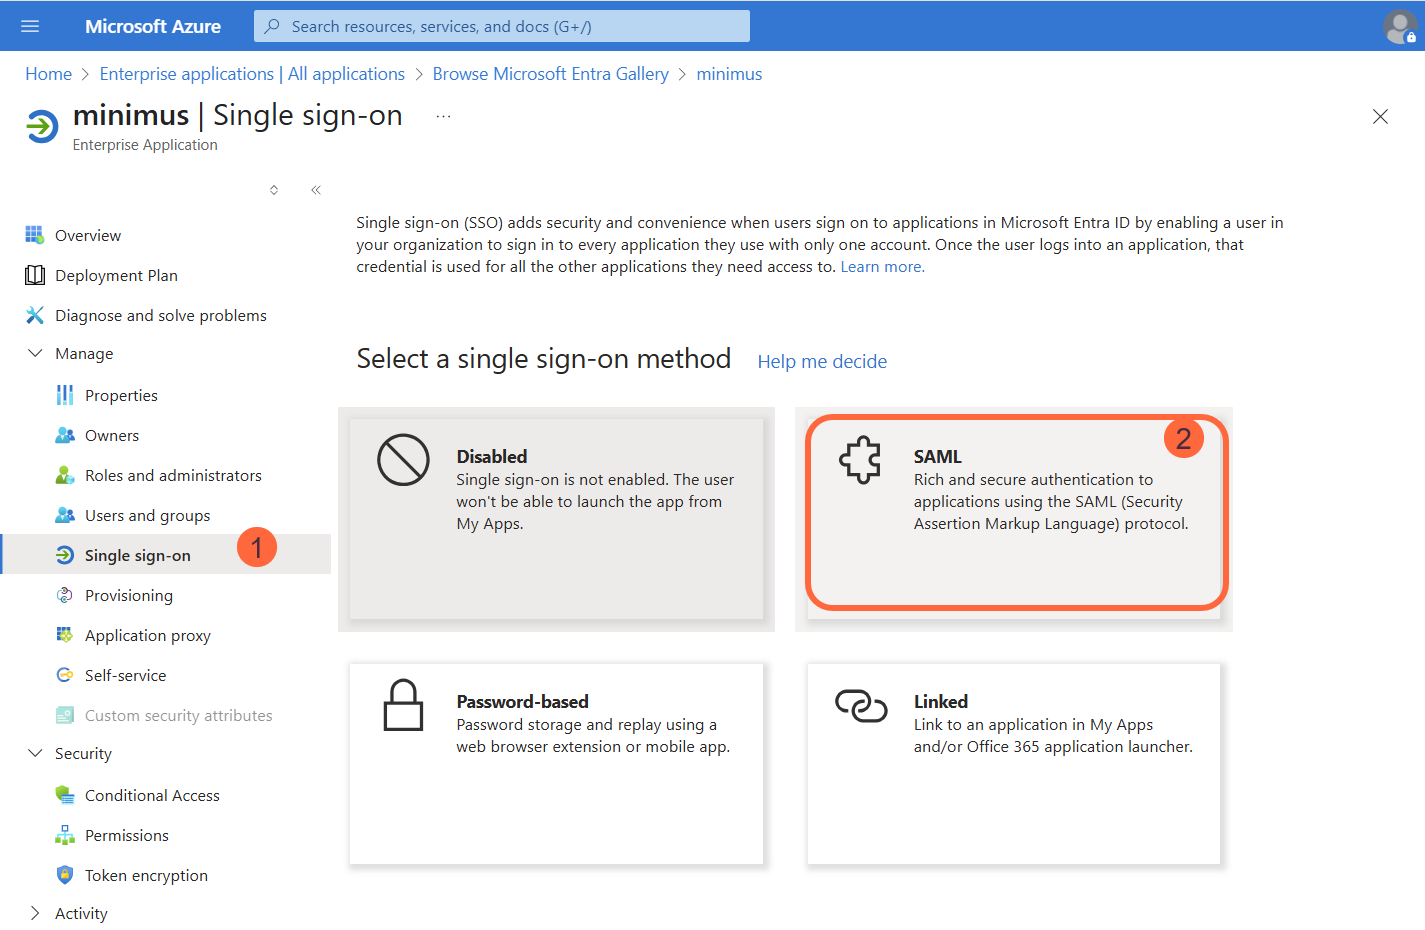 This will open the form **Set up Single Sign-On with SAML**. The form includes numbered steps.
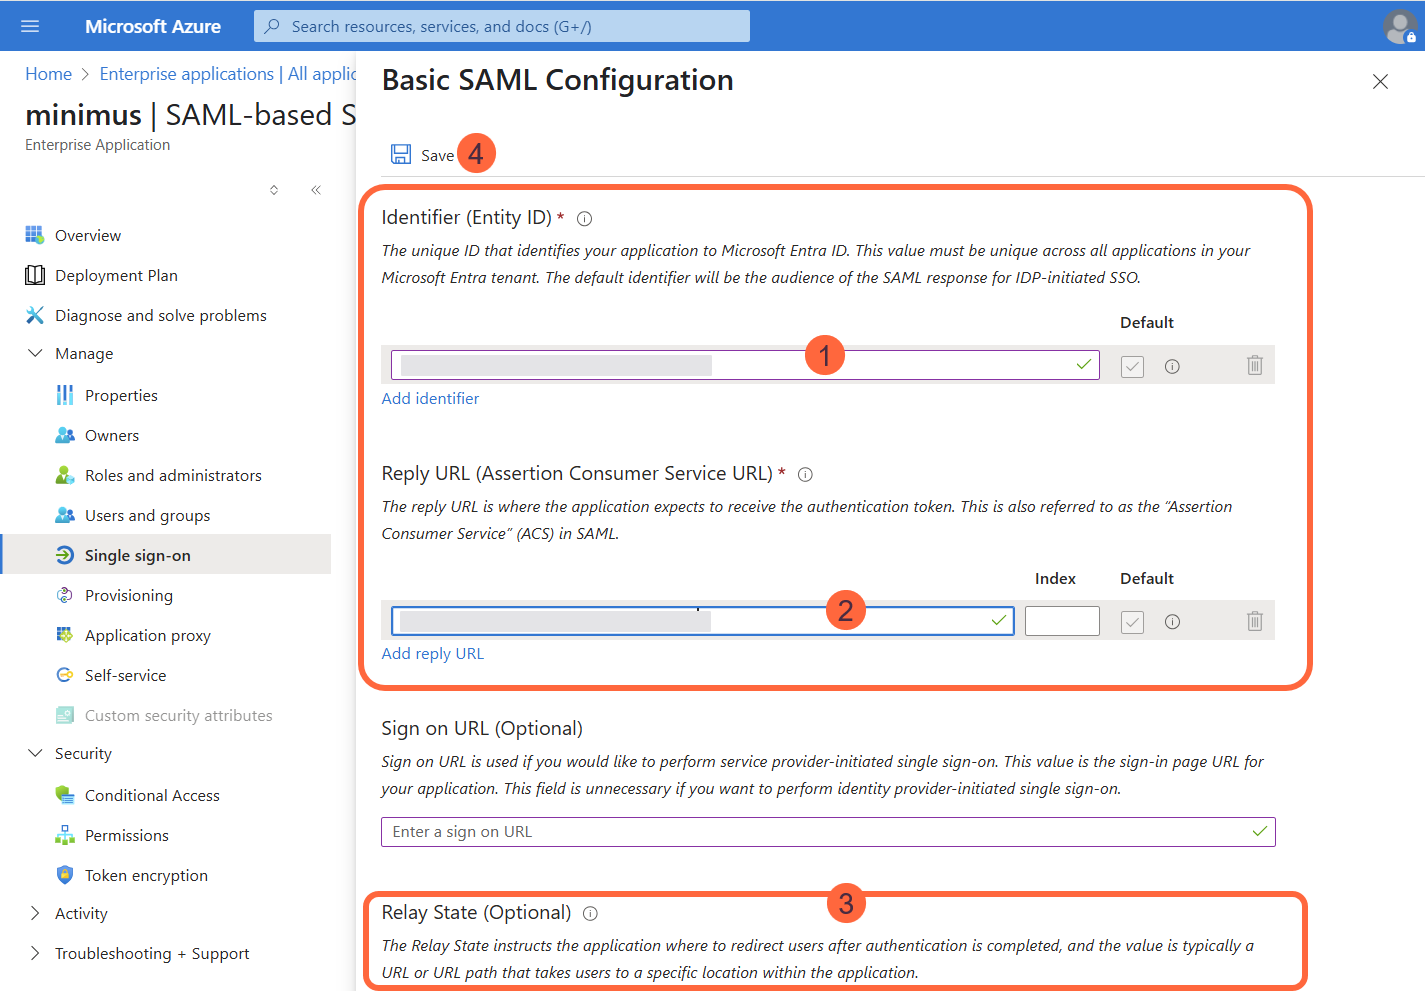
1. Select **Edit** for **Step 1** - **Basic SAML Configuration**.
This will open the form **Set up Single Sign-On with SAML**. The form includes numbered steps.
1. Select **Edit** for **Step 1** - **Basic SAML Configuration**.
 2. Copy the following from the Minimus SSO form to Azure:
| To copy from Minimus form | And paste in Azure form |
| :----------------------------- | :----------------------------------------- |
| SP Entity ID | Identifier (Entity ID) |
| Reply URL (Callback / ACS URL) | Reply URL (Assertion Consumer Service URL) |
| Relay State | Relay State (Optional) |
3. **Save** the form.
2. Copy the following from the Minimus SSO form to Azure:
| To copy from Minimus form | And paste in Azure form |
| :----------------------------- | :----------------------------------------- |
| SP Entity ID | Identifier (Entity ID) |
| Reply URL (Callback / ACS URL) | Reply URL (Assertion Consumer Service URL) |
| Relay State | Relay State (Optional) |
3. **Save** the form.
 1. You will be automatically navigated to the **Minimus App** overview page.
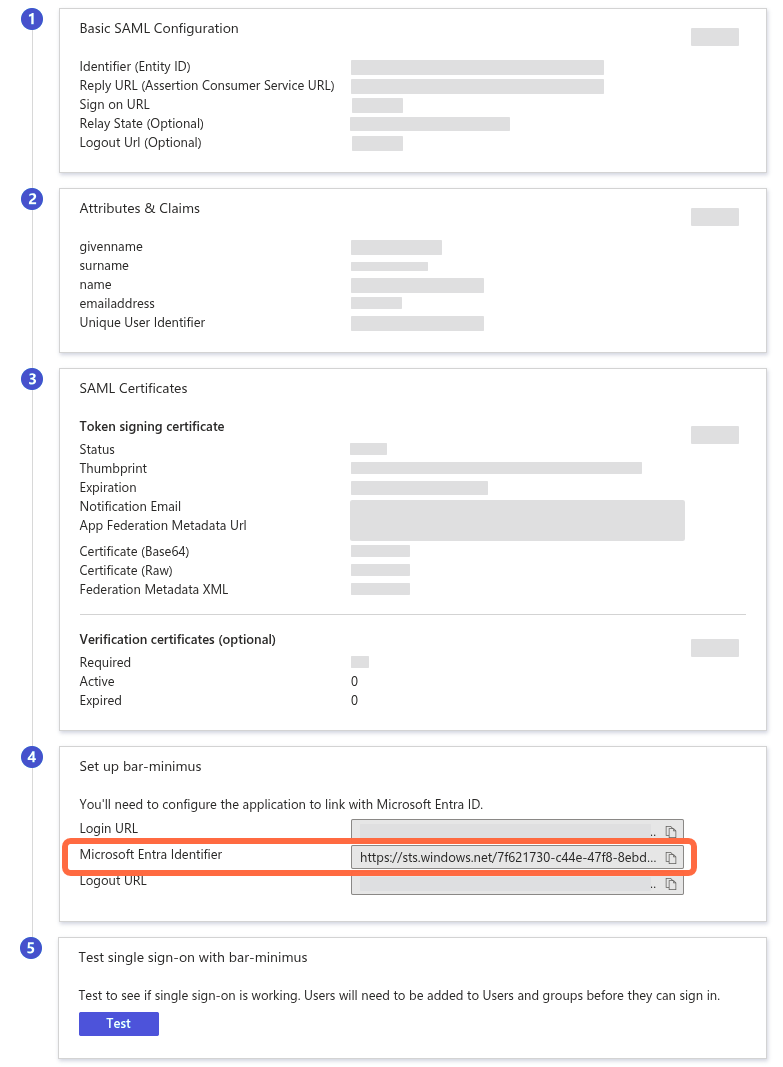
2. Copy the Azure **Microsoft Entra Identifier** to the **IdP Entity ID** in the Minimus form.
1. You will be automatically navigated to the **Minimus App** overview page.
2. Copy the Azure **Microsoft Entra Identifier** to the **IdP Entity ID** in the Minimus form.
 Copy the relevant schema to the SAML Attribute Mapping section in the Minimus SSO form as shown below.
1. Select **Edit** for **Step 2** - **Attributes & Claims**.
Copy the relevant schema to the SAML Attribute Mapping section in the Minimus SSO form as shown below.
1. Select **Edit** for **Step 2** - **Attributes & Claims**.
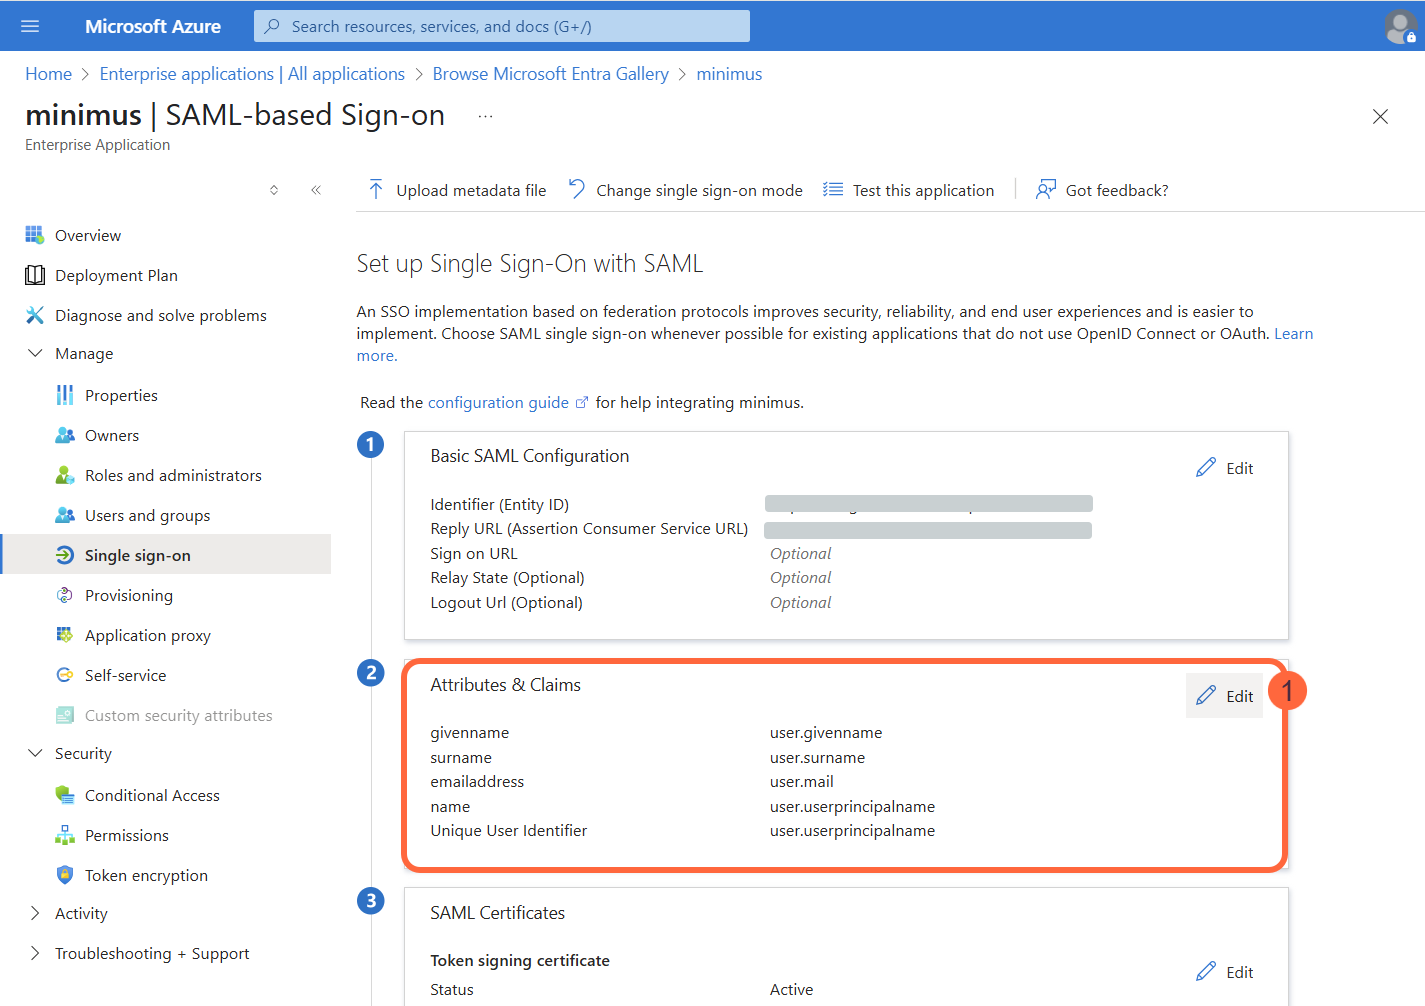 2. You will see a table of the default claims.
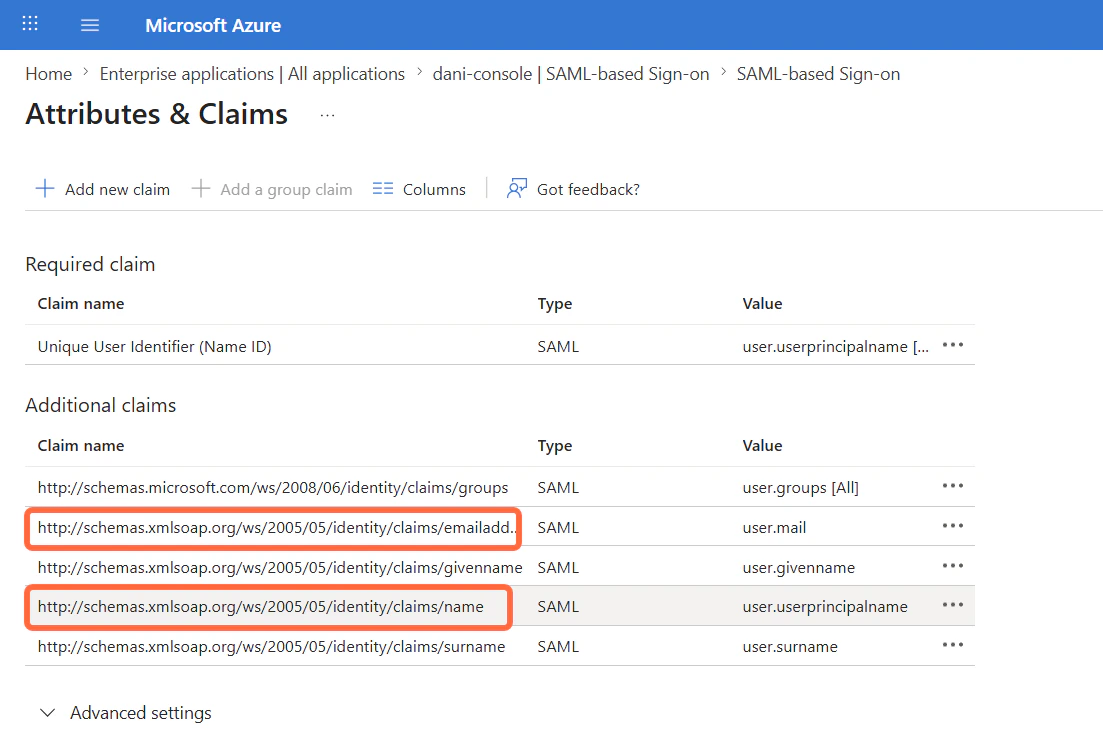
3. Copy the claim name for the `user.mail` and the `user.userprincipalname` to the Minimus form.
| Minimus Parameter | Azure Attribute Name |
| ----------------- | :--------------------- |
| Email | user.mail |
| Full Name | user.userprincipalname |
2. You will see a table of the default claims.
3. Copy the claim name for the `user.mail` and the `user.userprincipalname` to the Minimus form.
| Minimus Parameter | Azure Attribute Name |
| ----------------- | :--------------------- |
| Email | user.mail |
| Full Name | user.userprincipalname |
 1. In Azure, continue to **Step 3 - SAML Certificates**.
2. Download the **Base64 Certificate**.
3. Open the certificate in notepad or another code viewer, and copy the code (including "-----BEGIN CERTIFICATE... and ...END CERTIFICATE-----").
4. Copy the certificate to the Minimus SSO form.
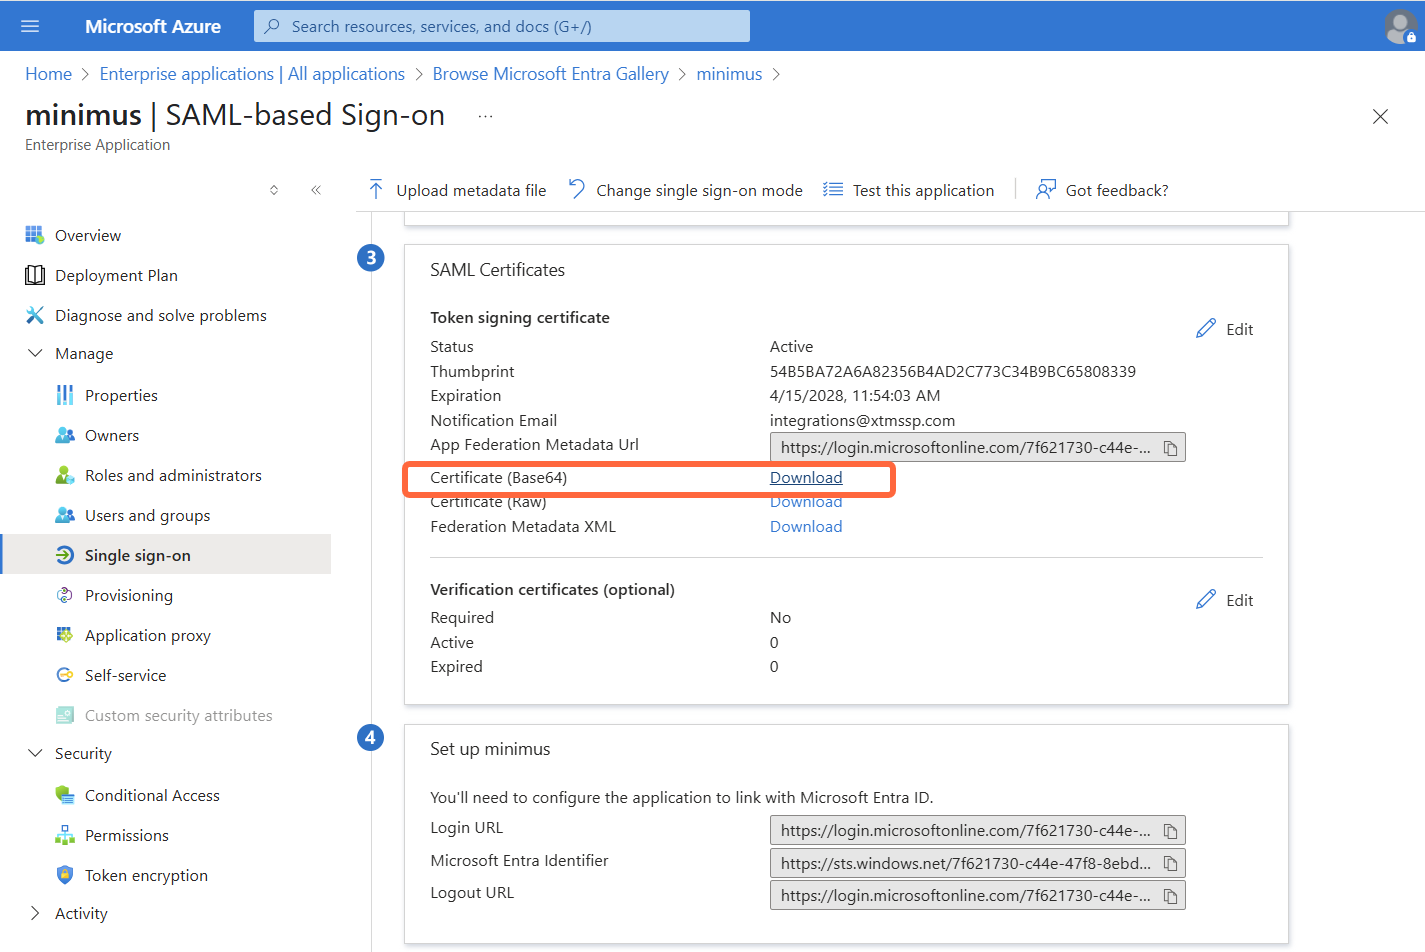
1. In Azure, continue to **Step 3 - SAML Certificates**.
2. Download the **Base64 Certificate**.
3. Open the certificate in notepad or another code viewer, and copy the code (including "-----BEGIN CERTIFICATE... and ...END CERTIFICATE-----").
4. Copy the certificate to the Minimus SSO form.
 1. In Azure, continue to **Step 4 - Set up Minimus**.
2. Copy the Azure **Login URL** to the field **Login SSO URL** in the Minimus SSO form.
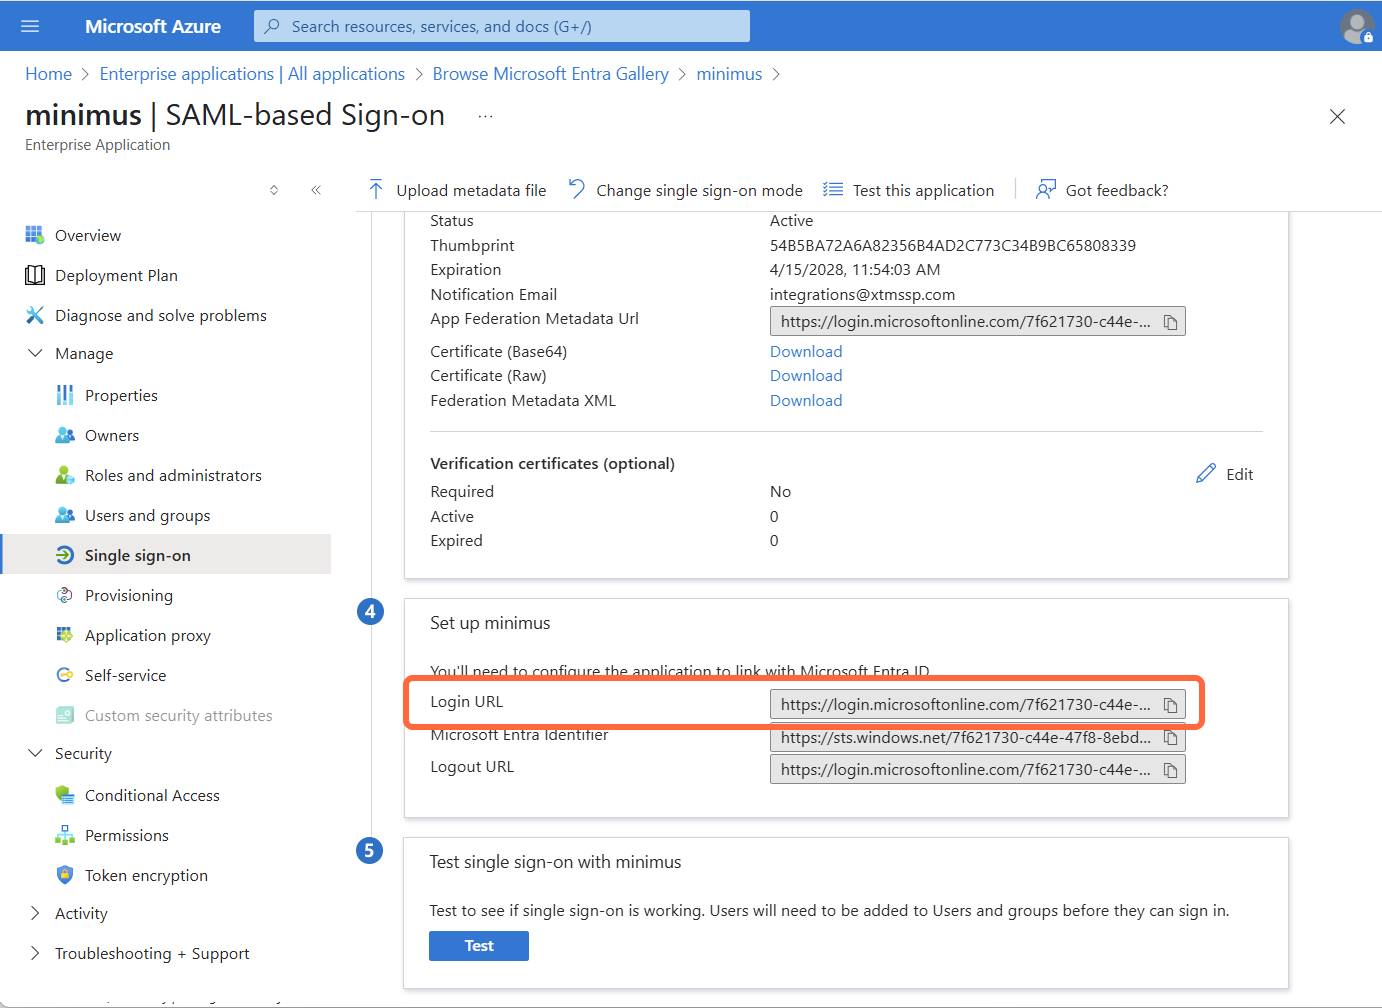
1. In Azure, continue to **Step 4 - Set up Minimus**.
2. Copy the Azure **Login URL** to the field **Login SSO URL** in the Minimus SSO form.
 * If you aren't interested in group mapping, skip to the next step and save the SSO configuration form in Minimus. You are ready to [add SSO users in Minimus](/manage/users).
* If you want to add group mapping, follow the steps below. You have the option to either manage Azure groups by group name or group ID. The configurations are different for each.
## Assign user/group access in Azure
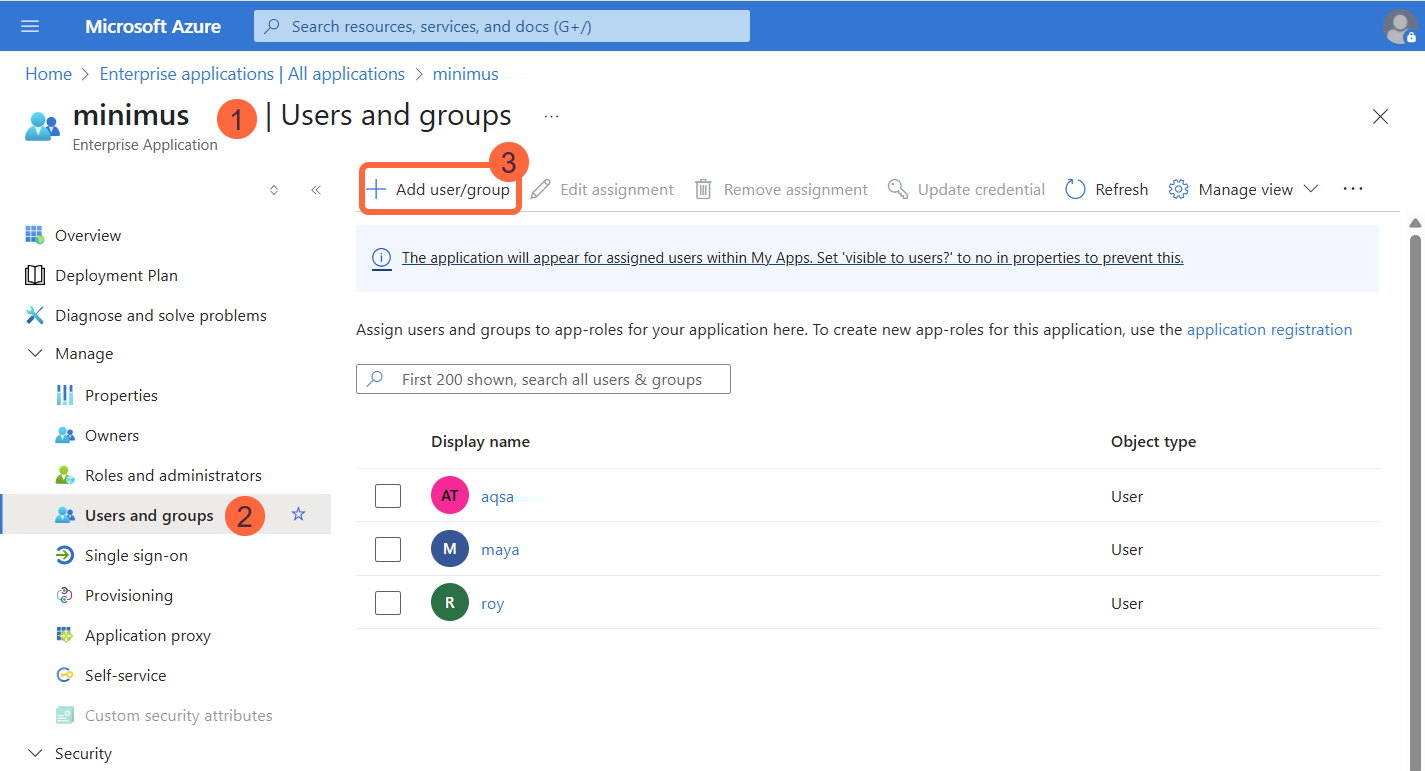
Grant Azure users and/or groups access to Minimus.
1. In Azure, select **Enterprise Applications**.
2. Select your **Minimus App** to open its details.
3. Select **Users and Groups** from the left menu.
4. Select **Add user/group** and follow the instructions on the page.
* If you aren't interested in group mapping, skip to the next step and save the SSO configuration form in Minimus. You are ready to [add SSO users in Minimus](/manage/users).
* If you want to add group mapping, follow the steps below. You have the option to either manage Azure groups by group name or group ID. The configurations are different for each.
## Assign user/group access in Azure
Grant Azure users and/or groups access to Minimus.
1. In Azure, select **Enterprise Applications**.
2. Select your **Minimus App** to open its details.
3. Select **Users and Groups** from the left menu.
4. Select **Add user/group** and follow the instructions on the page.
 ## Manage Azure group names in Minimus
The process involves a few extra steps if you plan to manage Azure group names in Minimus.
These steps are not relevant if you intend to manage Azure groups by *group ID.* Skip these steps if you plan to manage direct user access or Azure group IDs.
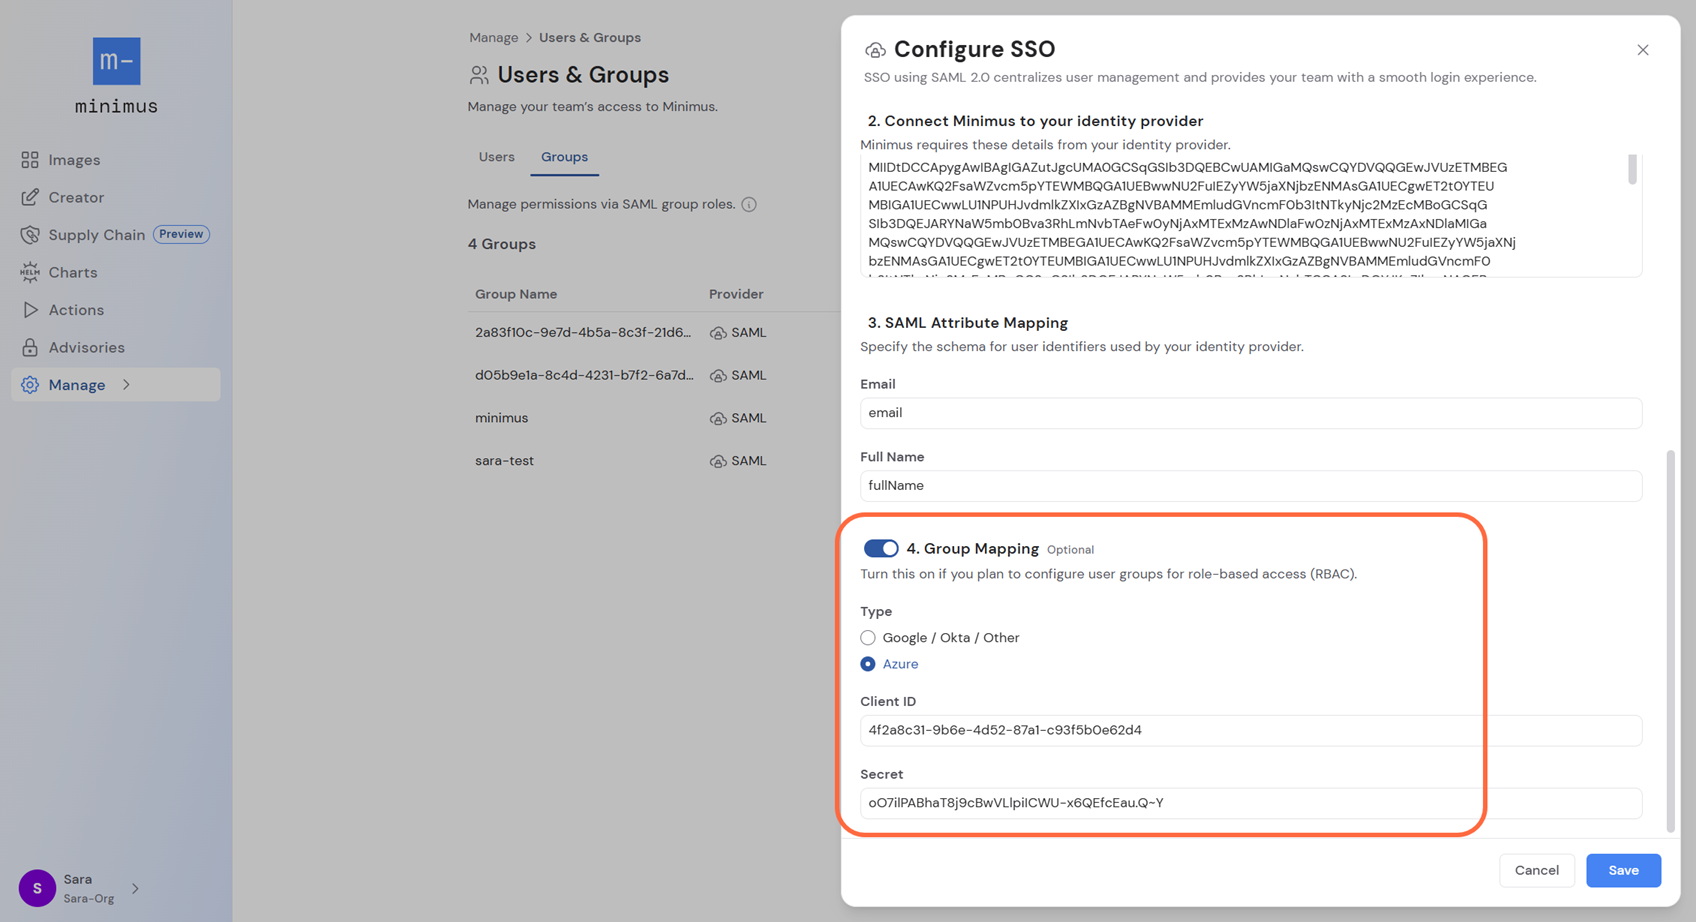
### Enable group mapping in Minimus
1. Open the Minimus SSO form ([direct link](https://images.minimus.io/manage/access/users?saml=open))
2. Enable **Step 4: Group Mapping**.
3. Select: **Azure**
4. Fill out the following Azure parameters:
* **Application ID** (also shown as **Application (client) ID** depending on where you look it up in Azure)
* **Client Secret** (see the next steps)
5. Save the Minimus SSO form.
## Manage Azure group names in Minimus
The process involves a few extra steps if you plan to manage Azure group names in Minimus.
These steps are not relevant if you intend to manage Azure groups by *group ID.* Skip these steps if you plan to manage direct user access or Azure group IDs.
### Enable group mapping in Minimus
1. Open the Minimus SSO form ([direct link](https://images.minimus.io/manage/access/users?saml=open))
2. Enable **Step 4: Group Mapping**.
3. Select: **Azure**
4. Fill out the following Azure parameters:
* **Application ID** (also shown as **Application (client) ID** depending on where you look it up in Azure)
* **Client Secret** (see the next steps)
5. Save the Minimus SSO form.
 ### Configure API permissions
1. In Azure, search for **App Registrations**.
2. Select the enterprise application you created in the previous steps. (We assume you named it **Minimus App**).
3. Authorize your app to call APIs:
### Configure API permissions
1. In Azure, search for **App Registrations**.
2. Select the enterprise application you created in the previous steps. (We assume you named it **Minimus App**).
3. Authorize your app to call APIs:
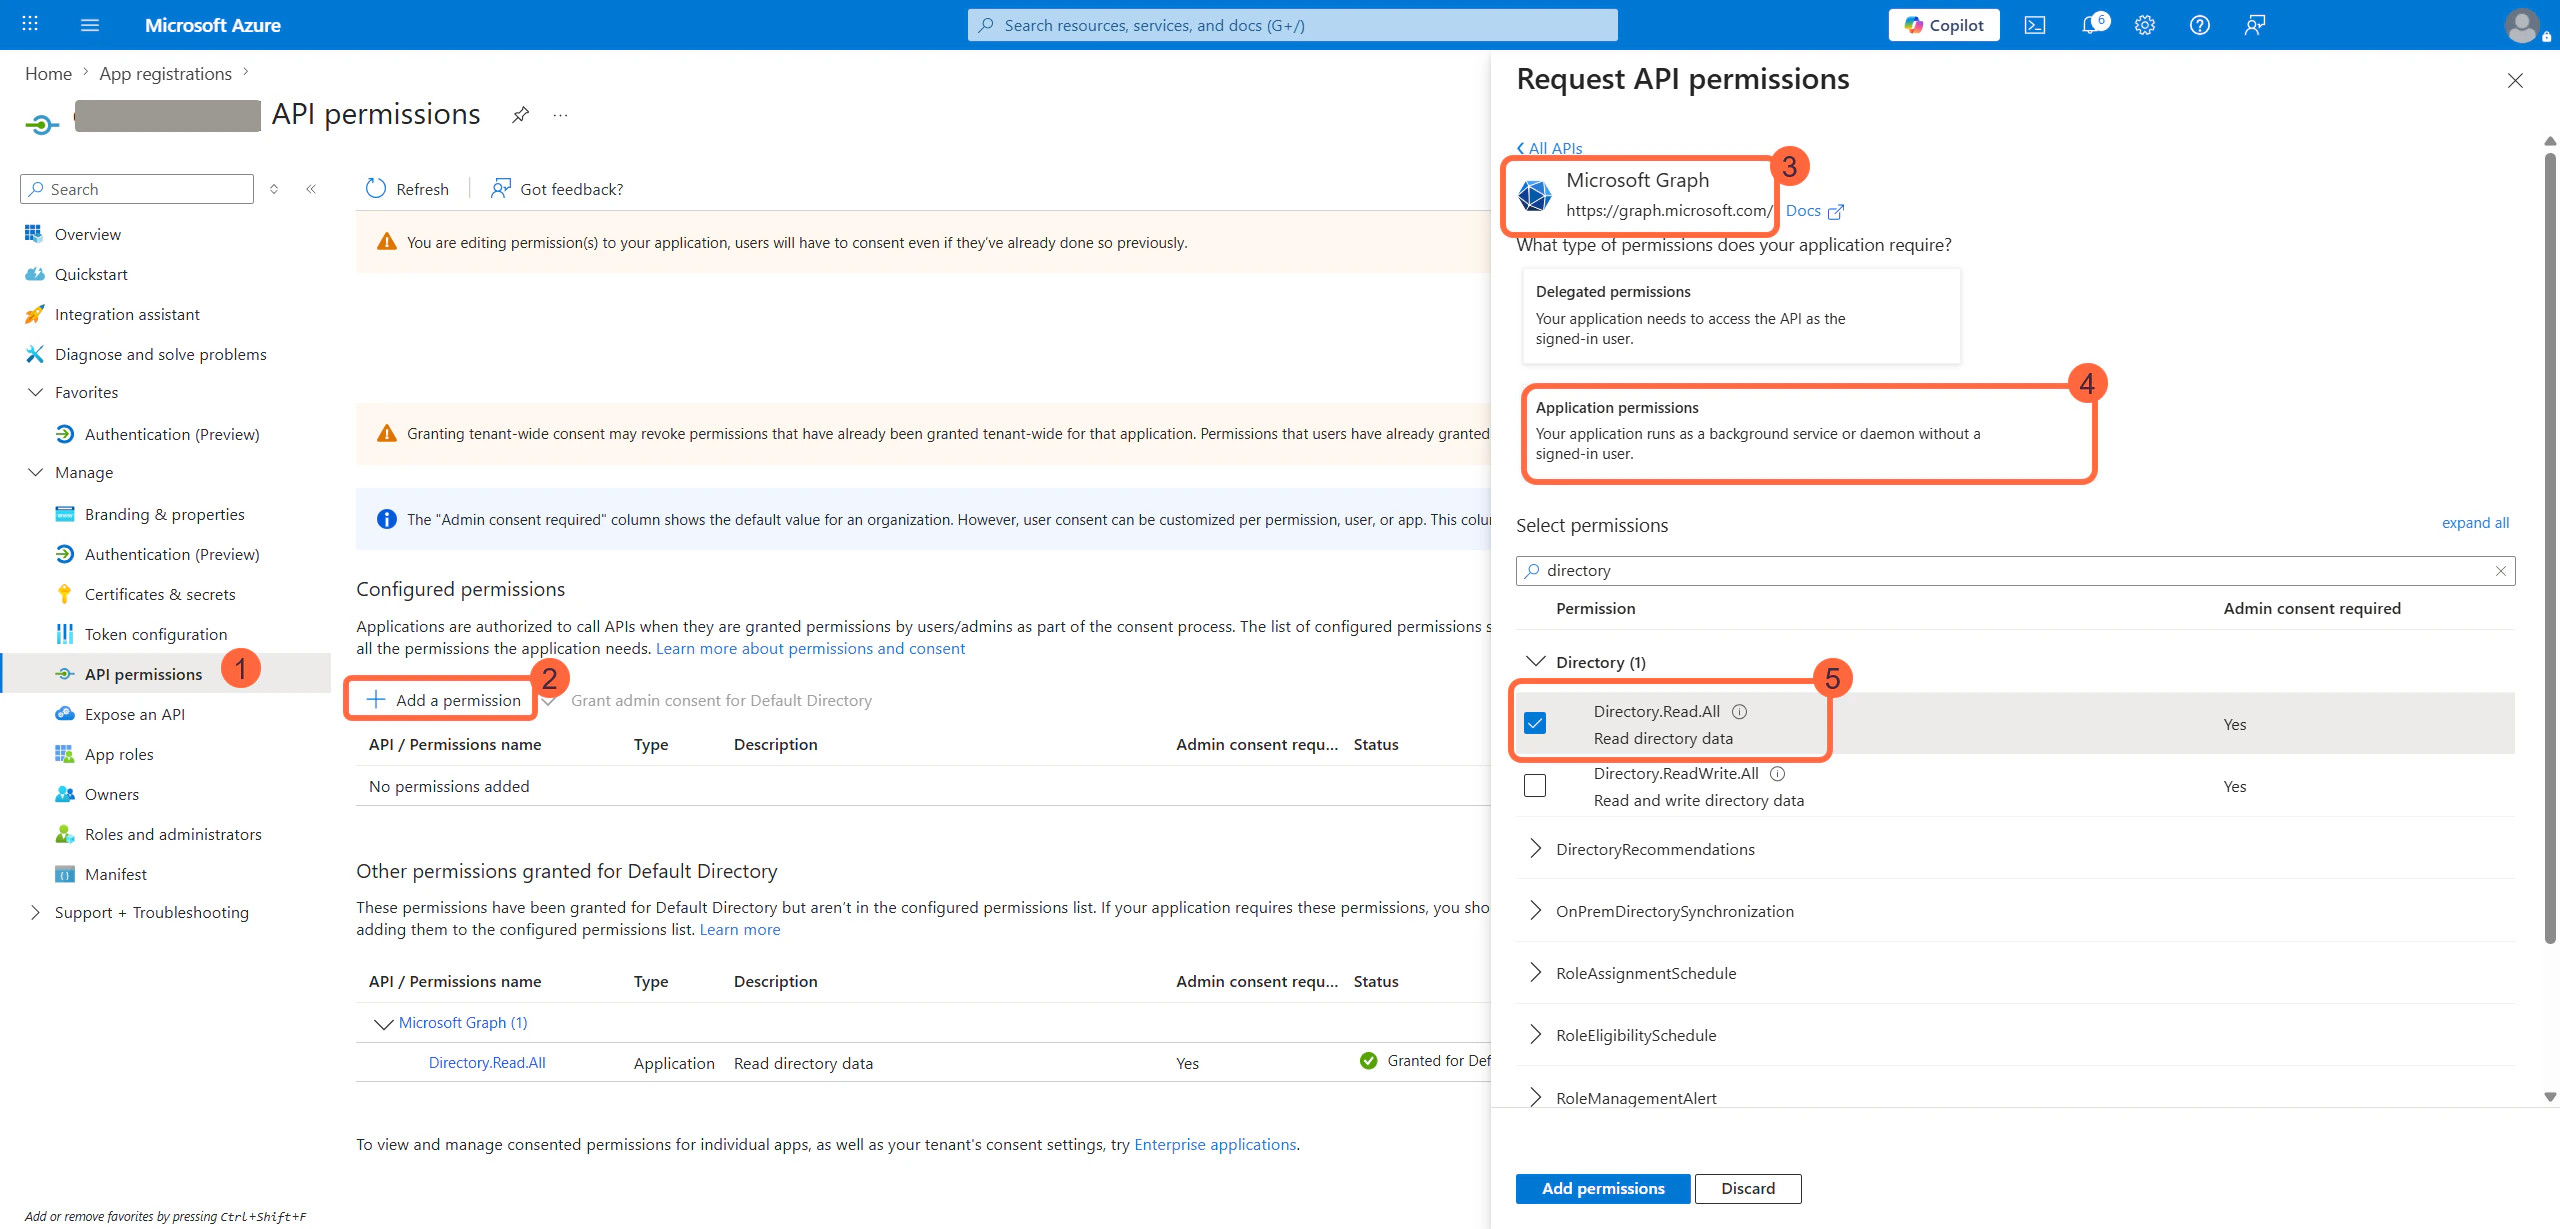 1. Select **API Permissions** from the left menu.
2. Select **Add a permission.**
3. Select **Microsoft Graph** (It will be the top option under the default tab, **Microsoft APIs**).
4. Select **Application permissions.**
5. Search for "directory" and select **Directory.Read.All.**
6. Click **add permissions** to save your changes.
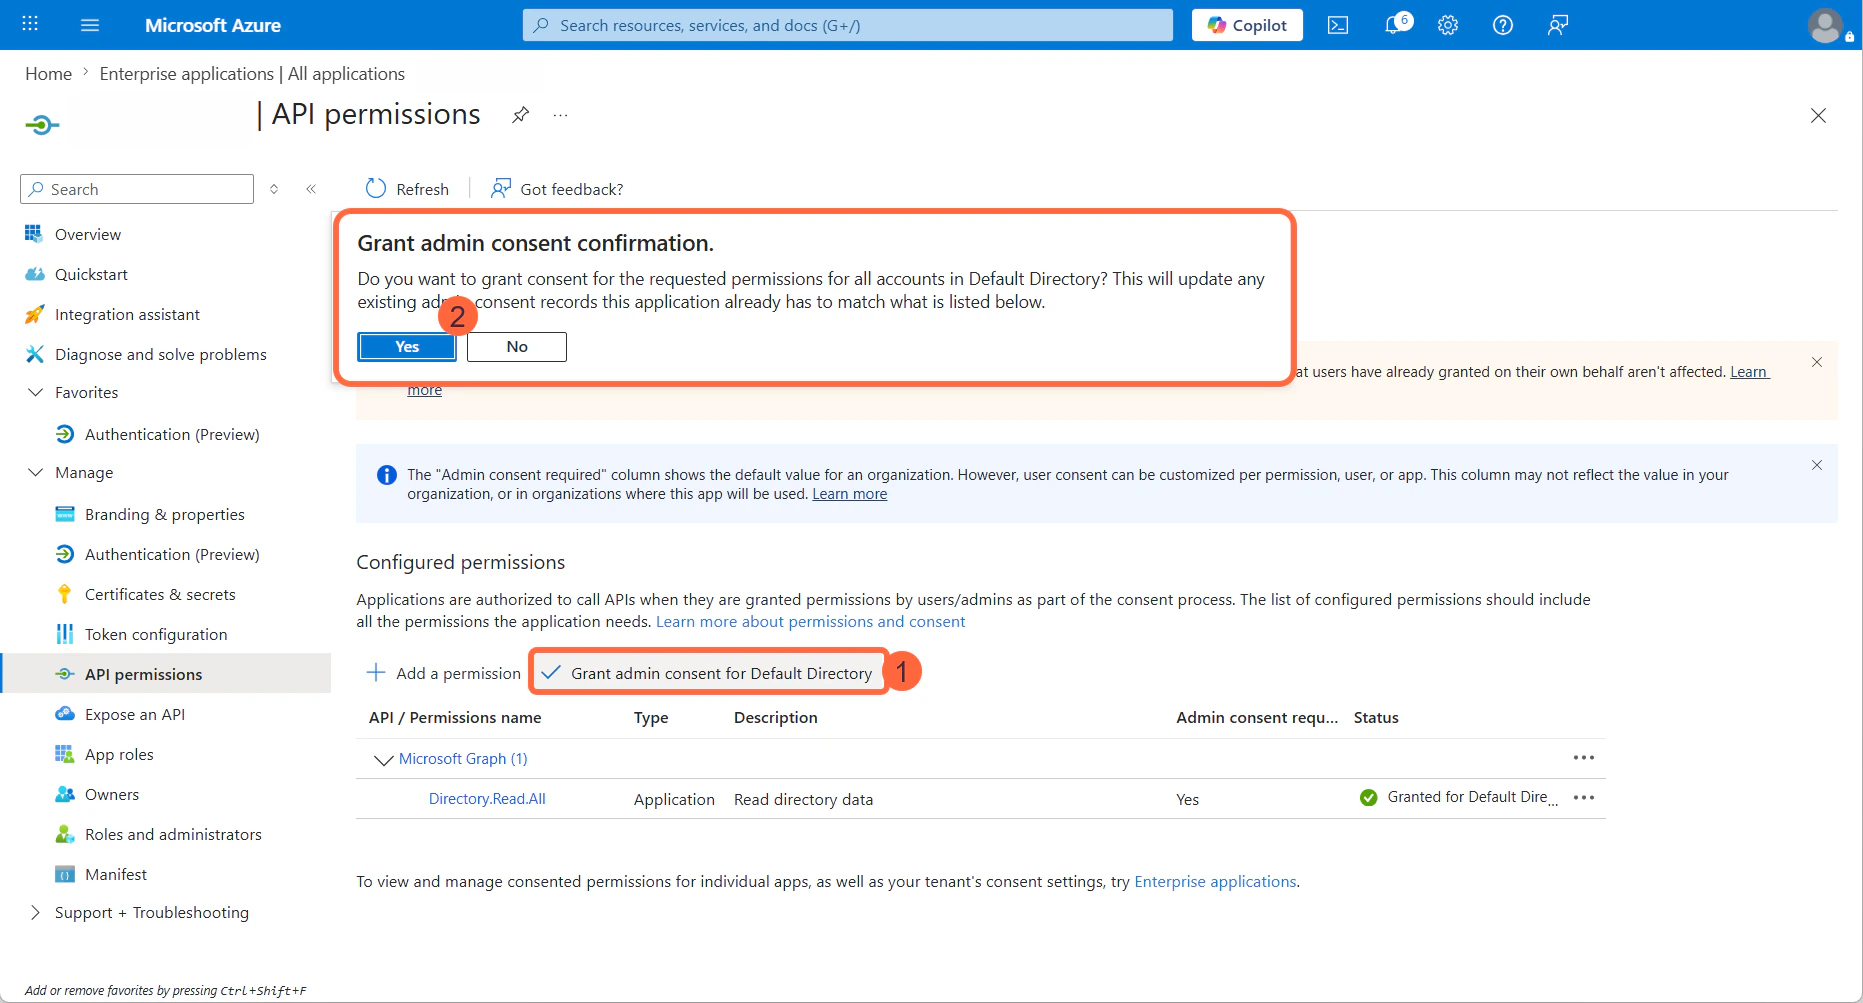
4. In the same window, select **grant admin consent for Default Directory** and confirm your selection.
1. Select **API Permissions** from the left menu.
2. Select **Add a permission.**
3. Select **Microsoft Graph** (It will be the top option under the default tab, **Microsoft APIs**).
4. Select **Application permissions.**
5. Search for "directory" and select **Directory.Read.All.**
6. Click **add permissions** to save your changes.
4. In the same window, select **grant admin consent for Default Directory** and confirm your selection.
 ### Generate client secret
You will need to generate a client secret and save it in the Minimus SSO form.
1. In Azure, search for **App Registrations**.
2. Select the enterprise application you created in the previous steps. (We assume you named it **Minimus App**).
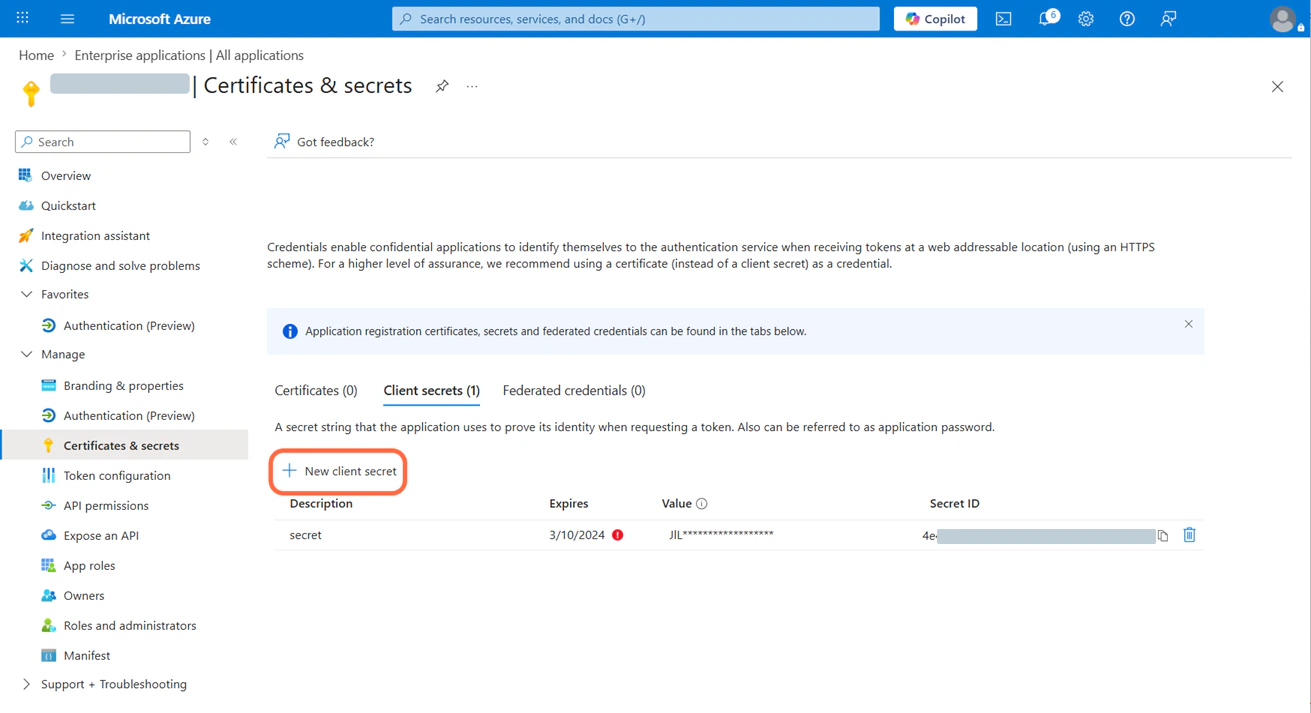
3. Select **certificates & secrets** from the left menu.
4. Select **+ New client secret**.
5. Set the secret's expiration, add a description (optional), and save the secret.
6. Copy the secret's value and save it immediately in the Minimus SSO form.
Once the page is refreshed the value will no longer be retrievable. If needed, you can always create a new client secret.
### Generate client secret
You will need to generate a client secret and save it in the Minimus SSO form.
1. In Azure, search for **App Registrations**.
2. Select the enterprise application you created in the previous steps. (We assume you named it **Minimus App**).
3. Select **certificates & secrets** from the left menu.
4. Select **+ New client secret**.
5. Set the secret's expiration, add a description (optional), and save the secret.
6. Copy the secret's value and save it immediately in the Minimus SSO form.
Once the page is refreshed the value will no longer be retrievable. If needed, you can always create a new client secret.
 ### Add Azure group names in Minimus
1. In Azure, look up your Azure groups. You can search for "groups" in the top searchbar.
### Add Azure group names in Minimus
1. In Azure, look up your Azure groups. You can search for "groups" in the top searchbar.
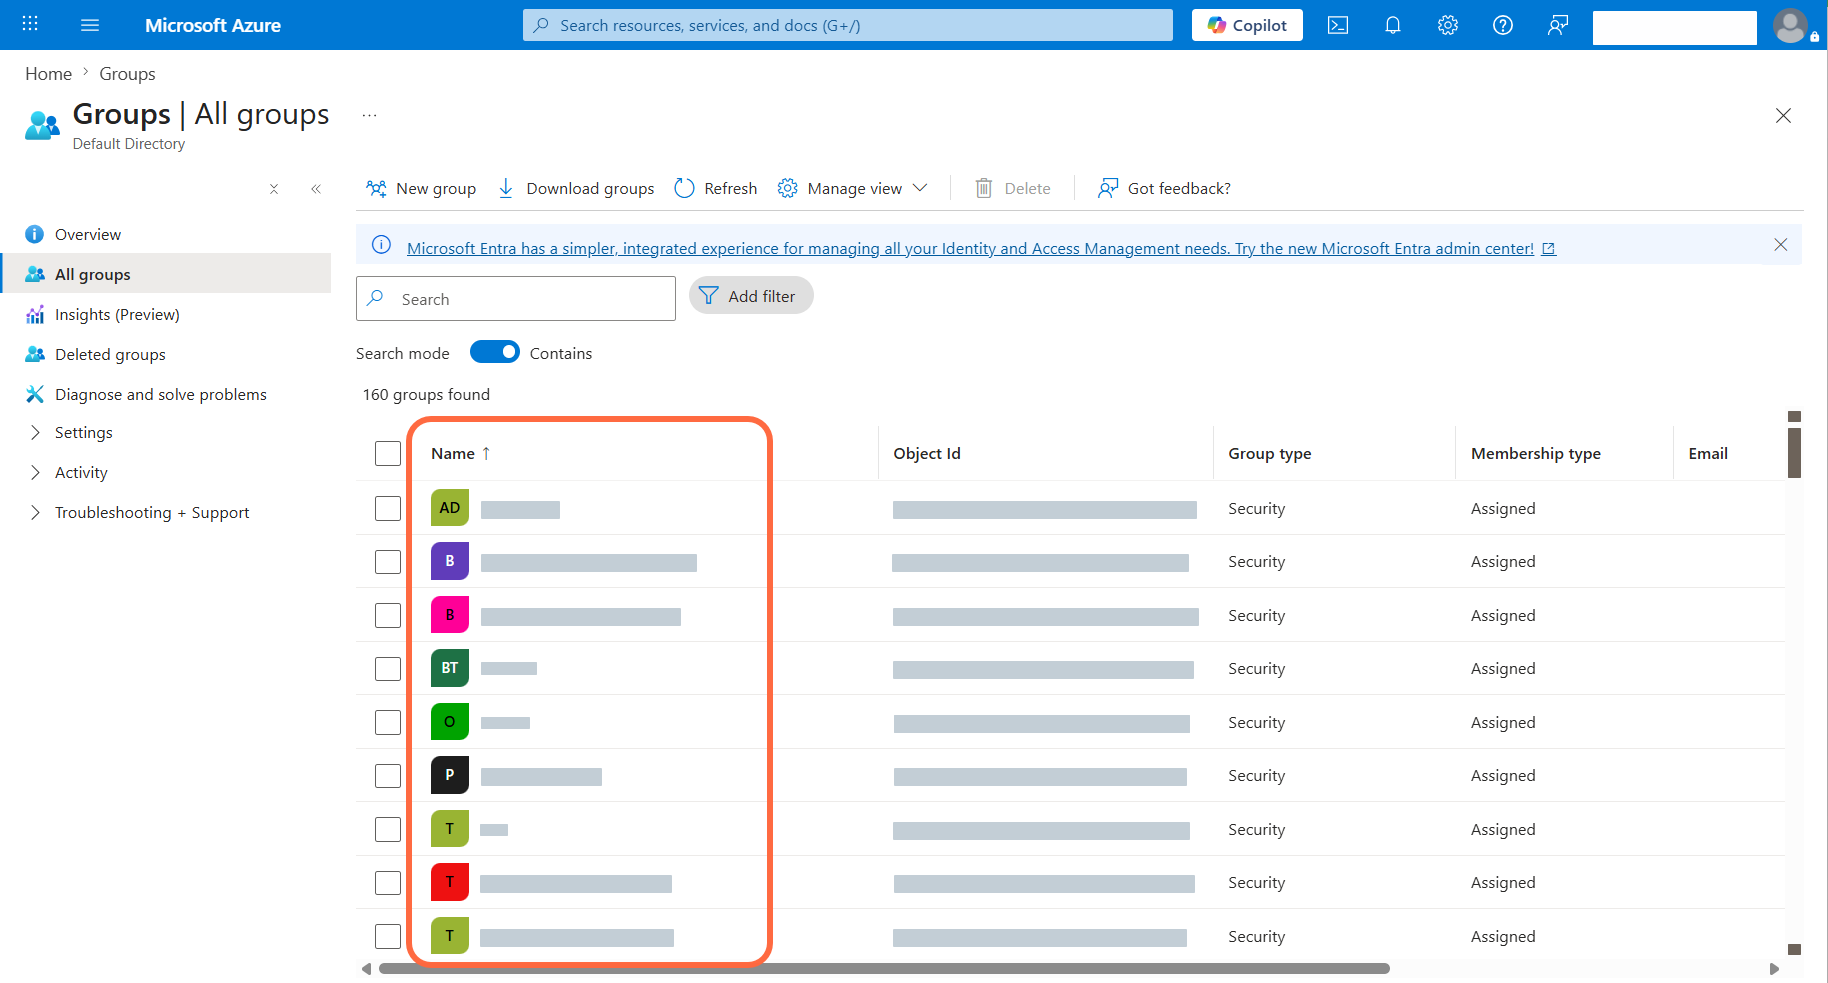 2. In the Minimus Groups form ([direct link](https://images.minimus.io/manage/access/groups)), add the groups by group name.
## Manage Azure group IDs in Minimus
The process involves a few extra steps if you plan to manage Azure group IDs in Minimus.
These steps are not relevant if you intend to manage Azure groups by *group name.* Skip these steps if you plan to manage direct user access or Azure group names.
### Add group claim
1. In Azure, search for **Enterprise Applications**
2. Select your app
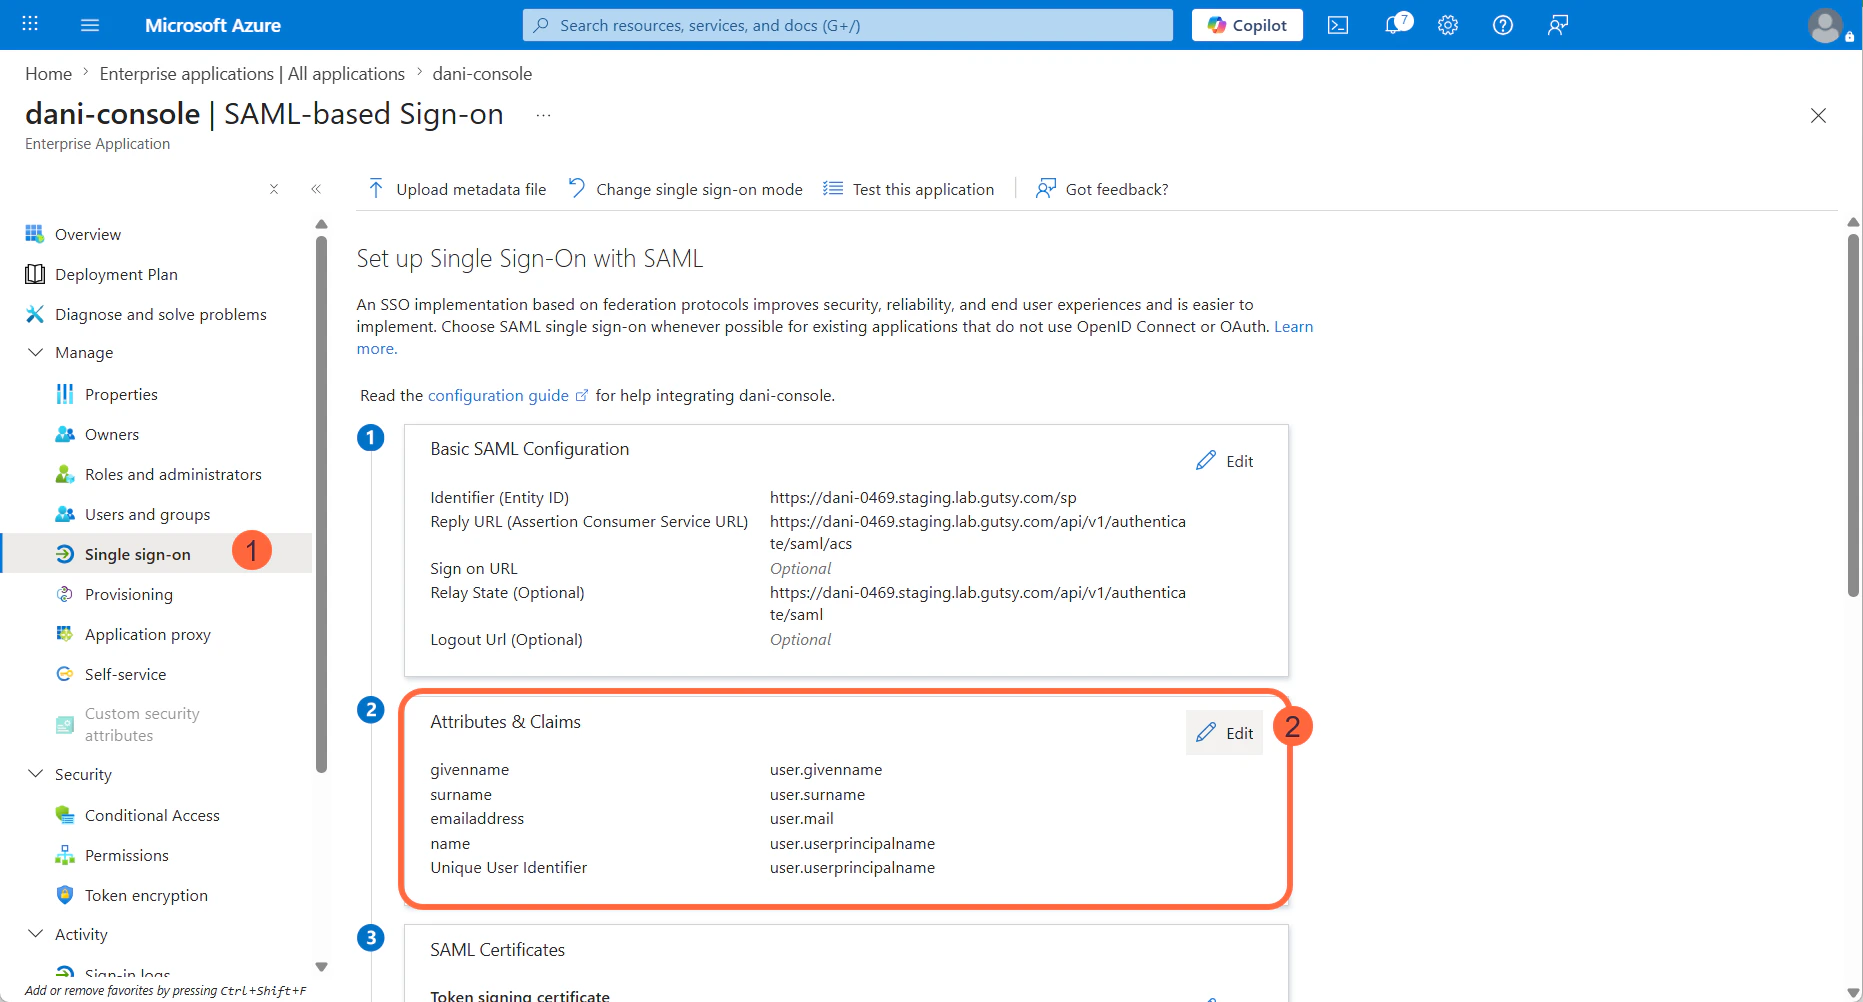
3. Select **single sign on** from the left menu
4. Select **edit** in **attributes & claims**
2. In the Minimus Groups form ([direct link](https://images.minimus.io/manage/access/groups)), add the groups by group name.
## Manage Azure group IDs in Minimus
The process involves a few extra steps if you plan to manage Azure group IDs in Minimus.
These steps are not relevant if you intend to manage Azure groups by *group name.* Skip these steps if you plan to manage direct user access or Azure group names.
### Add group claim
1. In Azure, search for **Enterprise Applications**
2. Select your app
3. Select **single sign on** from the left menu
4. Select **edit** in **attributes & claims**
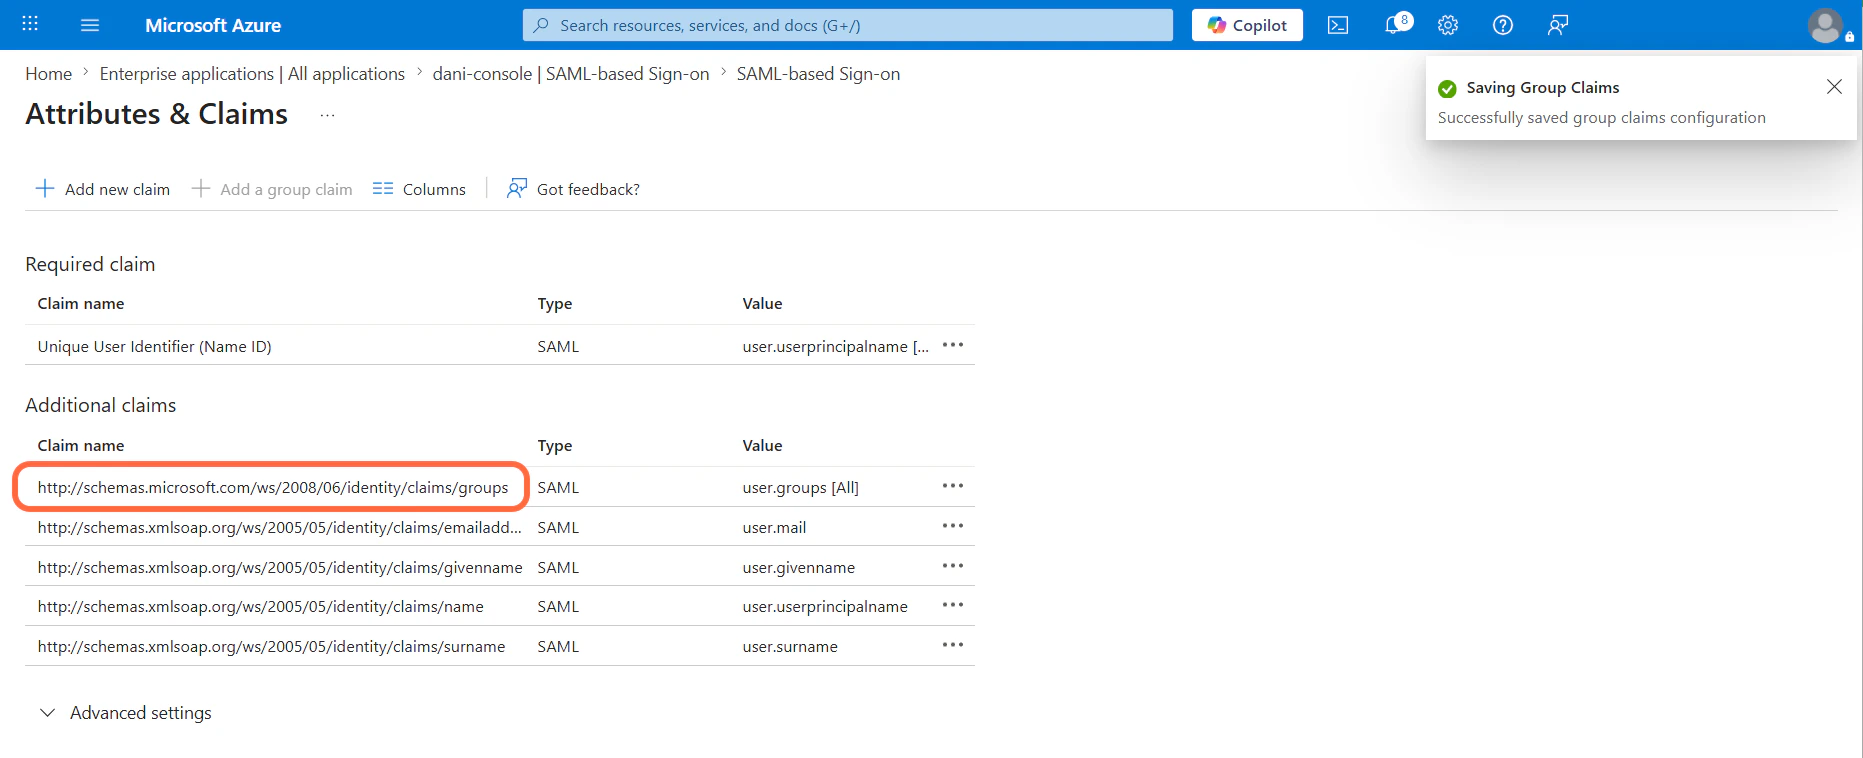
 5. Select **add a group claim**. A form will appear to the right:
1. Select the relevant groups. You can select **all groups** or another option. There are advanced options as well to filter out specific groups, etc.
2. Save your group claim.
5. Select **add a group claim**. A form will appear to the right:
1. Select the relevant groups. You can select **all groups** or another option. There are advanced options as well to filter out specific groups, etc.
2. Save your group claim.
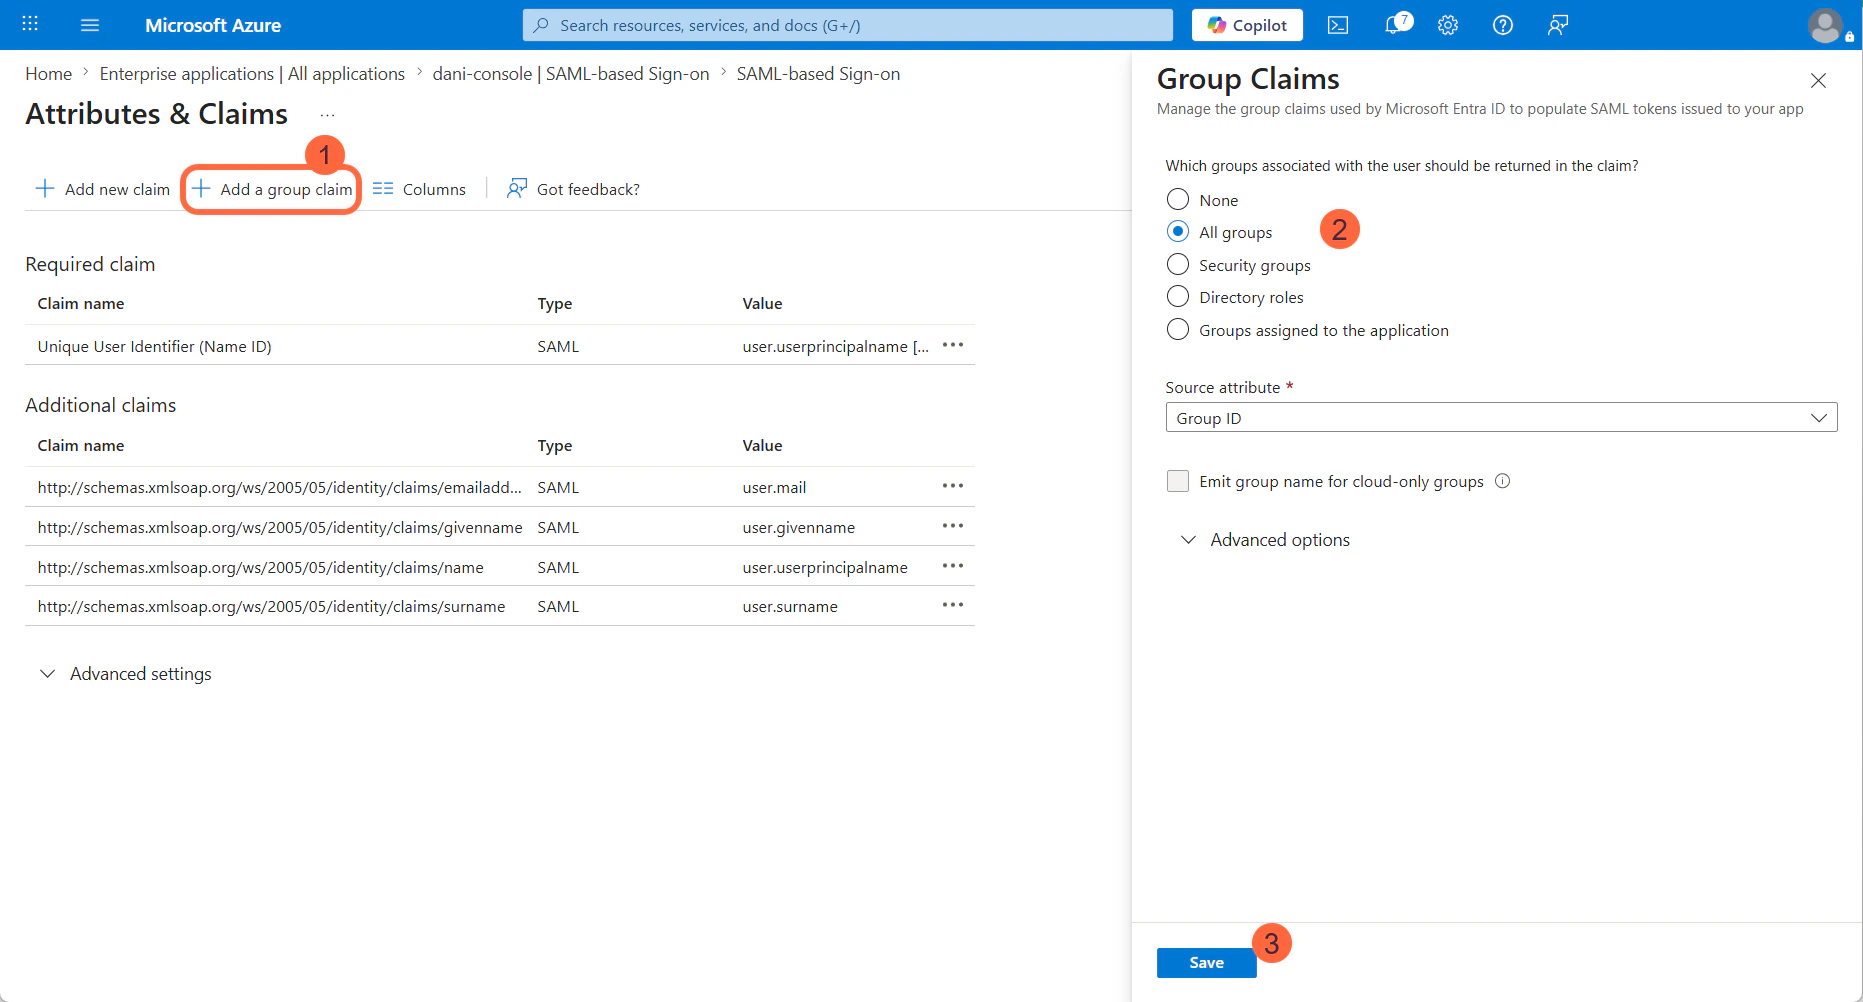 6. The new group claim will be added to the list. Its format is fixed: `http://schemas.microsoft.com/ws/2008/06/identity/claims/groups`
 ### Enable group mapping in Minimus
1. Open the Minimus SSO form ([direct link](https://images.minimus.io/manage/access/users?saml=open))
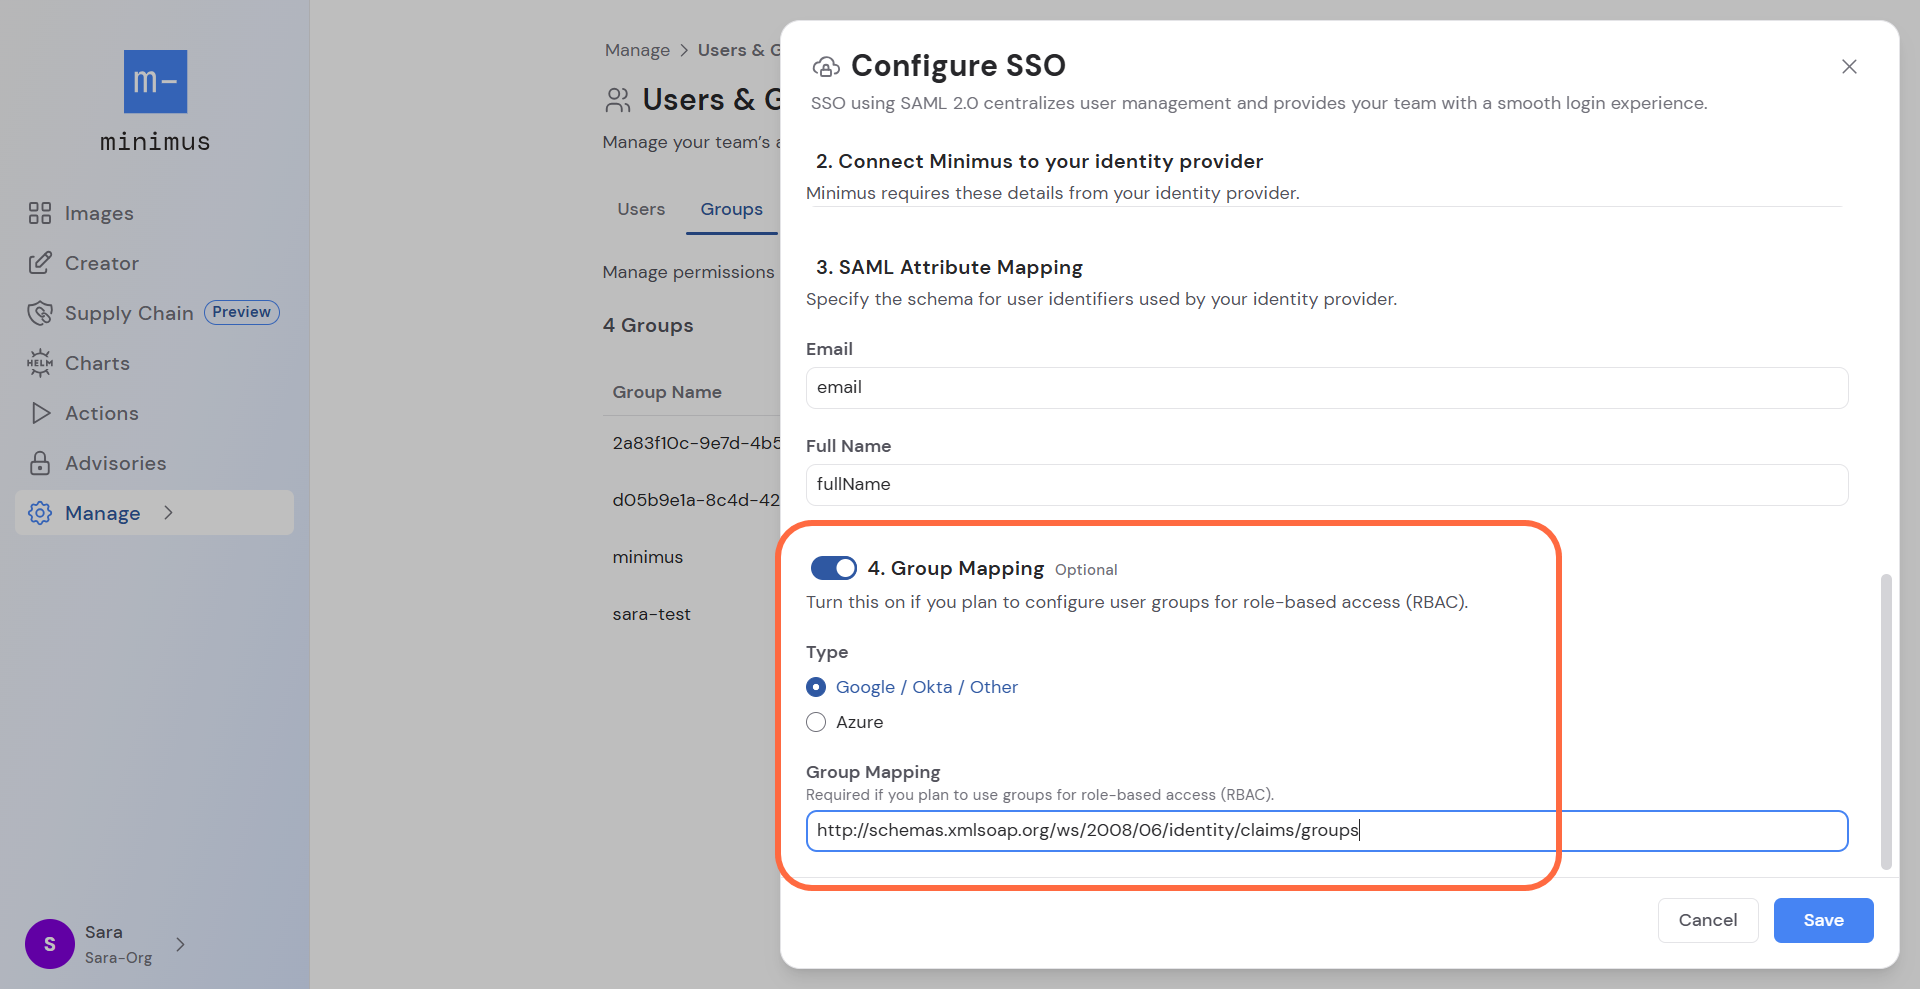
2. Enable **Step 4: Group Mapping**.
3. Keep the default selection: **Google / Okta / Other**
4. Paste in the Azure group mapping:
```shellscript theme={null}
http://schemas.xmlsoap.org/ws/2008/06/identity/claims/groups
```
5. Save the Minimus SSO form.
### Enable group mapping in Minimus
1. Open the Minimus SSO form ([direct link](https://images.minimus.io/manage/access/users?saml=open))
2. Enable **Step 4: Group Mapping**.
3. Keep the default selection: **Google / Okta / Other**
4. Paste in the Azure group mapping:
```shellscript theme={null}
http://schemas.xmlsoap.org/ws/2008/06/identity/claims/groups
```
5. Save the Minimus SSO form.
 ### Add Azure group IDs in Minimus
1. In Azure, look up your Azure groups. You can search for "groups" in the top searchbar.
### Add Azure group IDs in Minimus
1. In Azure, look up your Azure groups. You can search for "groups" in the top searchbar.
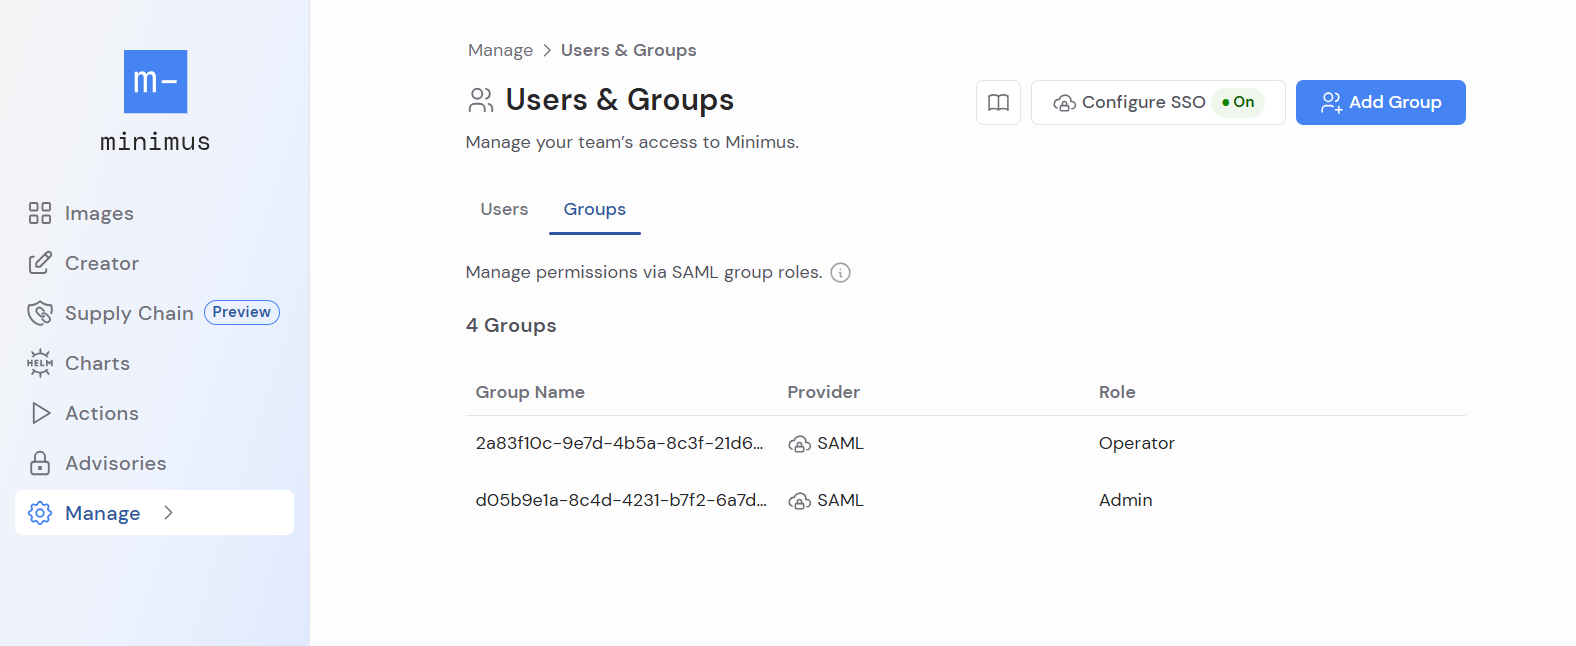
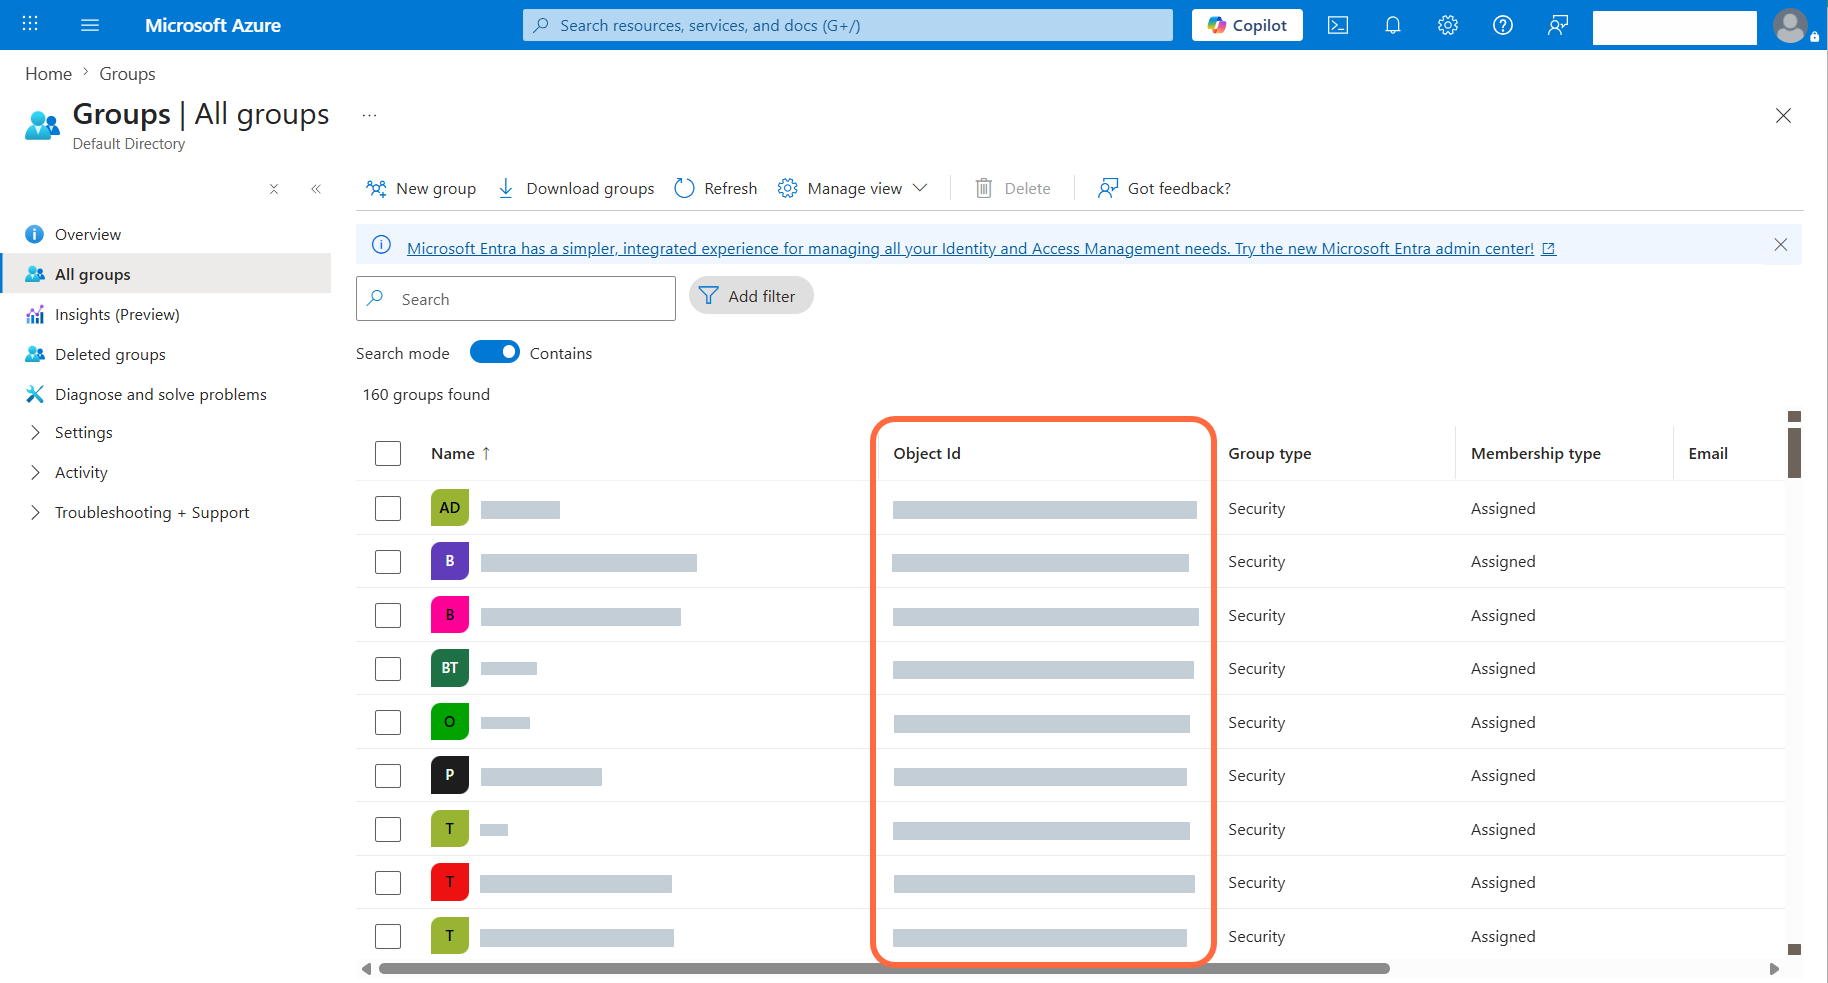 2. In the Minimus Groups form ([direct link](https://images.minimus.io/manage/access/groups)), add the groups by Azure group ID.
 ## Troubleshooting SSO access
When copying the certificate to Minimus, make sure there is no whitespace before or after the certificate. Also, check that the expected prefix and suffix are included.
```text theme={null}
-----BEGIN CERTIFICATE-----
-----END CERTIFICATE-----
```
## Troubleshooting SSO access
When copying the certificate to Minimus, make sure there is no whitespace before or after the certificate. Also, check that the expected prefix and suffix are included.
```text theme={null}
-----BEGIN CERTIFICATE-----
-----END CERTIFICATE-----
```