> ## Documentation Index
> Fetch the complete documentation index at: https://docs.minimus.io/llms.txt
> Use this file to discover all available pages before exploring further.
# Google SSO
> Configure single-sign-on (SSO) for Minimus via Google
Add single-sign-on (SSO) to Minimus in Google Workspace Admin Console, by configuring Minimus as a custom SAML app.
## Prepare the SSO form in Minimus
1. Go to **Manage** > **Users & Groups** ([direct link](https://images.minimus.io/manage/access/users?saml=open))
2. Click **Configure SSO** at the top of the page to open the Minimus SSO form.
Keep this form open and available in another browser tab as you configure the SAML app in Azure.
3. The form has 4 parts:
1. **Configure Minimus as a custom app in your identity provider** - You will copy these parameters from Minimus to Google in the next steps.
1. SP Entity ID
2. Reply URL (Callback / ACS URL)
3. Relay State (optional) - If you leave the Relay State blank, users will only be able to login with SSO from the Minimus homepage.
2. **Connect Minimus to your identity provider** - You will fetch these parameters from your Google custom app and save them to the Minimus form.
1. Login SSO URL
2. IdP Entity ID
3. Certificate
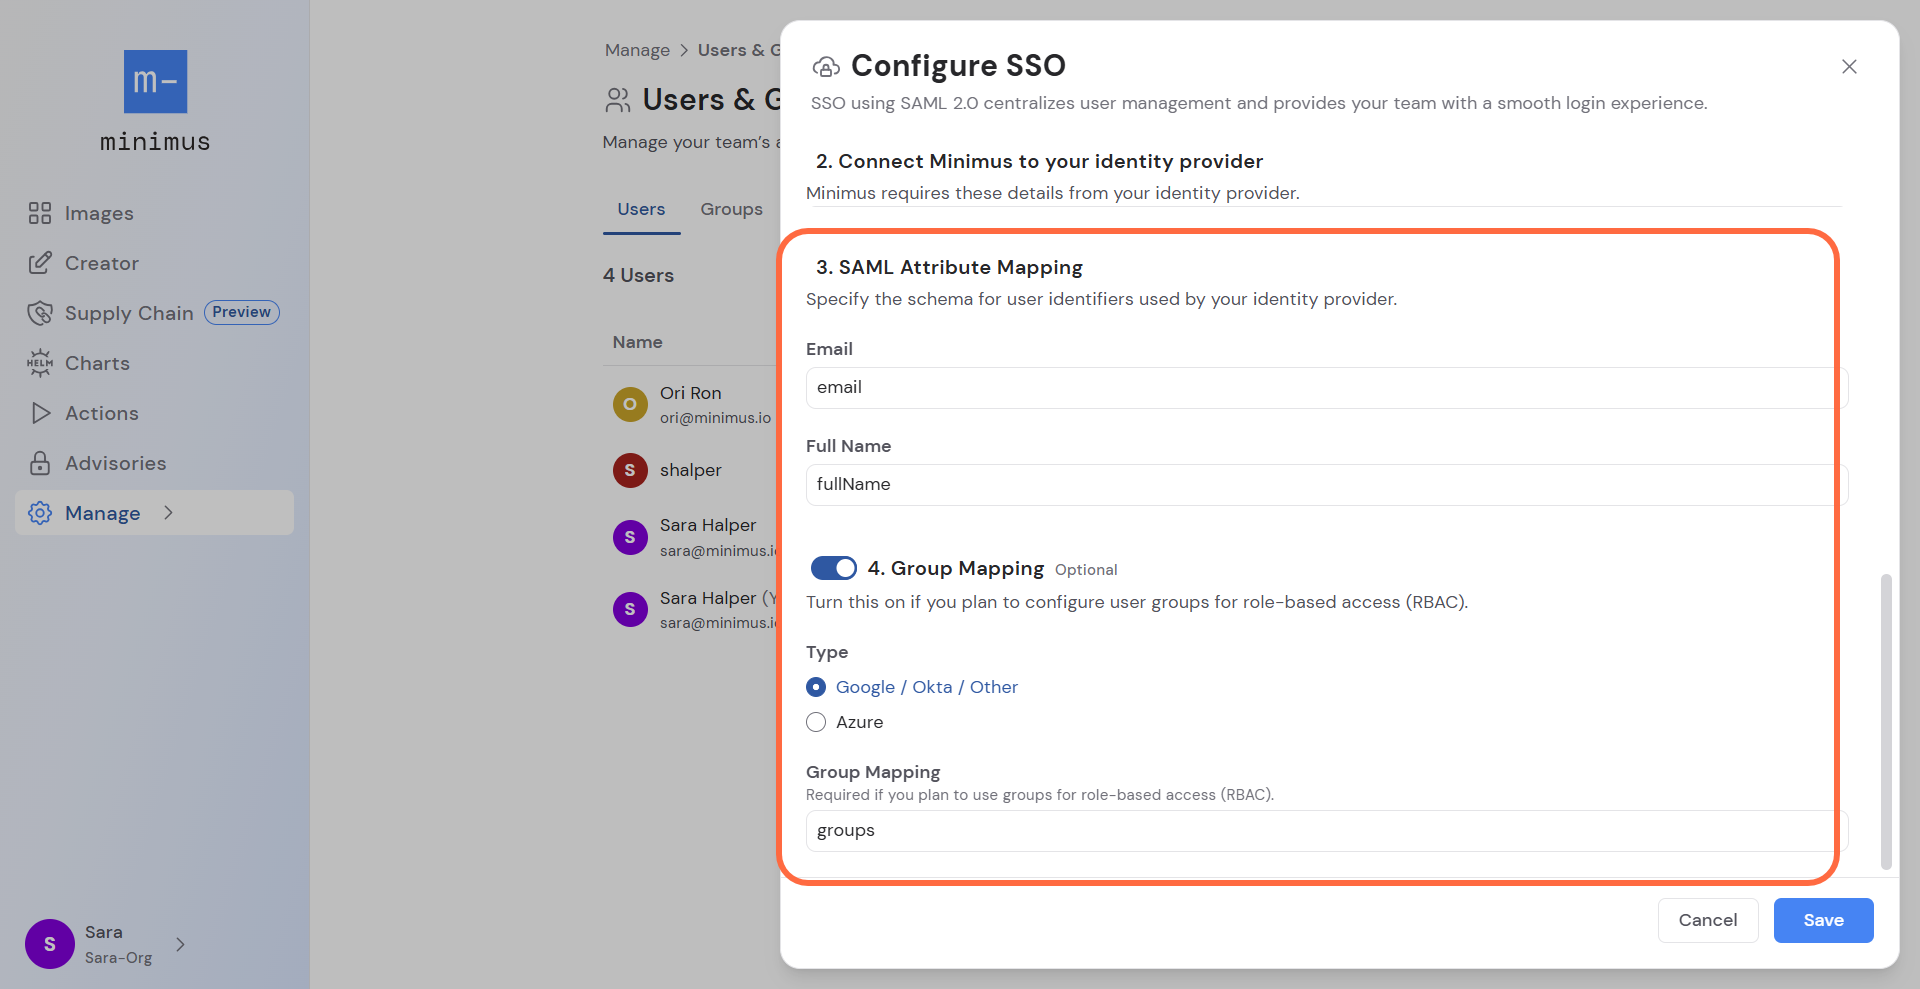
3. **SAML Attribute Mapping** - Google uses the standard AD claim formats.
1. **Email** - input `email` (in lowercase).
2. **Full name** **-** input `firstName` (Note the camel case).
4. **Group Mapping** is optional and can be enabled if you plan to configure user groups. [See the instructions in user groups](https://docs.minimus.io/manage/user-groups).
## Add Minimus as a custom app in Google
1. Login to your Google Workspace Admin Console.
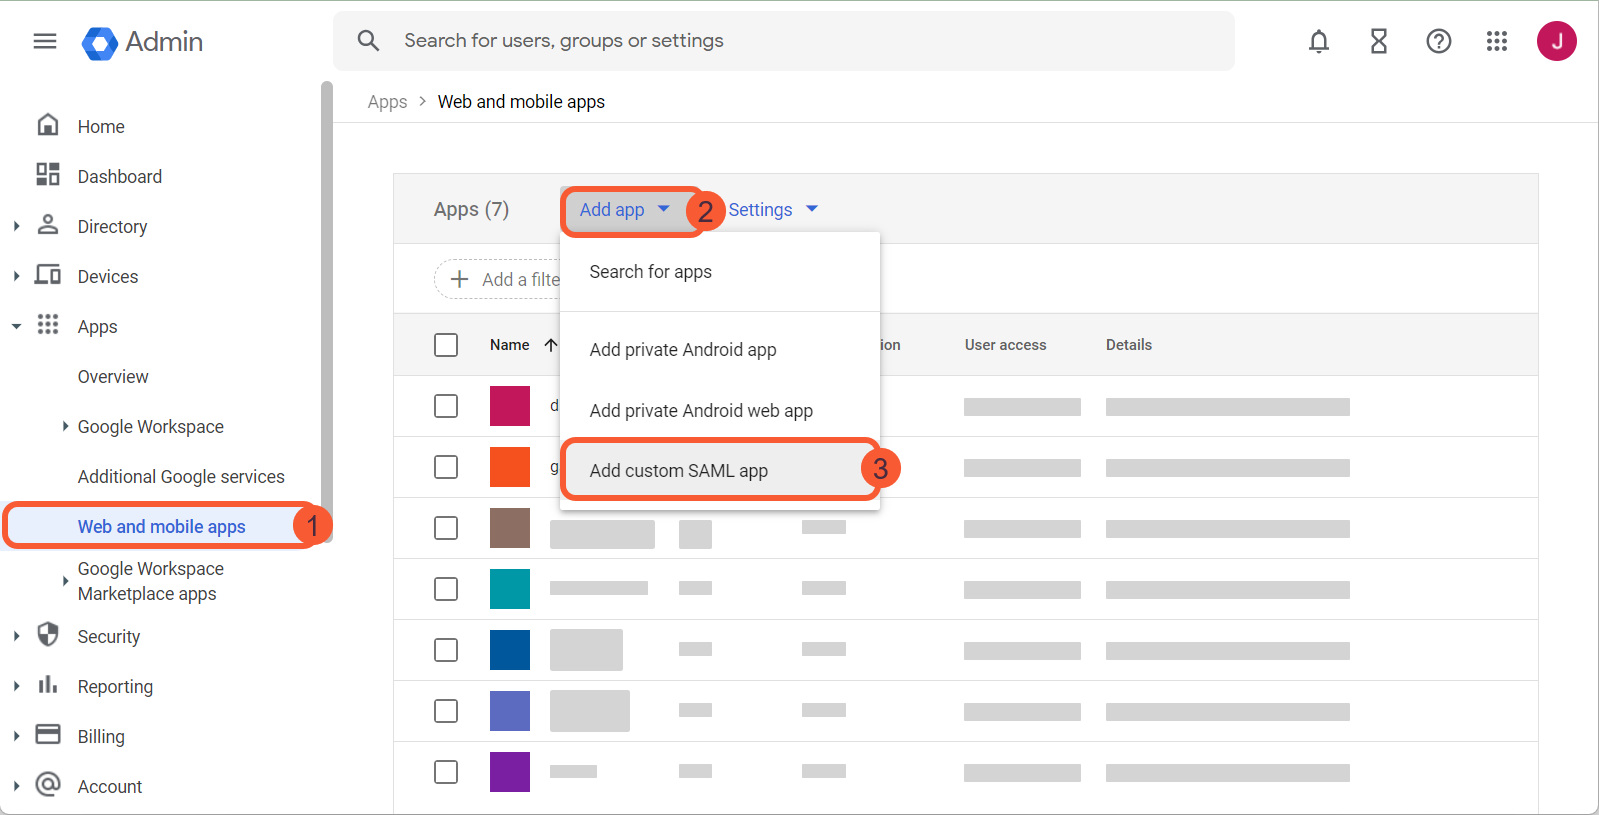
2. In the left-menu, go to **Apps > Web and mobile apps**
3. Select the option **+Add app >Add custom SAML app**
 Fill out the **App details**:
1. Name the application. (We'll assume the name **Minimus App** was used for the rest of this guide.)
2. (Optional) Add a description.
3. (Optional) Upload the Minimus logo to help your team identify the app in their app gallery. (This is not required but highly recommended.)
4. **Continue** to the next step.
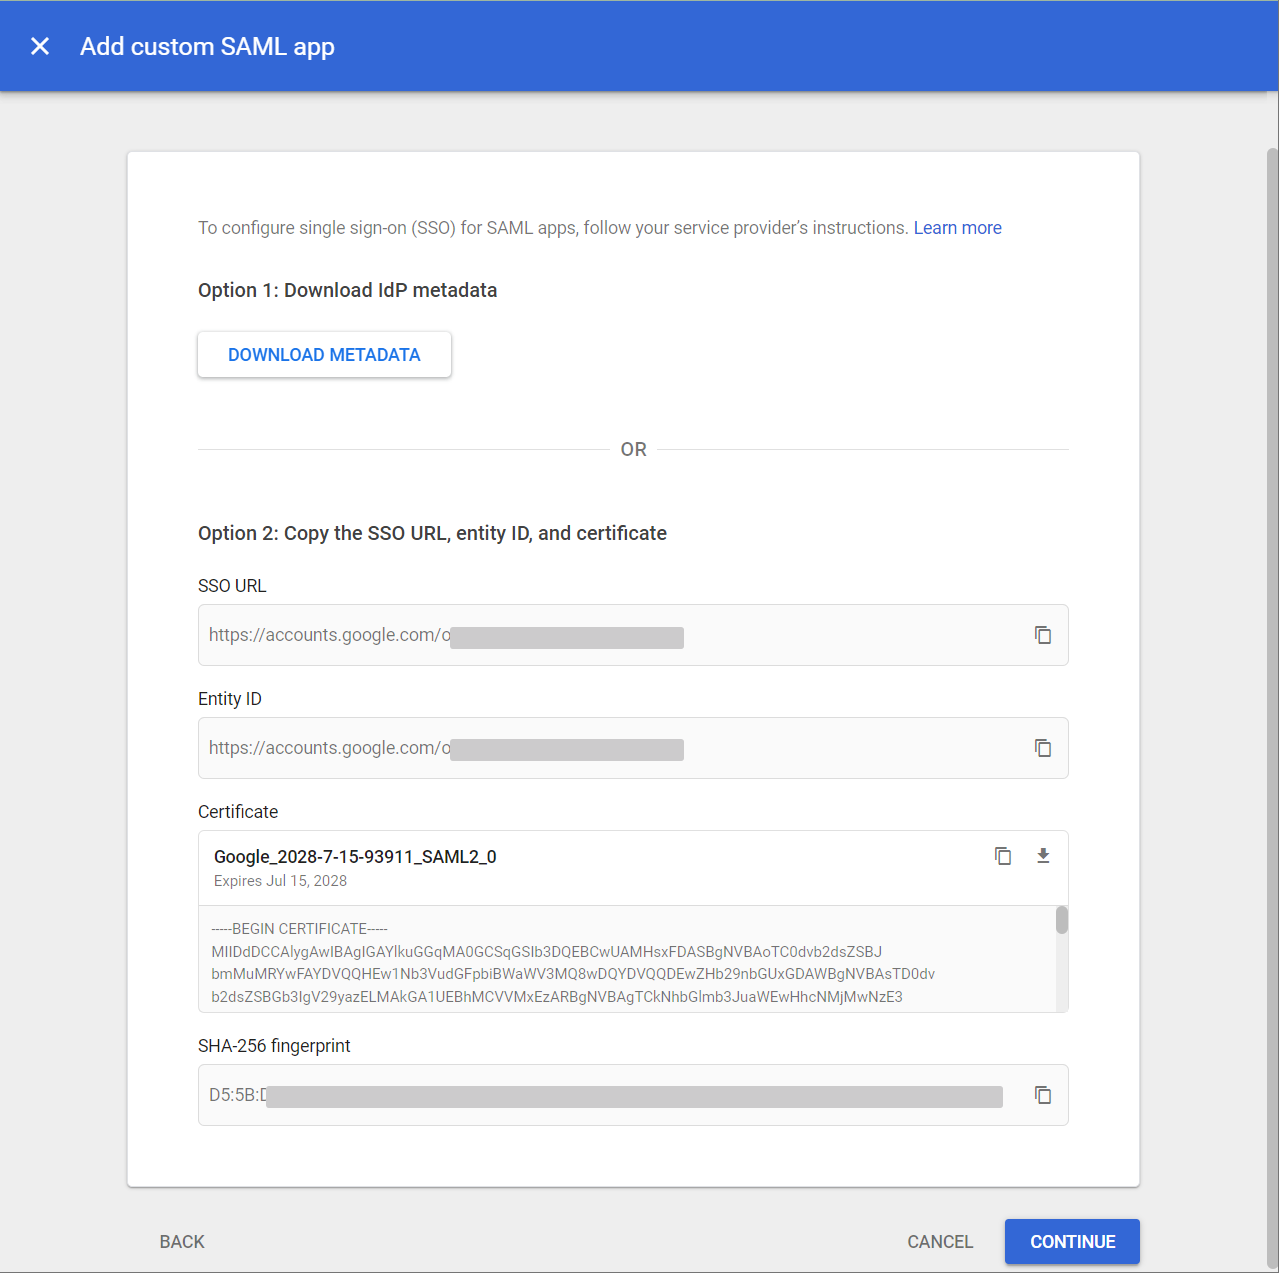
Copy the metadata from Google to Minimus:
1. Open the Minimus SSO form in another browser tab. You can use this [direct link](https://images.minimus.io/manage/access/users?saml=open) or navigate as follows: Go to **Manage** > **Users & Groups**. Then click **Configure SSO** at the top of the page.
2. Copy the following parameters from Google to Minimus:
| Copy from Google | Paste in Minimus |
| :--------------- | :--------------- |
| SSO URL | Login URL |
| Entity ID | IdP Entity ID |
| Certificate | Certificate |
You can also download the details if you prefer.
Fill out the **App details**:
1. Name the application. (We'll assume the name **Minimus App** was used for the rest of this guide.)
2. (Optional) Add a description.
3. (Optional) Upload the Minimus logo to help your team identify the app in their app gallery. (This is not required but highly recommended.)
4. **Continue** to the next step.
Copy the metadata from Google to Minimus:
1. Open the Minimus SSO form in another browser tab. You can use this [direct link](https://images.minimus.io/manage/access/users?saml=open) or navigate as follows: Go to **Manage** > **Users & Groups**. Then click **Configure SSO** at the top of the page.
2. Copy the following parameters from Google to Minimus:
| Copy from Google | Paste in Minimus |
| :--------------- | :--------------- |
| SSO URL | Login URL |
| Entity ID | IdP Entity ID |
| Certificate | Certificate |
You can also download the details if you prefer.
 **Continue** to the next step.
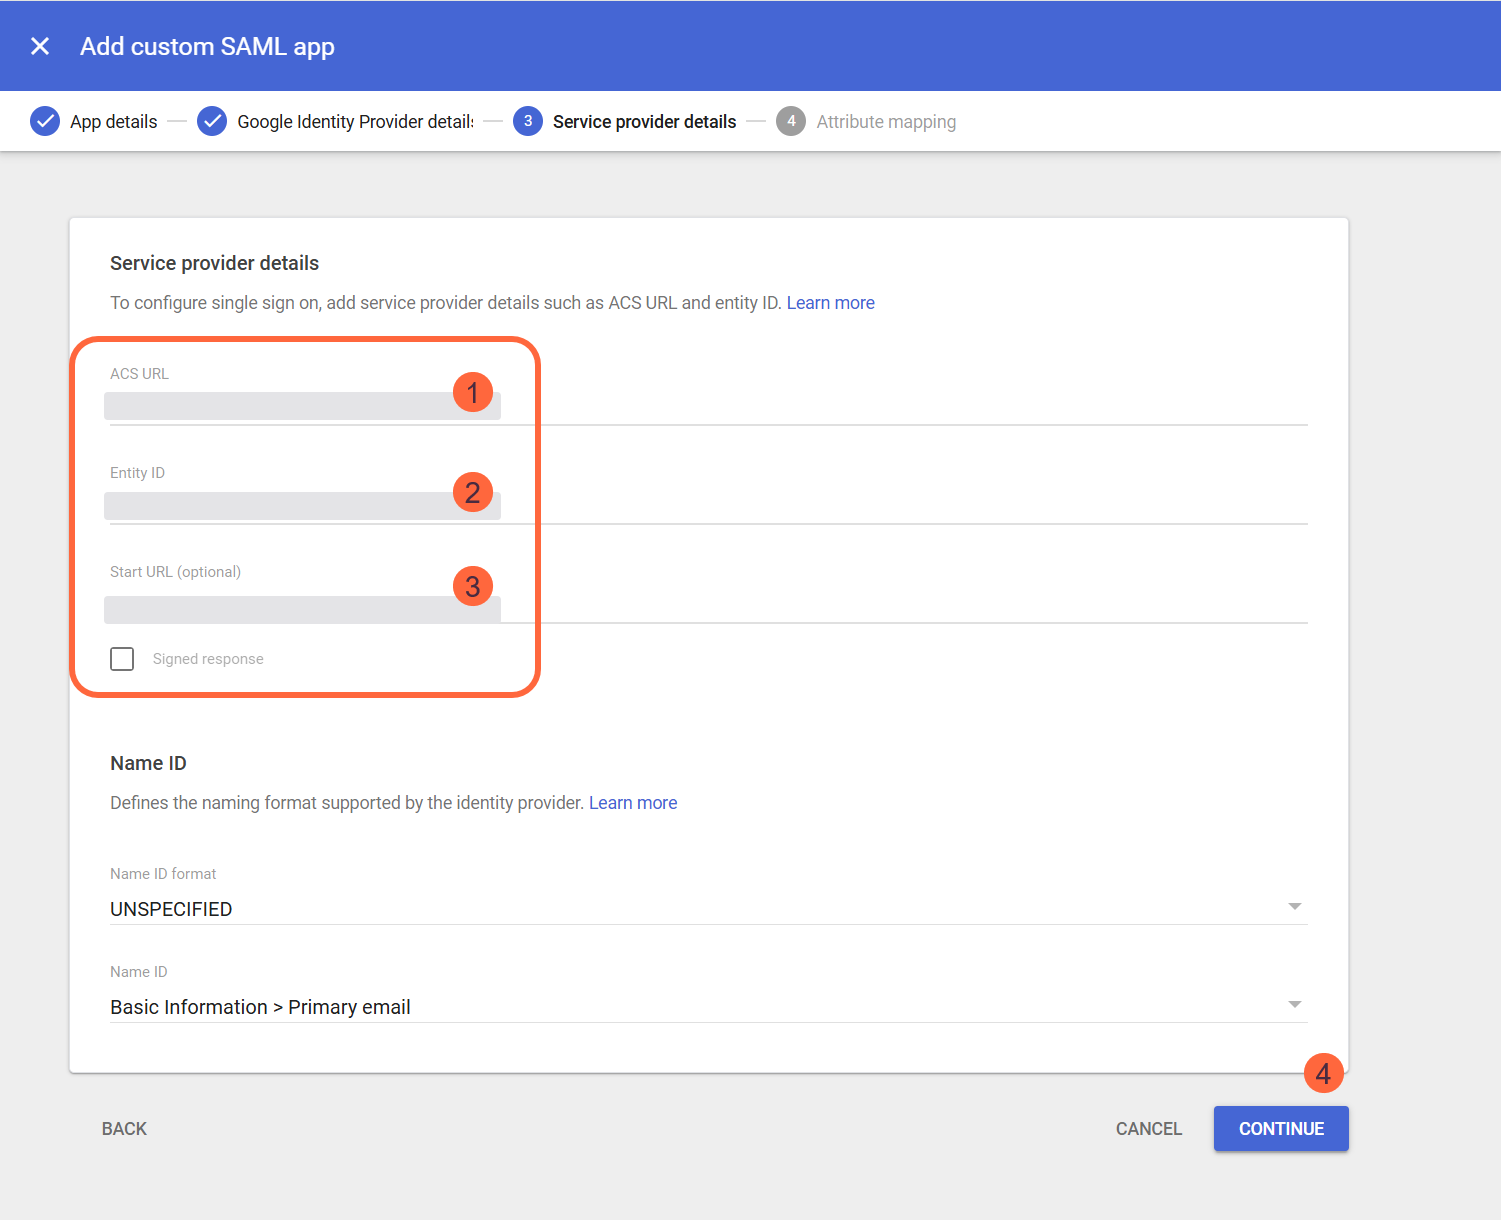
1. Copy the following service provider details from Minimus to Google:
| Minimus form | Google form | Notes |
| :----------- | :---------- | -------------------------------------------------------------------------------------------------------------------------------------- |
| Reply URL | ACS URL | - |
| SP Entity ID | Entity ID | - |
| Relay State | Start URL | Required to enable users to login via Google apps. If left blank, users will only be able to login with SSO from the Minimus homepage. |
2. **Continue** to the next step.
**Continue** to the next step.
1. Copy the following service provider details from Minimus to Google:
| Minimus form | Google form | Notes |
| :----------- | :---------- | -------------------------------------------------------------------------------------------------------------------------------------- |
| Reply URL | ACS URL | - |
| SP Entity ID | Entity ID | - |
| Relay State | Start URL | Required to enable users to login via Google apps. If left blank, users will only be able to login with SSO from the Minimus homepage. |
2. **Continue** to the next step.
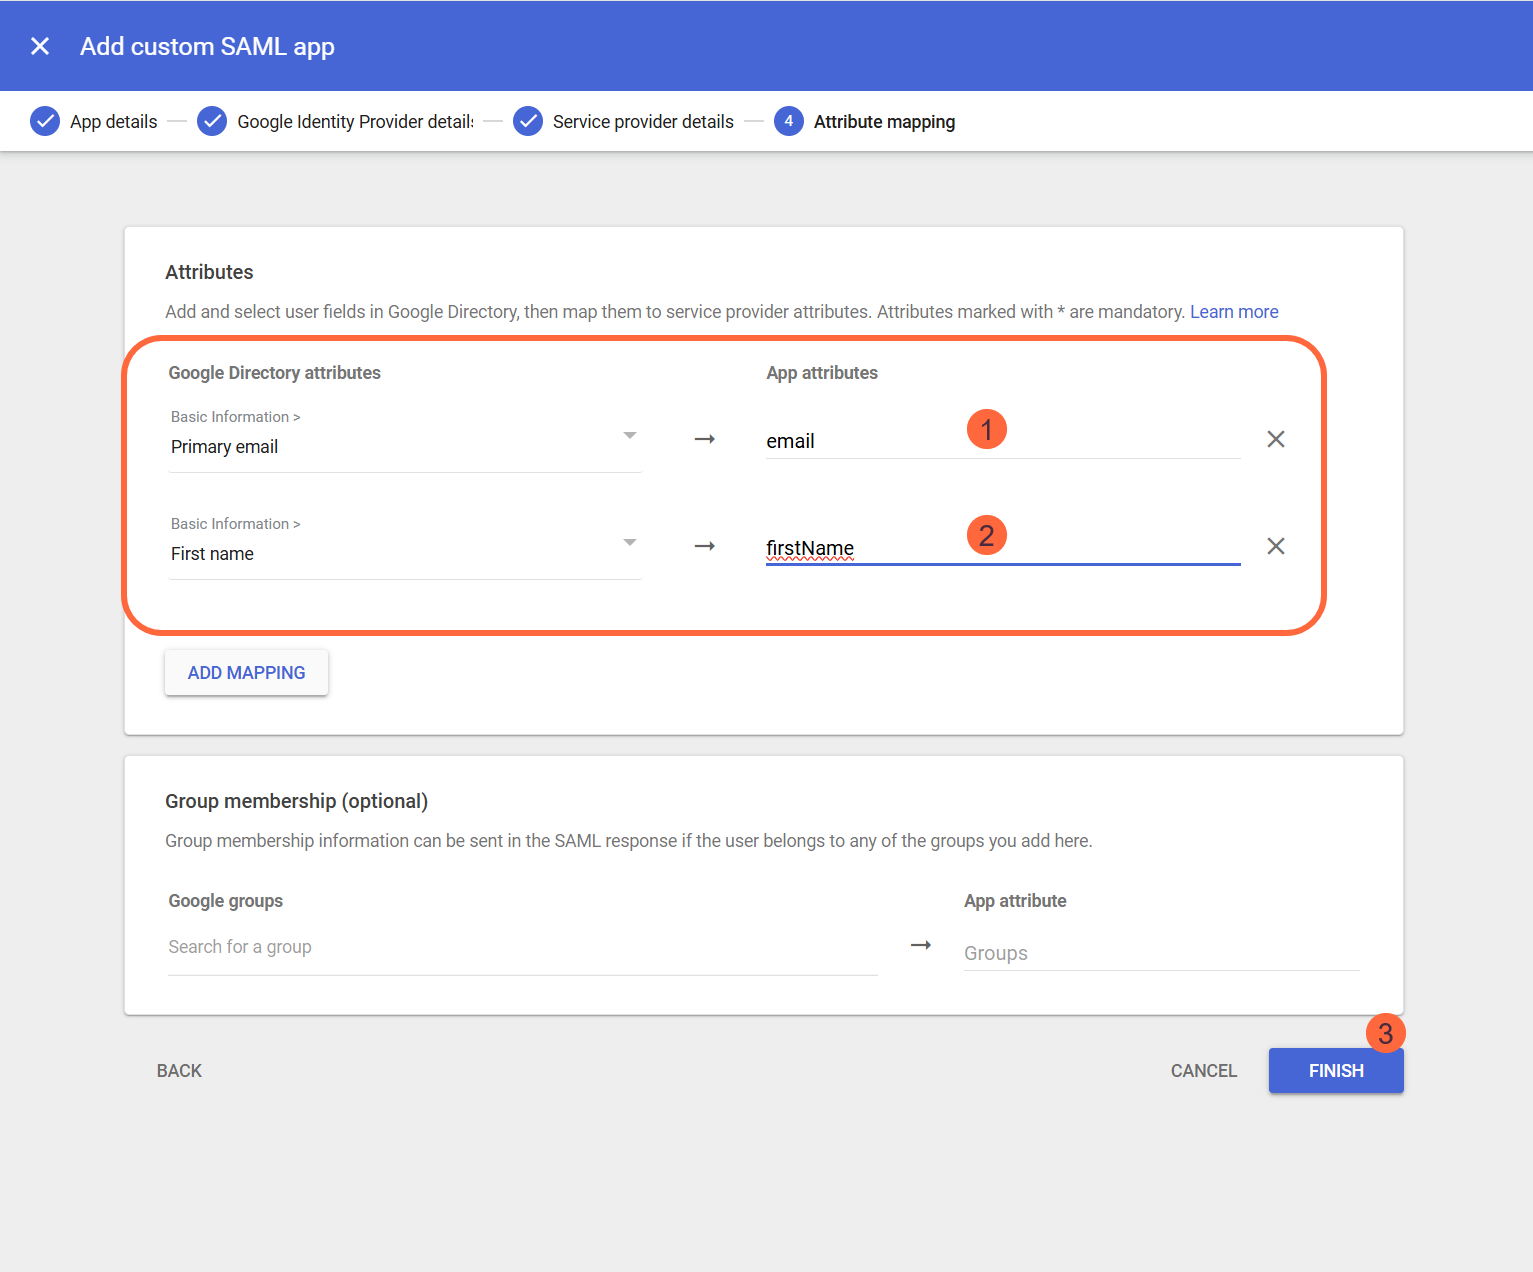
 1. Under **SAML Attribute mapping**, map the **Google Directory attributes** to the **Minimus app attributes**:
| Google Directory Attribute | App attribute |
| ----------------------------------------------- | ----------------- |
| Select **Primary email** from the dropdown list | Input `email` |
| Select **First name** from the dropdown list | Input `firstName` |
2. Select **Finish** to confirm the configuration.
1. Under **SAML Attribute mapping**, map the **Google Directory attributes** to the **Minimus app attributes**:
| Google Directory Attribute | App attribute |
| ----------------------------------------------- | ----------------- |
| Select **Primary email** from the dropdown list | Input `email` |
| Select **First name** from the dropdown list | Input `firstName` |
2. Select **Finish** to confirm the configuration.
 Back in the Minimus SAML form, fill out the following under **Step 3: SAML Attribute Mapping**:
| Minimus Parameter | Input to type in |
| :---------------- | :--------------- |
| Email | email |
| Full name | fullName |
If you plan to use groups, enable **Step 4: Group Mapping**. This step is optional. It is only relevant if you intend to configure [group roles](/manage/user-groups).
* **Type: Google / Okta / Other** (This should already be selected by default).
* **Group Mapping**: Type in `groups` to match the attribute expression from the previous step.
Back in the Minimus SAML form, fill out the following under **Step 3: SAML Attribute Mapping**:
| Minimus Parameter | Input to type in |
| :---------------- | :--------------- |
| Email | email |
| Full name | fullName |
If you plan to use groups, enable **Step 4: Group Mapping**. This step is optional. It is only relevant if you intend to configure [group roles](/manage/user-groups).
* **Type: Google / Okta / Other** (This should already be selected by default).
* **Group Mapping**: Type in `groups` to match the attribute expression from the previous step.
 You are now ready to save the SSO configuration form in Minimus to complete the configuration.
## Turn on access to the Minimus App
In Google Workspace, user access is turned off by default for newly-added apps. Here's how to turn it on.
1. Login to your Google Workspace Admin Console.
2. In the left-menu, go to **Apps > Web and mobile apps**.
3. Select the Minimus App from the list.
4. Expand the **User Access** window.
You are now ready to save the SSO configuration form in Minimus to complete the configuration.
## Turn on access to the Minimus App
In Google Workspace, user access is turned off by default for newly-added apps. Here's how to turn it on.
1. Login to your Google Workspace Admin Console.
2. In the left-menu, go to **Apps > Web and mobile apps**.
3. Select the Minimus App from the list.
4. Expand the **User Access** window.
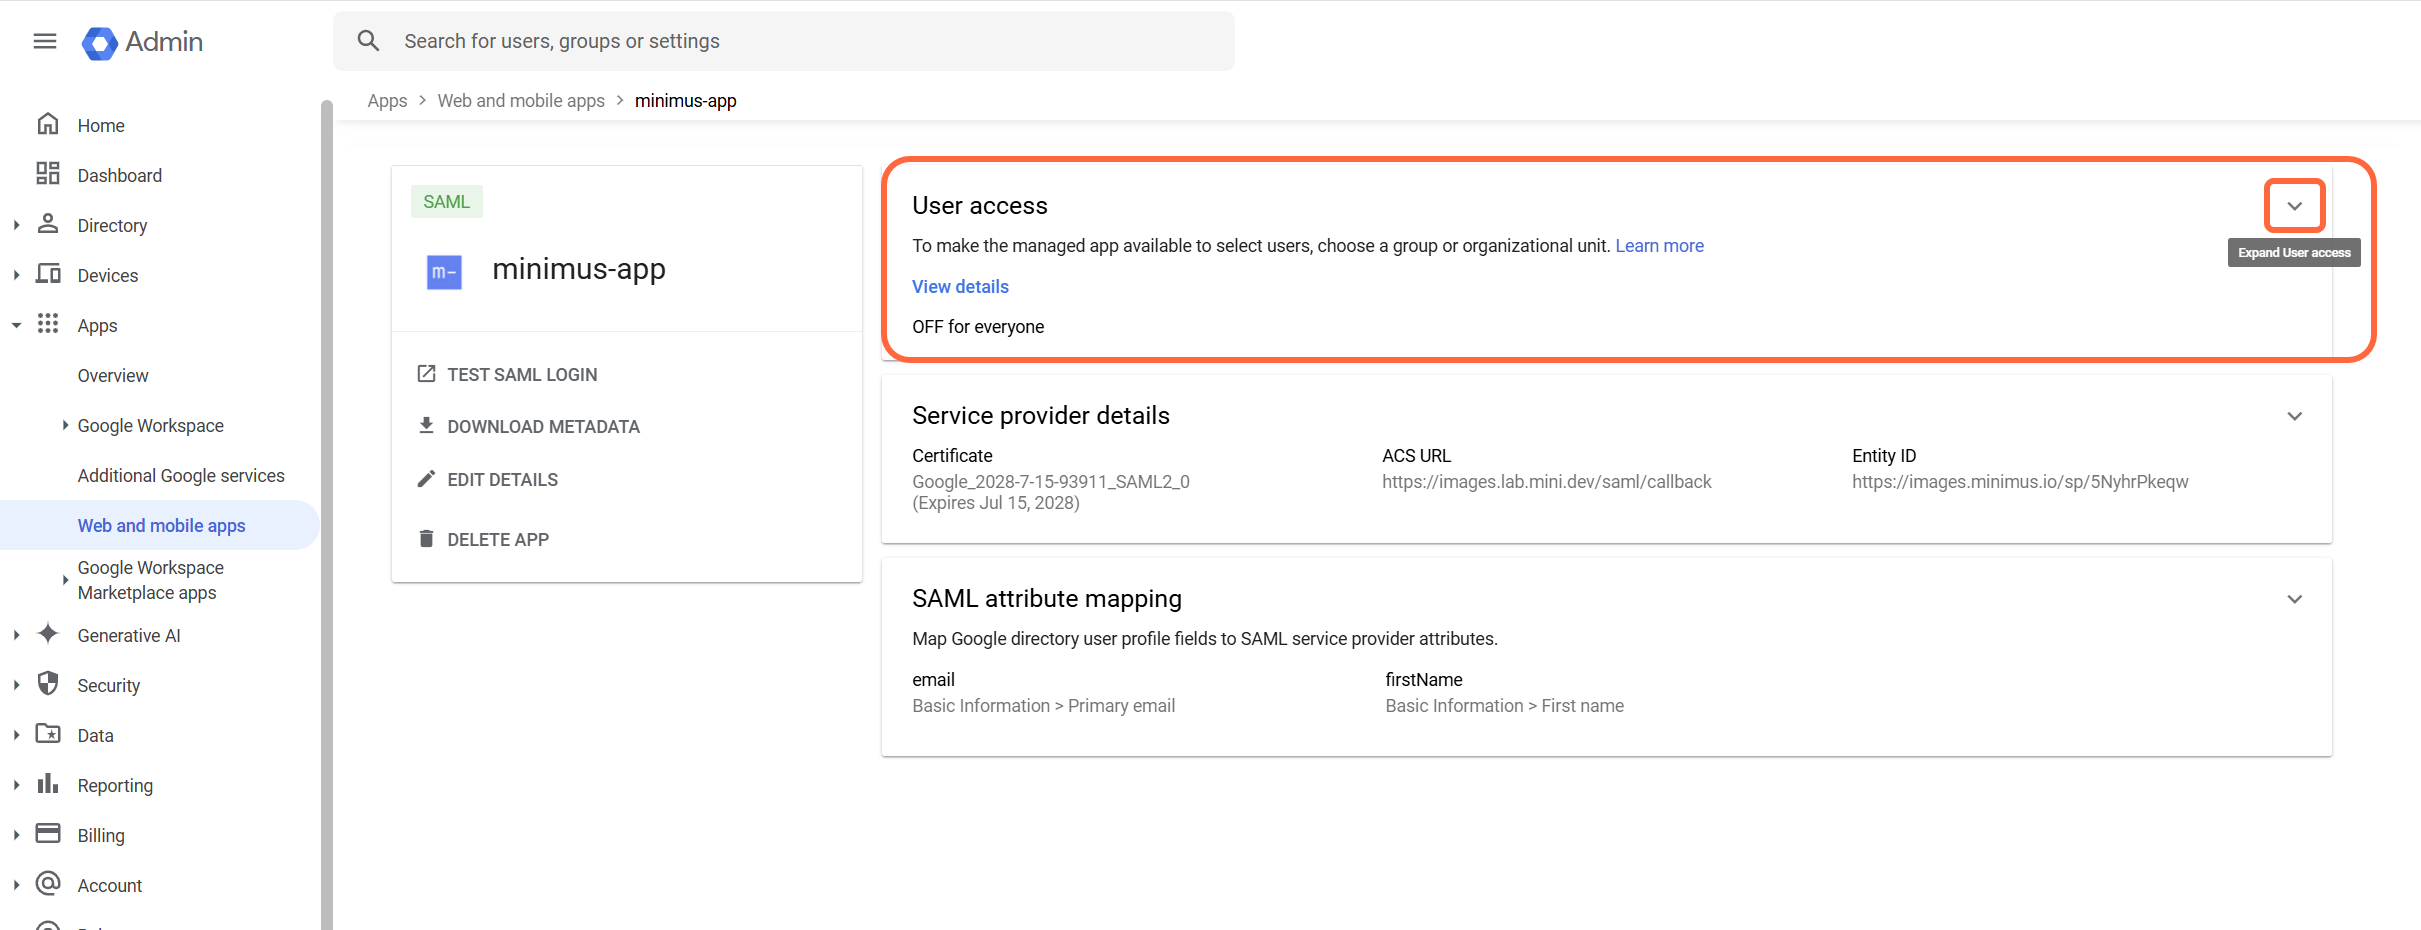 5. Select the state **ON for everyone**.
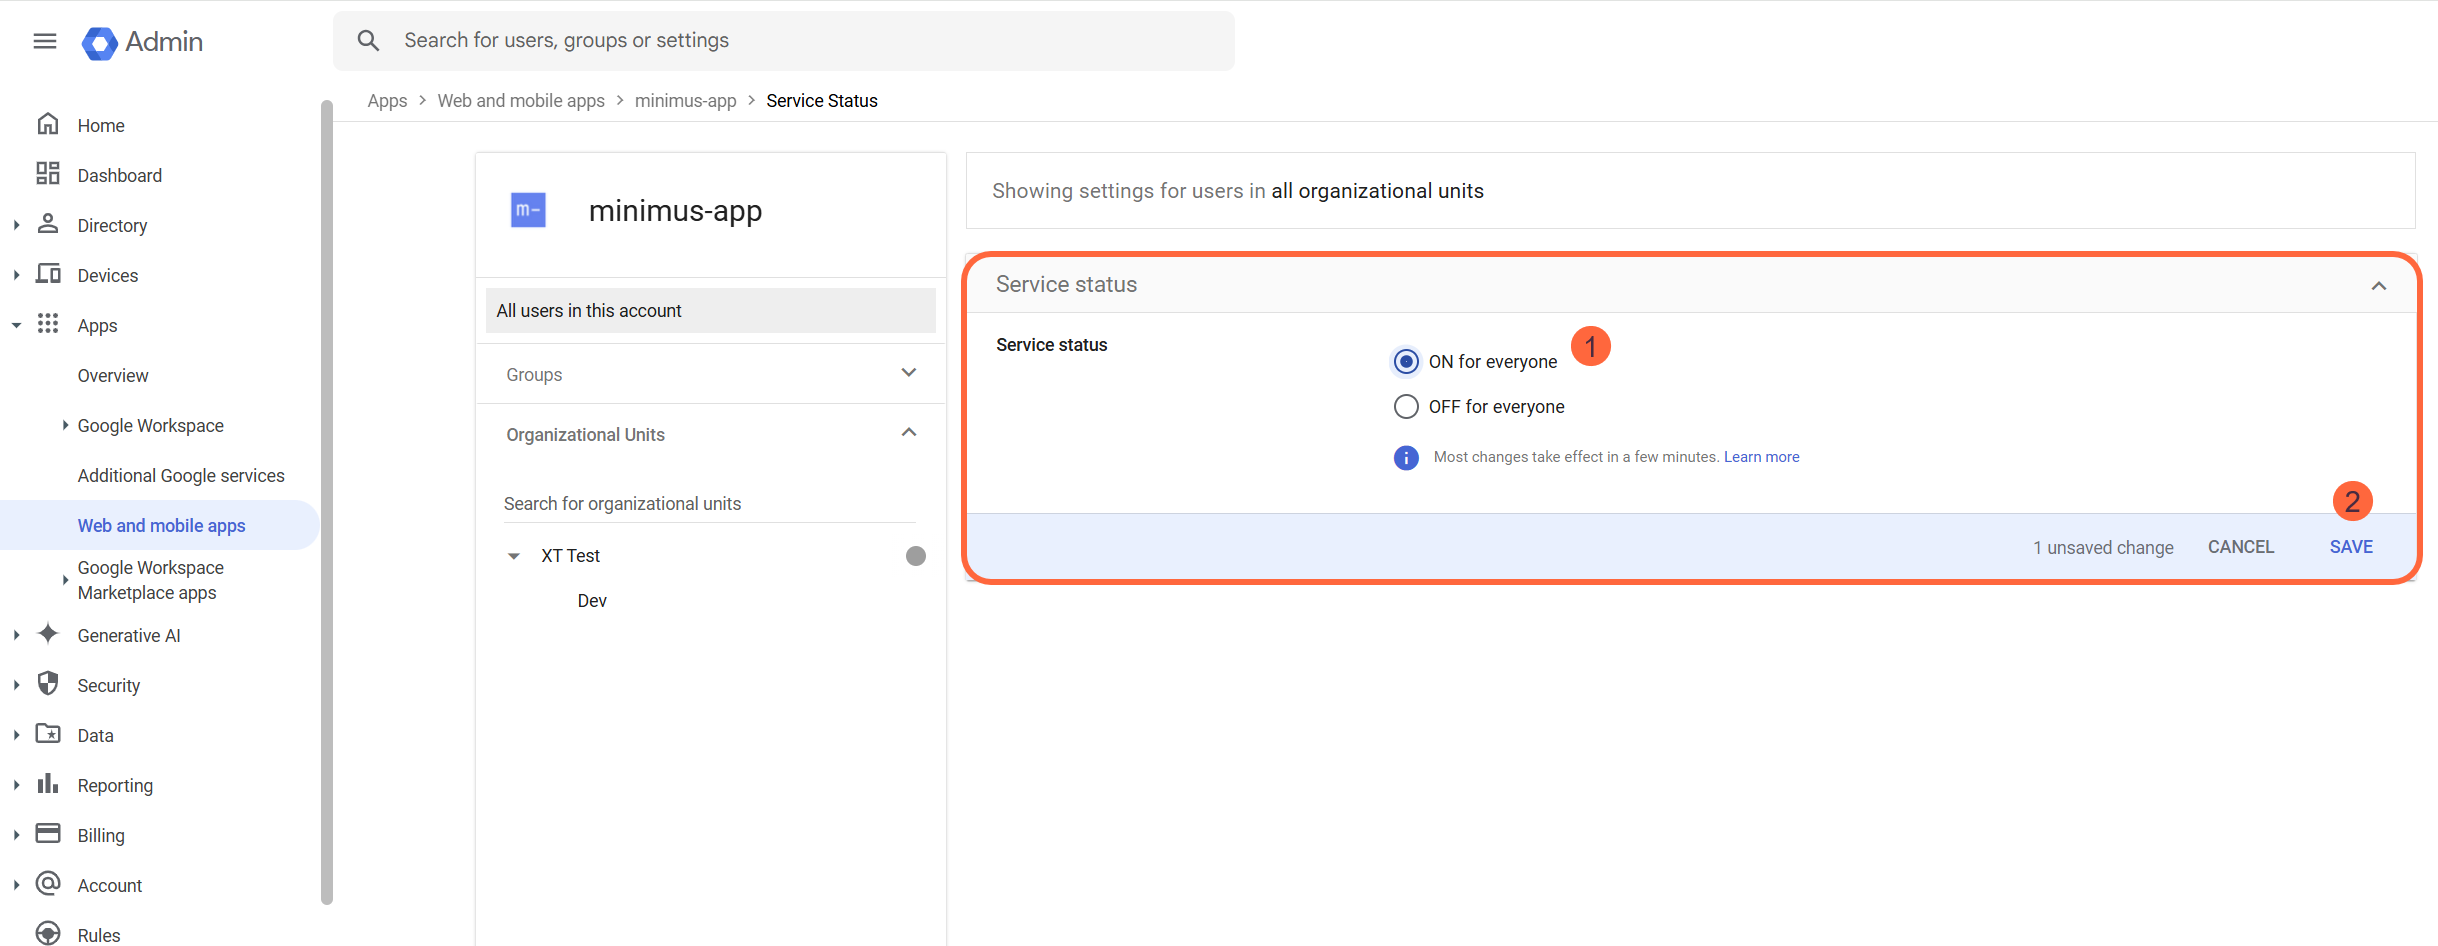 6. **Save** the changes. That's it. You're all set.
Note that changes made in Google Workspace Admin Console usually take a few minutes to take effect. Wait a few minutes before testing access to your newly created Minimus app.
## Troubleshooting SSO access
When copying the certificate to Minimus, make sure there is no whitespace before or after the certificate. Also, check that the expected prefix and suffix are included.
```text theme={null}
-----BEGIN CERTIFICATE-----
-----END CERTIFICATE-----
```
6. **Save** the changes. That's it. You're all set.
Note that changes made in Google Workspace Admin Console usually take a few minutes to take effect. Wait a few minutes before testing access to your newly created Minimus app.
## Troubleshooting SSO access
When copying the certificate to Minimus, make sure there is no whitespace before or after the certificate. Also, check that the expected prefix and suffix are included.
```text theme={null}
-----BEGIN CERTIFICATE-----
-----END CERTIFICATE-----
```