> ## Documentation Index
> Fetch the complete documentation index at: https://docs.minimus.io/llms.txt
> Use this file to discover all available pages before exploring further.
# Keycloak SSO
> Configure single-sign-on (SSO) for Minimus via Keycloak
Configure Minimus as a custom SAML app in Keycloak to enable SSO for Minimus. To get started, [deploy the Minimus Keycloak image](https://images.minimus.io/images/keycloak/quick-start).
## Prepare the SSO form in Minimus
1. Go to **Manage** > **Users & Groups** ([direct link](https://images.minimus.io/manage/access/users?saml=open))
2. Click **Configure SSO** at the top of the page to open the Minimus SSO form.
Keep this form open and available in another browser tab as you configure the SAML app in Keycloak.
3. The form has 4 parts:
1. **Configure Minimus as a custom app in your identity provider** - You will copy these parameters from Minimus to Keycloak in the next steps.
1. SP Entity ID
2. Reply URL (Callback / ACS URL)
3. Relay State (optional) - If you leave the Relay State blank, users will only be able to log in with SSO from the Minimus homepage.
2. **Connect Minimus to your identity provider** - You will fetch these parameters from your Keycloak client and save them to the Minimus form:
1. Login SSO URL
2. IdP Entity ID
3. Certificate
3. **SAML Attribute Mapping** - You will fetch the Keycloak claim names for the following parameters and save them to the Minimus form:
| Minimus Parameter | Keycloak Attribute Name |
| :---------------- | :---------------------- |
| Email | user.mail |
| Full Name | user.userprincipalname |
4. **Group Mapping** is optional and can be enabled if you plan to configure user groups. [See the instructions in user groups](/manage/user-groups).
## Add Minimus as a client in Keycloak
Create the Minimus client in Keycloak and link it to your Minimus Console.
1. Visit your Keycloak admin center. (URL example [http://address:8080/admin/master/console/](http://address:8080/admin/master/console/))
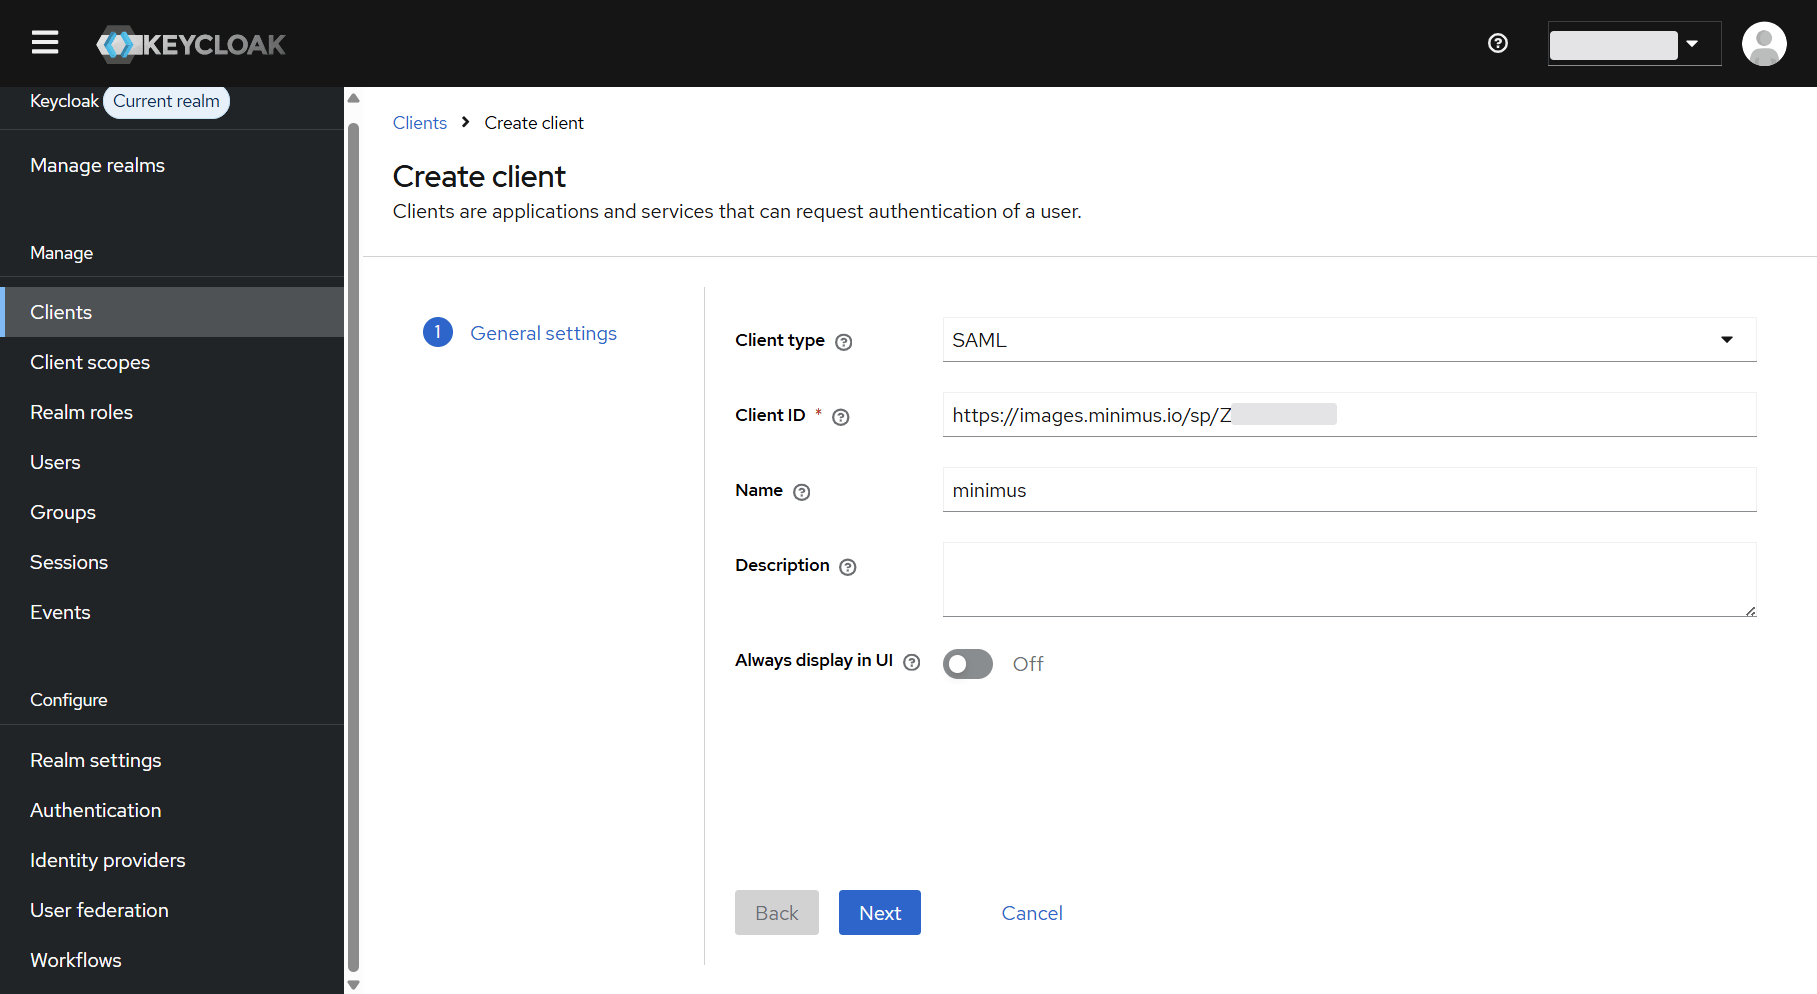
2. Select **Clients** from the left menu > Select **Create client**.
3. Fill out the form:
1. **Client type** - Change the selection to **SAML**.
2. **Client ID** - Copy & paste the value from **Minimus SP Entity ID** ([link to your Minimus form](https://images.minimus.io/manage/access/users?saml=open)).
3. Name the client and add a description (optional).
4. Select **Next** to proceed.
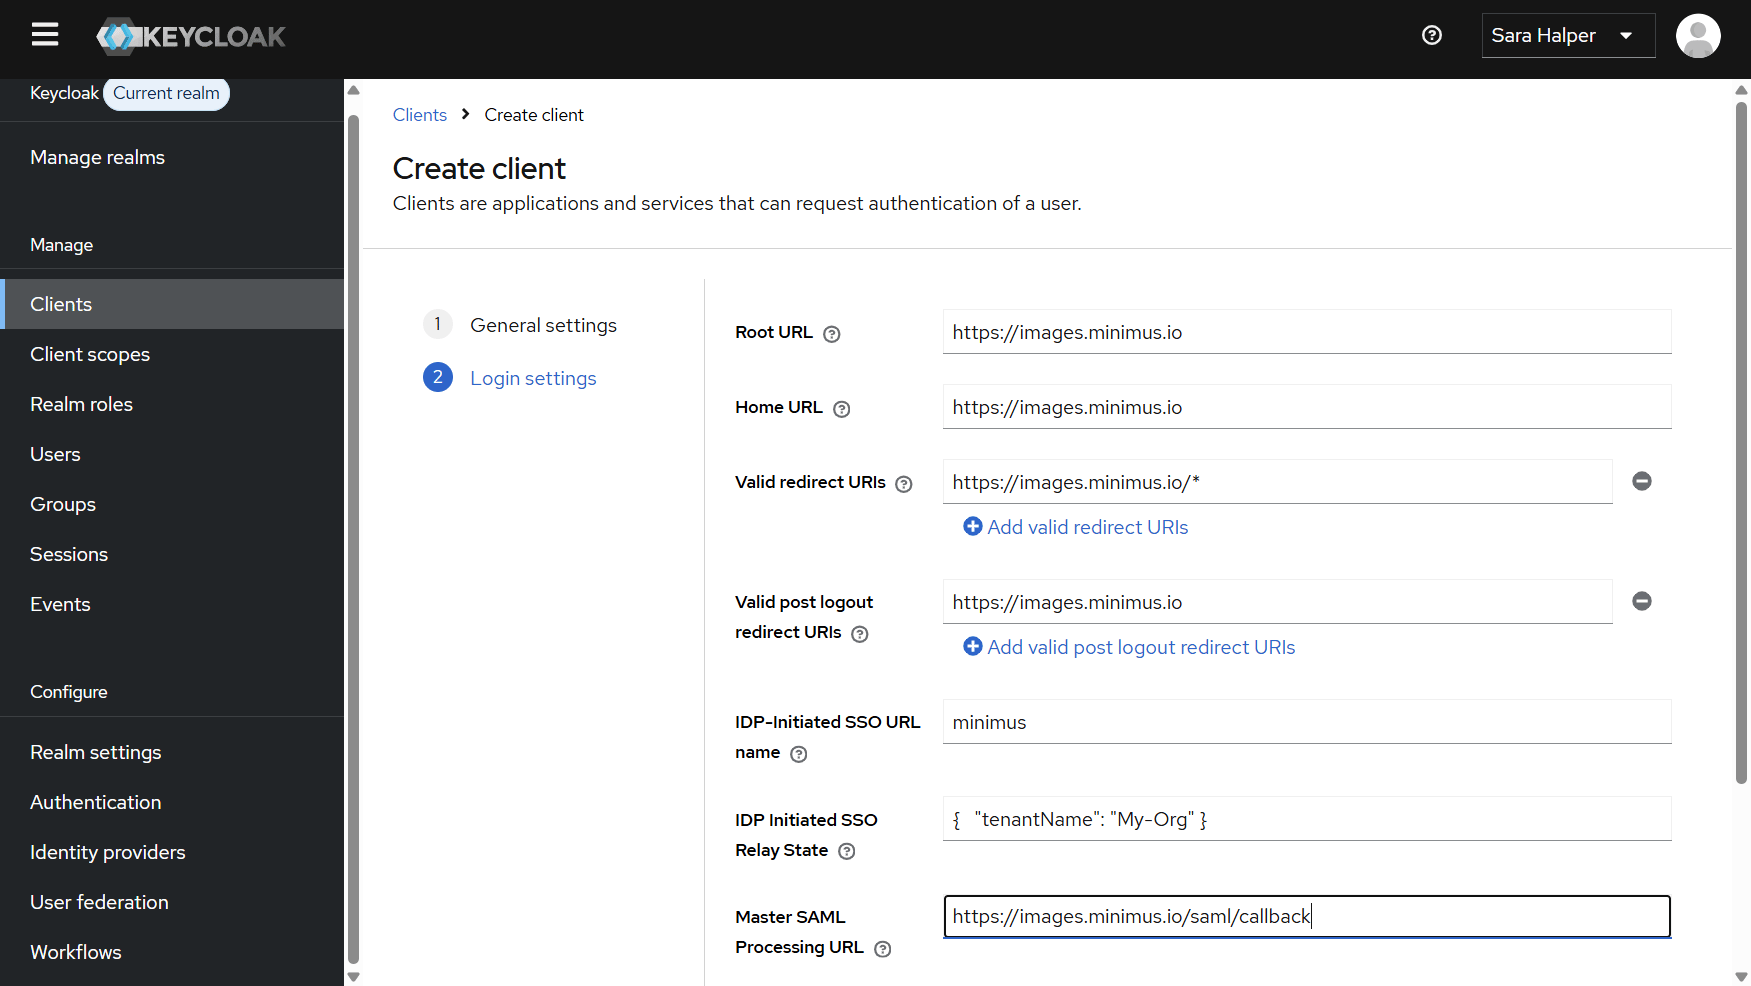
 Configure the client:
1. Set the following as `https://images.minimus.io`:
1. **Root URL**
2. **Home URL**
3. **Valid post logout redirect URIs**
2. **Valid Redirect URI** - Set it to `https://images.minimus.io/*`
3. **IDP-Initiated SSO URL Name** - Set the name as `minimus`
4. **IDP Initiated SSO Relay State** - for example:
```json theme={null}
{
"tenantName": "My-Org"
}
```
5. **Master SAML Processing URL** - Set it as `https://images.minimus.io/saml/callback`
6. **Save** your changes.
Configure the client:
1. Set the following as `https://images.minimus.io`:
1. **Root URL**
2. **Home URL**
3. **Valid post logout redirect URIs**
2. **Valid Redirect URI** - Set it to `https://images.minimus.io/*`
3. **IDP-Initiated SSO URL Name** - Set the name as `minimus`
4. **IDP Initiated SSO Relay State** - for example:
```json theme={null}
{
"tenantName": "My-Org"
}
```
5. **Master SAML Processing URL** - Set it as `https://images.minimus.io/saml/callback`
6. **Save** your changes.
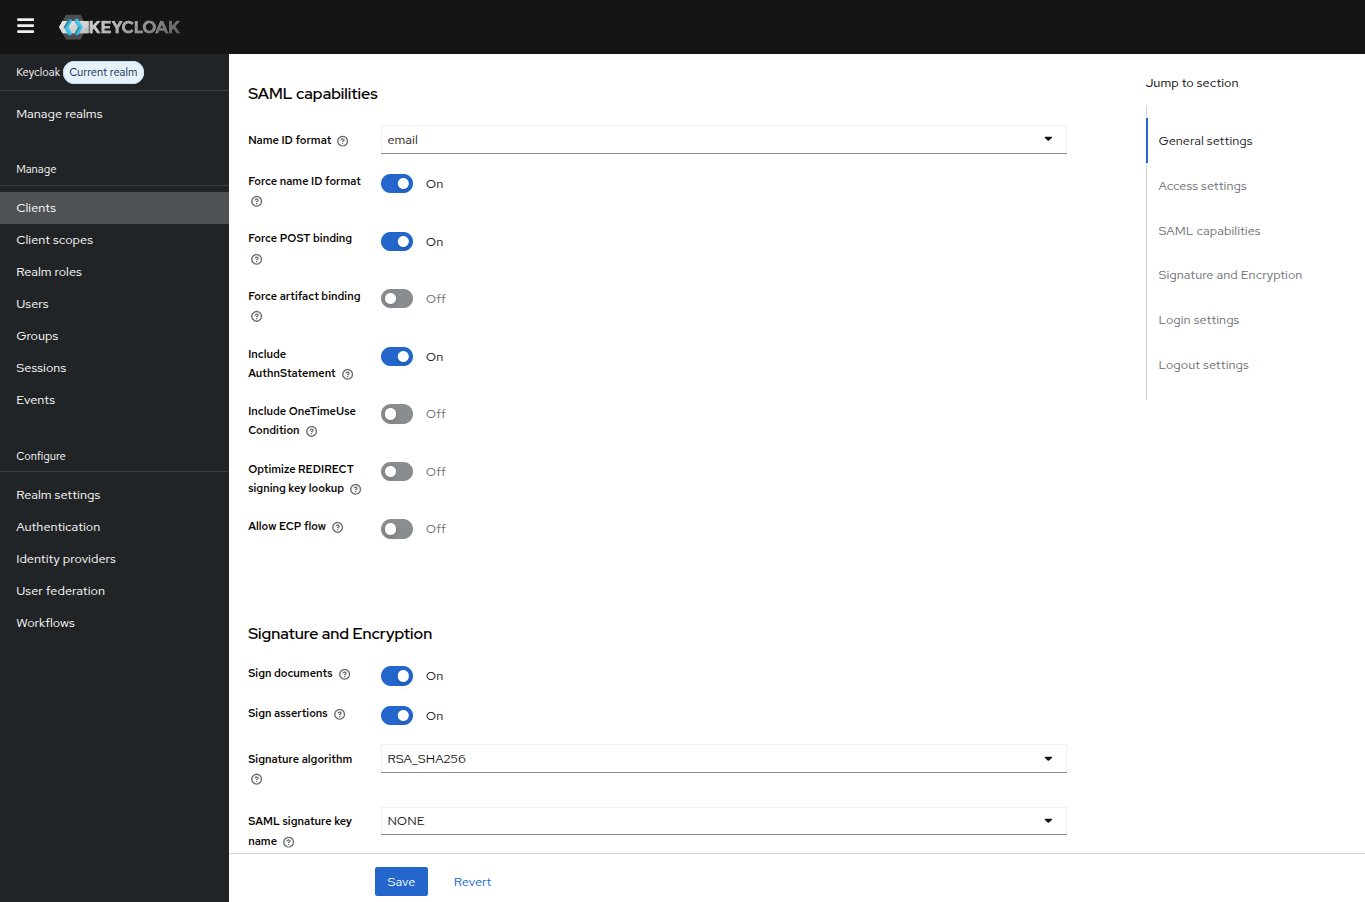
 Scroll down to the section **SAML capabilities** and set the following:
* **Name ID format** - Select **email** from the dropdown list
* **Force name ID format** - ON
* **Force POST binding** - ON
Scroll down to the section **Signature and Encryption** and set the following:
* **Sign documents** - ON
* **Sign assertions** - ON
Adjust the rest of the optional settings as relevant and save your changes.
Scroll down to the section **SAML capabilities** and set the following:
* **Name ID format** - Select **email** from the dropdown list
* **Force name ID format** - ON
* **Force POST binding** - ON
Scroll down to the section **Signature and Encryption** and set the following:
* **Sign documents** - ON
* **Sign assertions** - ON
Adjust the rest of the optional settings as relevant and save your changes.
 1. Navigate to the **Keys** tab
2. The section is named **Signing keys config**
3. Disable **Client signature required**. You will be asked to confirm your change
4. **Save** your changes
1. Navigate to the **Client scopes** tab in the top bar.
2. Select your Client ID in the table
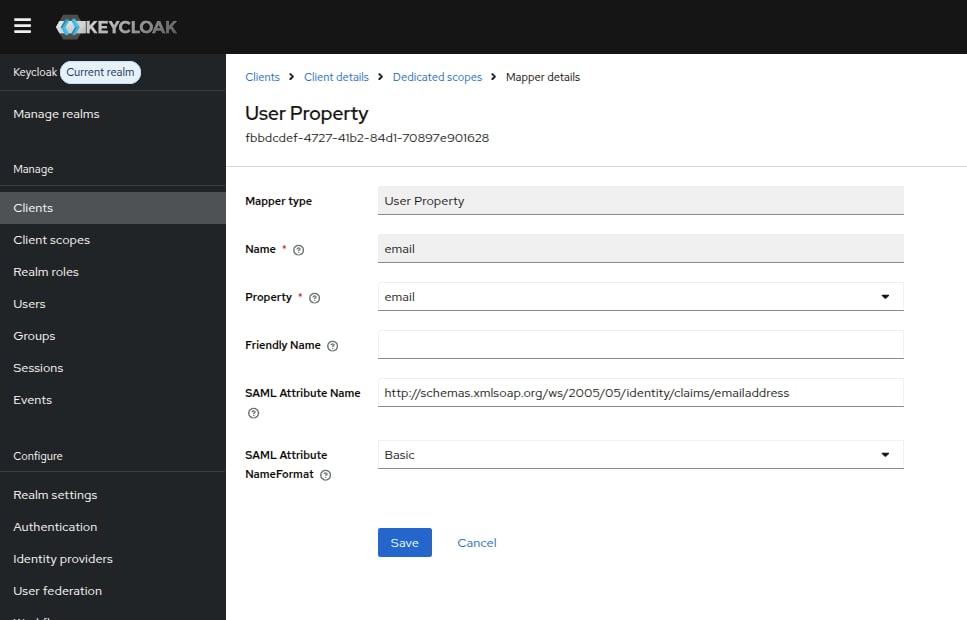
1. Select **Configure a new mapper**
2. Select **User Property**
3. Fill in the mapper attributes:
* **Name** - `email`
* **Property** - Select `email` from the dropdown list
* **Friendly Name** - Optional field
* **SAML Attribute Name** - Paste in `http://schemas.xmlsoap.org/ws/2005/05/identity/claims/emailaddress`
* **SAML Attribute NameFormat** - Basic
4. Save your changes
1. Navigate to the **Keys** tab
2. The section is named **Signing keys config**
3. Disable **Client signature required**. You will be asked to confirm your change
4. **Save** your changes
1. Navigate to the **Client scopes** tab in the top bar.
2. Select your Client ID in the table
1. Select **Configure a new mapper**
2. Select **User Property**
3. Fill in the mapper attributes:
* **Name** - `email`
* **Property** - Select `email` from the dropdown list
* **Friendly Name** - Optional field
* **SAML Attribute Name** - Paste in `http://schemas.xmlsoap.org/ws/2005/05/identity/claims/emailaddress`
* **SAML Attribute NameFormat** - Basic
4. Save your changes
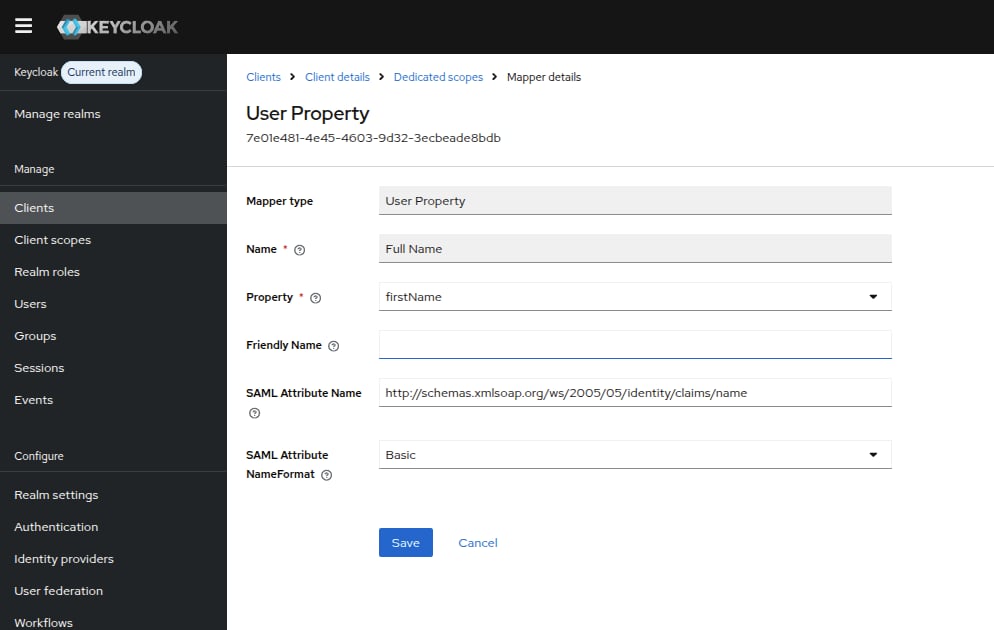
 1. In the mappers table, select **Add mapper > By configuration**
2. Select **User Property**
3. Fill in the mapper attributes:
* **Name** - Type in `fullName`
* **Property** - Select `firstName` from the dropdown list
* **SAML Attribute Name** - `http://schemas.xmlsoap.org/ws/2005/05/identity/claims/name`
* **SAML Attribute NameFormat** - Basic
4. **Save** your changes
1. In the mappers table, select **Add mapper > By configuration**
2. Select **User Property**
3. Fill in the mapper attributes:
* **Name** - Type in `fullName`
* **Property** - Select `firstName` from the dropdown list
* **SAML Attribute Name** - `http://schemas.xmlsoap.org/ws/2005/05/identity/claims/name`
* **SAML Attribute NameFormat** - Basic
4. **Save** your changes
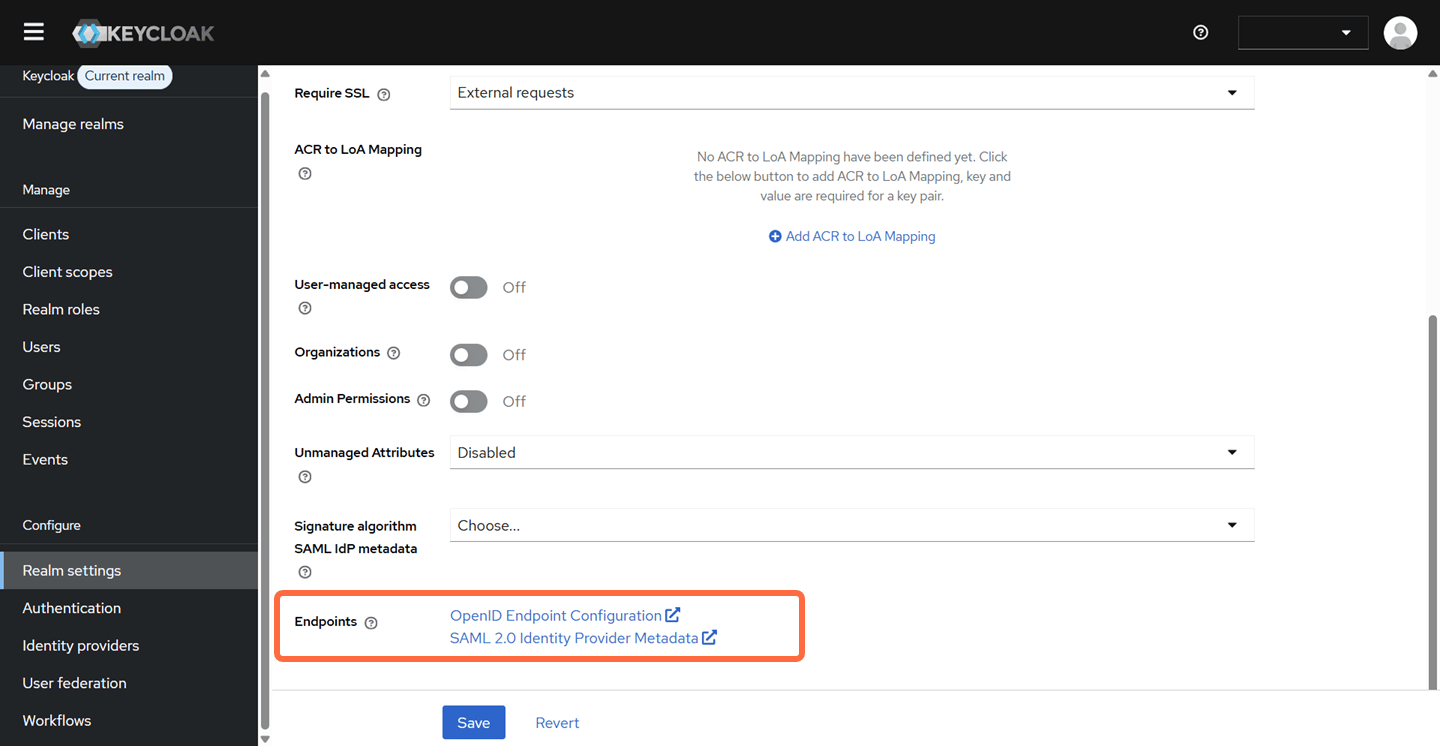
 1. In the left menu, select **Realm settings**.
2. In the **General** tab, select **SAML 2.0 Identity Provider Metadata**.
3. Copy the certificate between `` and ``.
1. In the left menu, select **Realm settings**.
2. In the **General** tab, select **SAML 2.0 Identity Provider Metadata**.
3. Copy the certificate between `` and ``.
 1. In your Minimus console, go to **Manage** > **Users & Groups** > **Configure SSO**.
2. Fill the following fields:
* **IdP Entity ID** - `https://YOUR_KEYCLOAK_EXTERNAL_IP_OR_URL/realms/master`
* **Login URL** - `https://YOUR_KEYCLOAK_EXTERNAL_IP_OR_URL/realms/master/protocol/saml`
* **Certificate** - Paste the certificate you copied in the previous step.
3. Fill in the SAML Attribute Mapping fields:
* **Email** - `http://schemas.xmlsoap.org/ws/2005/05/identity/claims/emailaddress`
* **Full Name** - `http://schemas.xmlsoap.org/ws/2005/05/identity/claims/name`
* **Group Mapping** - `groups`
4. **Save** your changes.
That's it! You should now be able to manage access to Minimus with Keycloak SSO.
## Troubleshooting SSO access
When copying the certificate to Minimus, make sure there is no whitespace before or after the certificate. Also, check that the expected prefix and suffix are included.
```text theme={null}
-----BEGIN CERTIFICATE-----
-----END CERTIFICATE-----
```
1. In your Minimus console, go to **Manage** > **Users & Groups** > **Configure SSO**.
2. Fill the following fields:
* **IdP Entity ID** - `https://YOUR_KEYCLOAK_EXTERNAL_IP_OR_URL/realms/master`
* **Login URL** - `https://YOUR_KEYCLOAK_EXTERNAL_IP_OR_URL/realms/master/protocol/saml`
* **Certificate** - Paste the certificate you copied in the previous step.
3. Fill in the SAML Attribute Mapping fields:
* **Email** - `http://schemas.xmlsoap.org/ws/2005/05/identity/claims/emailaddress`
* **Full Name** - `http://schemas.xmlsoap.org/ws/2005/05/identity/claims/name`
* **Group Mapping** - `groups`
4. **Save** your changes.
That's it! You should now be able to manage access to Minimus with Keycloak SSO.
## Troubleshooting SSO access
When copying the certificate to Minimus, make sure there is no whitespace before or after the certificate. Also, check that the expected prefix and suffix are included.
```text theme={null}
-----BEGIN CERTIFICATE-----
-----END CERTIFICATE-----
```