Which images are synced by default
The service will sync all Minimus images included in your subscription. For every image type (for example, Node, Python, etc.), all image versions available from Minimus will be synced.Online vs. air-gapped
The process supports syncing to any private registry, whether it is connected to the Web or air-gapped. Below is a brief comparison of the processes depending on registry connectivity.Online registry syncs automatically
If your private registry is online and supports external connections, the sync service can be fully automated using a scheduled cron job.- Review the Minimus networking requirements to ensure your firewall is configured correctly.
- Once you set up the service, it will run automatically and keep your private registry up to date.
Sync to air-gapped registry is partially automated
If your registry is air-gapped (aka offline), the sync service can be partially automated using a scheduled cron job. A manual step will be needed to connect to the air-gapped registry and upload the images. See more details below.Comparison summary
| Registry Connectivity | External Connectivity | Automation | Frequency | Time investment |
|---|---|---|---|---|
| Online registry | Supported | Fully supported using cron job scheduling | Daily using cron job scheduling | One time set up |
| Air-gapped registry | Not supported | Partially supported using cron job scheduling | Varies (depends on the organization) | Repeated manual effort involved |
Tracking image updates
You can set up actions to receive important security updates. This is particularly recommended if your team pulls images from a private registry, and are less likely to follow updates in the Minimus gallery. We recommend that you continue to visit the Minimus gallery regularly to receive updates and helpful information about image versions, advisories, and vulnerability fixes.Set up syncing to an online private registry
Prerequisite
Before you begin, install Skopeo on the target host. Skopeo version 1.12 or higher is required. Installation instructions
Set up the sync to a registry with internet connectivity
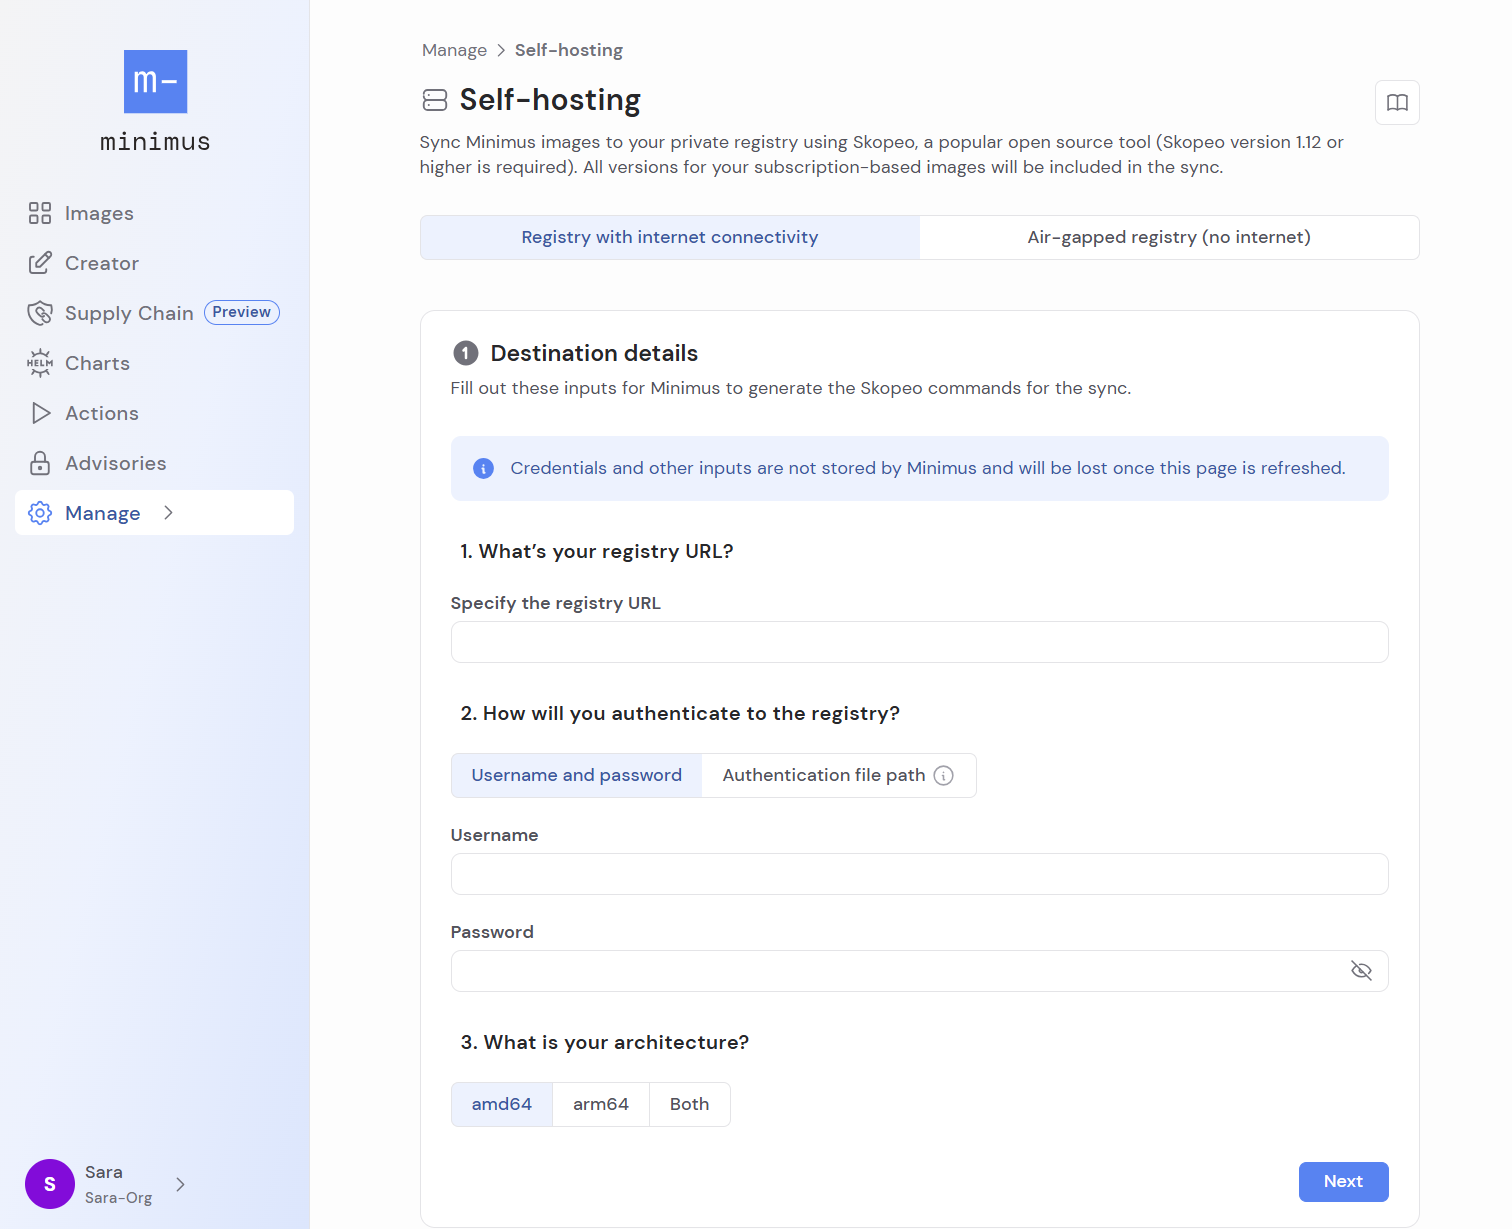
- From the left menu, select Manage > Self-hosting. (Or use this direct link.)
- Select the tab: Registry with internet connectivity. A form with 3 parts will appear:
- Destination details
- Sync images
- Set up automation
Fill in the destination details
- Specify your registry URL.
- How will you authenticate to the registry? Decide between username & password and an authentication file path.
- If you selected username & password, provide them.
- If you selected an authentication file path, select the relevant option:
- Default file path. Select this option if the path matches one of the defaults:
${XDG_RUNTIME_DIR}/containers/auth.json
$HOME/.docker/config.json - Other file path. Select this option and provide the path.
- Default file path. Select this option if the path matches one of the defaults:
- Select the relevant image architecture: amd64, arm64, or both.
- Select Next to continue.
Run the commands to sync the images
- Download the provided YAML file and save it on a machine where Skopeo is installed.
- (Optional) Specify the path to the YAML file to update the placeholder in the code snippet below.
-
Copy the provided code snippet and run it on your target host. Example command:
- The first time sync should now be done. Your private registry should have copies of all of the images included in your Minimus subscription.
- Click Next to set up automation.
Set up automation
This step is recommended but not strictly required.
-
Open the crontab file on the target host to edit it:
-
Add the provided cron job entry to run the command every day at midnight. For example:
Set up syncing for an air-gapped private registry
Prerequisite
Before you begin, install Skopeo on your internet-connected machine and the target host in your air-gapped environment. Skopeo version 1.12 or higher is required. Installation instructions
Set up the sync to an air-gapped registry
- From the left menu, select Manage > Self-hosting. (Or use this direct link.)
- Select the tab: Air-gapped registry (no internet). A form with 3 parts will appear:
- Destination details
- Sync images
- Set up automation
Fill in the destination details
- Specify the path to your Removable drive. The process assumes you will use a removable drive to store the images temporarily.
- Air-gapped registry details - Specify the details for Minimus to configure the Skopeo commands for you. Otherwise, you can toggle off this option to skip this step and configure the Skopeo commands independently.
- Air-gapped registry URL - Specify the URL for the destination registry.
- How will you authenticate to the registry? Decide between username & password and an authentication file path.
- If you selected username & password, provide them.
- If you selected an authentication file path, select the relevant option:
- Default file path. Select this option if the path matches one of the defaults:
${XDG_RUNTIME_DIR}/containers/auth.json
$HOME/.docker/config.json - Other file path. Select this option and provide the path.
- Default file path. Select this option if the path matches one of the defaults:
- Select the relevant image architecture: amd64, arm64, or both.
- Select Next to continue.
Run the commands to sync the images to the removable drive
- Download the provided YAML file and save it on a machine where Skopeo is installed. Connect the removable drive to the machine.
- (Optional) Specify the path to the YAML file to update the placeholder in the code snippet below.
-
Copy the provided code snippet and run it on your target host. Example command:
- The images should now be on the removable drive, waiting to be transferred to the air-gapped registry.
Run the command to sync the images from the removable drive to the air-gapped registry
- Move the removable drive to a machine in the air-gapped network.
-
Copy the provided code snippet and run it on the machine. The command will sync the images from the removable drive to your private registry. Example command:
- The images should now be synced to your air-gapped registry.
- Click Next to set up automation.
Set up automation
This step is recommended but not required. It can automate the sync to a storage directory on your internet-connected machine. The sync from the removable disk remains manual.
-
Open the crontab file on the host to edit it:
-
Add the provided cron job entry to run the command every day at midnight. For example:
Good to go!
Minimus image versions and updates should now sync on a regular schedule to a storage directory, ready to be moved to your private air-gapped registry.Repeat the above steps to move the images to your removable drive and copy them to your registry. This step is manual and cannot be automated.